1. Create Shipments & Invoices
The order import created orders. In this section you ship them, and Sage 300 raises the invoice from the shipment in the same operation. One Refresh produces a shipment number and an invoice number for every order.
Sage 300 generates three of the numbers involved: the order line number, the
shipment number and the invoice number. You capture each one the same way, as
you captured Sage300OrderNumber in 6.1.
Map > Field Mapping
The order detail lines need to carry the line number Sage 300 assigns them. The shipment uses it to match each of its lines to the right order line.
- Re-open the integration and press the Transform Setup tab.
- Open the Map transform and press Field Mapping.
- Set Current Transaction Id to
OrderDetails. -
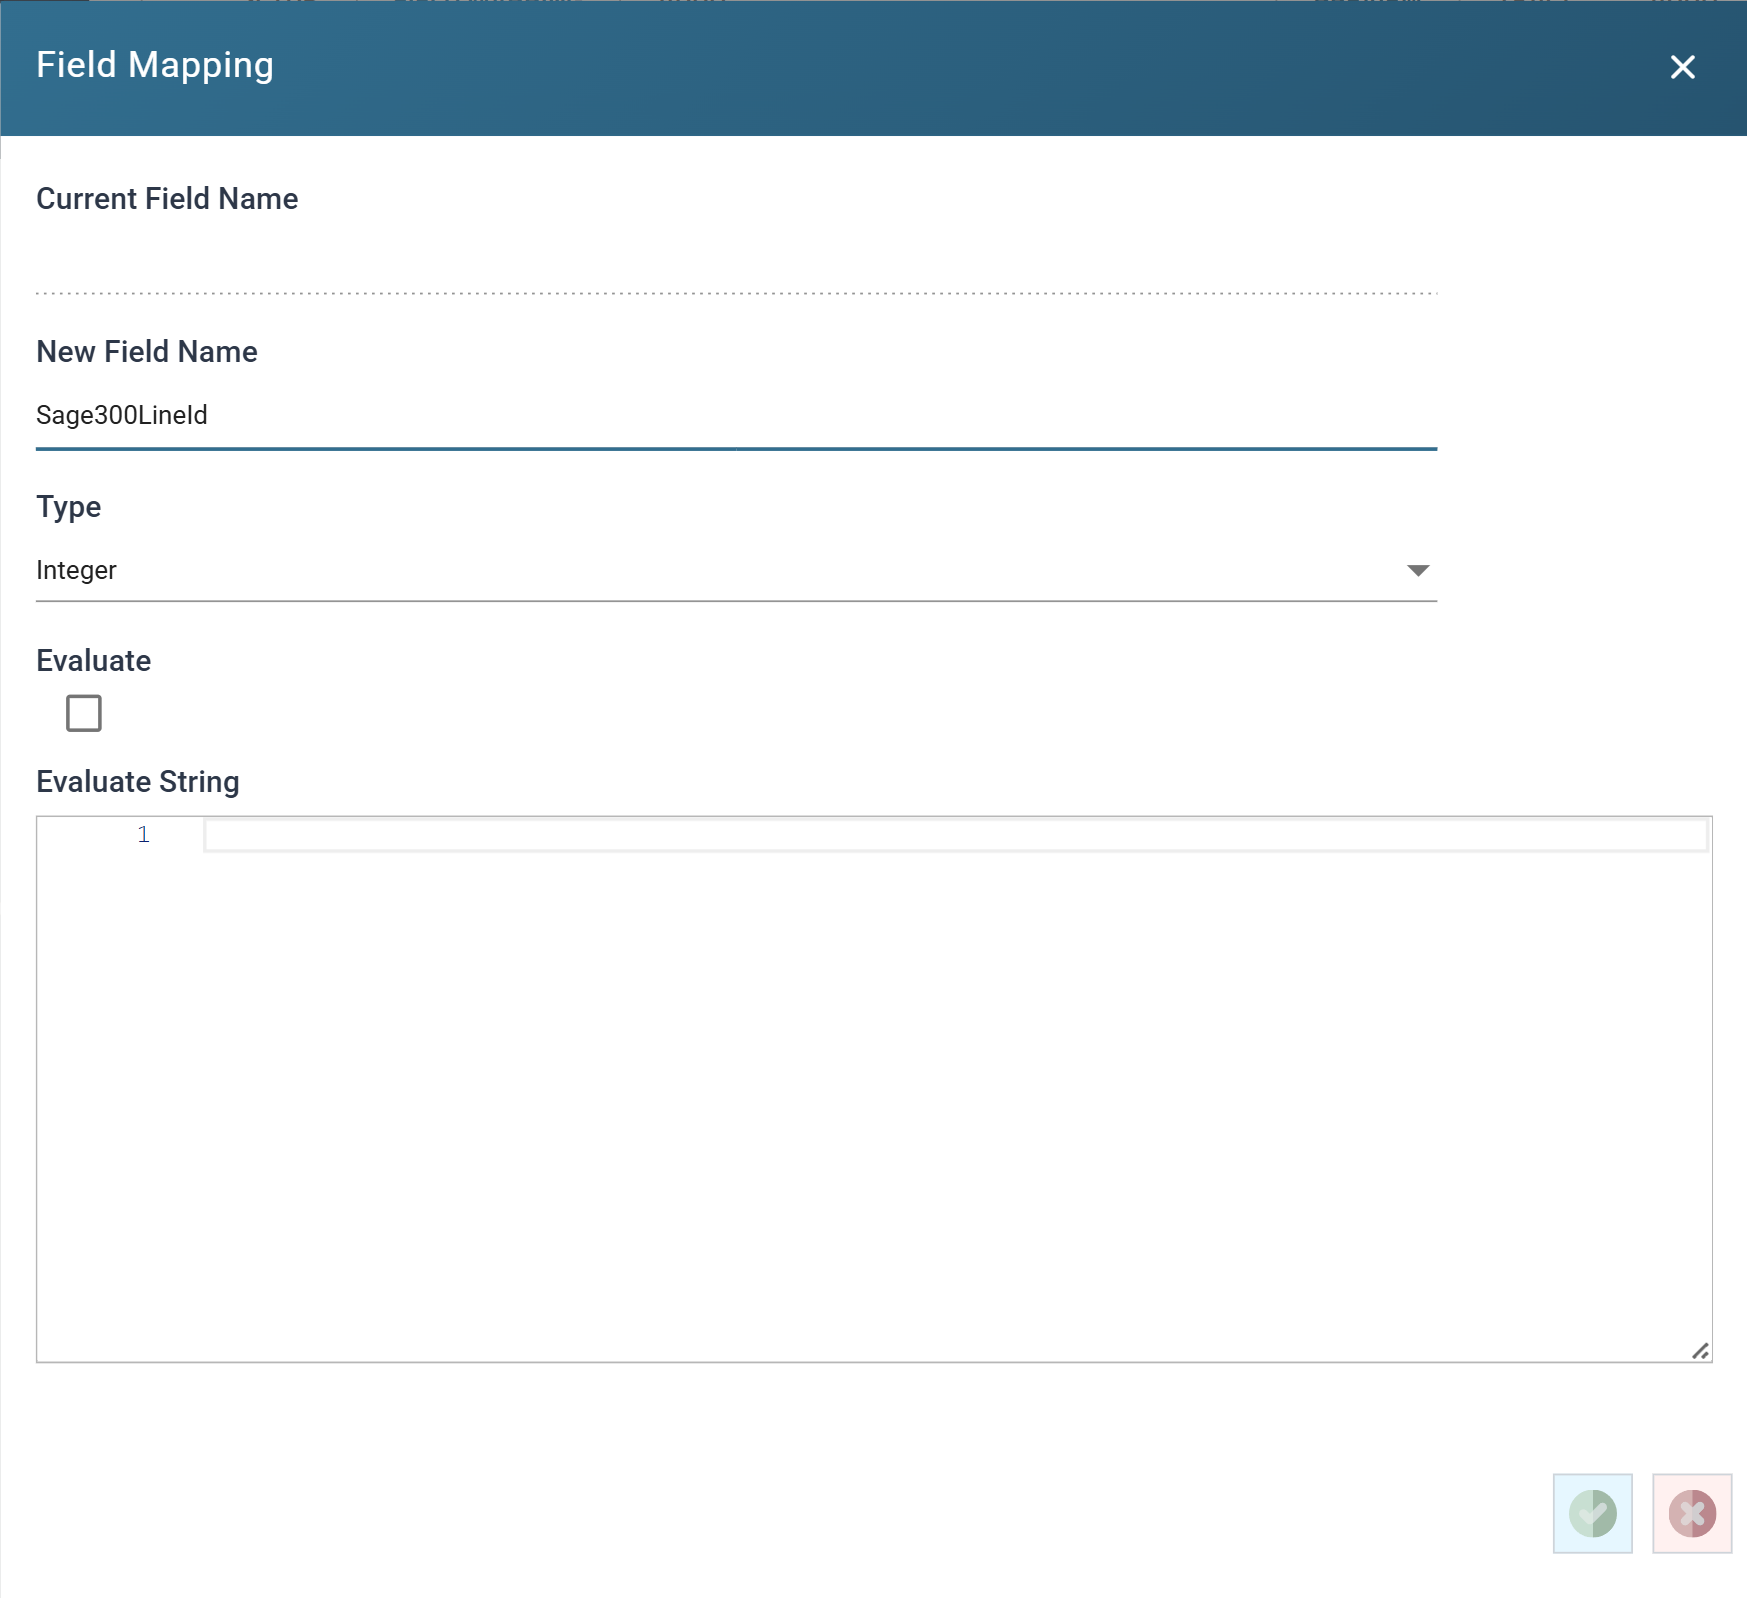
Press Add and fill the dialog:
- New Field Name
- For training, enter:
Sage300LineId
- For training, enter:
- Type
- For training, select: Integer. It will hold a line number.
- Evaluate
- For training, leave unticked.
- Evaluate String
- Leave empty. The field must be blank. The connector puts the value Sage 300 generates into it.
- New Field Name
-
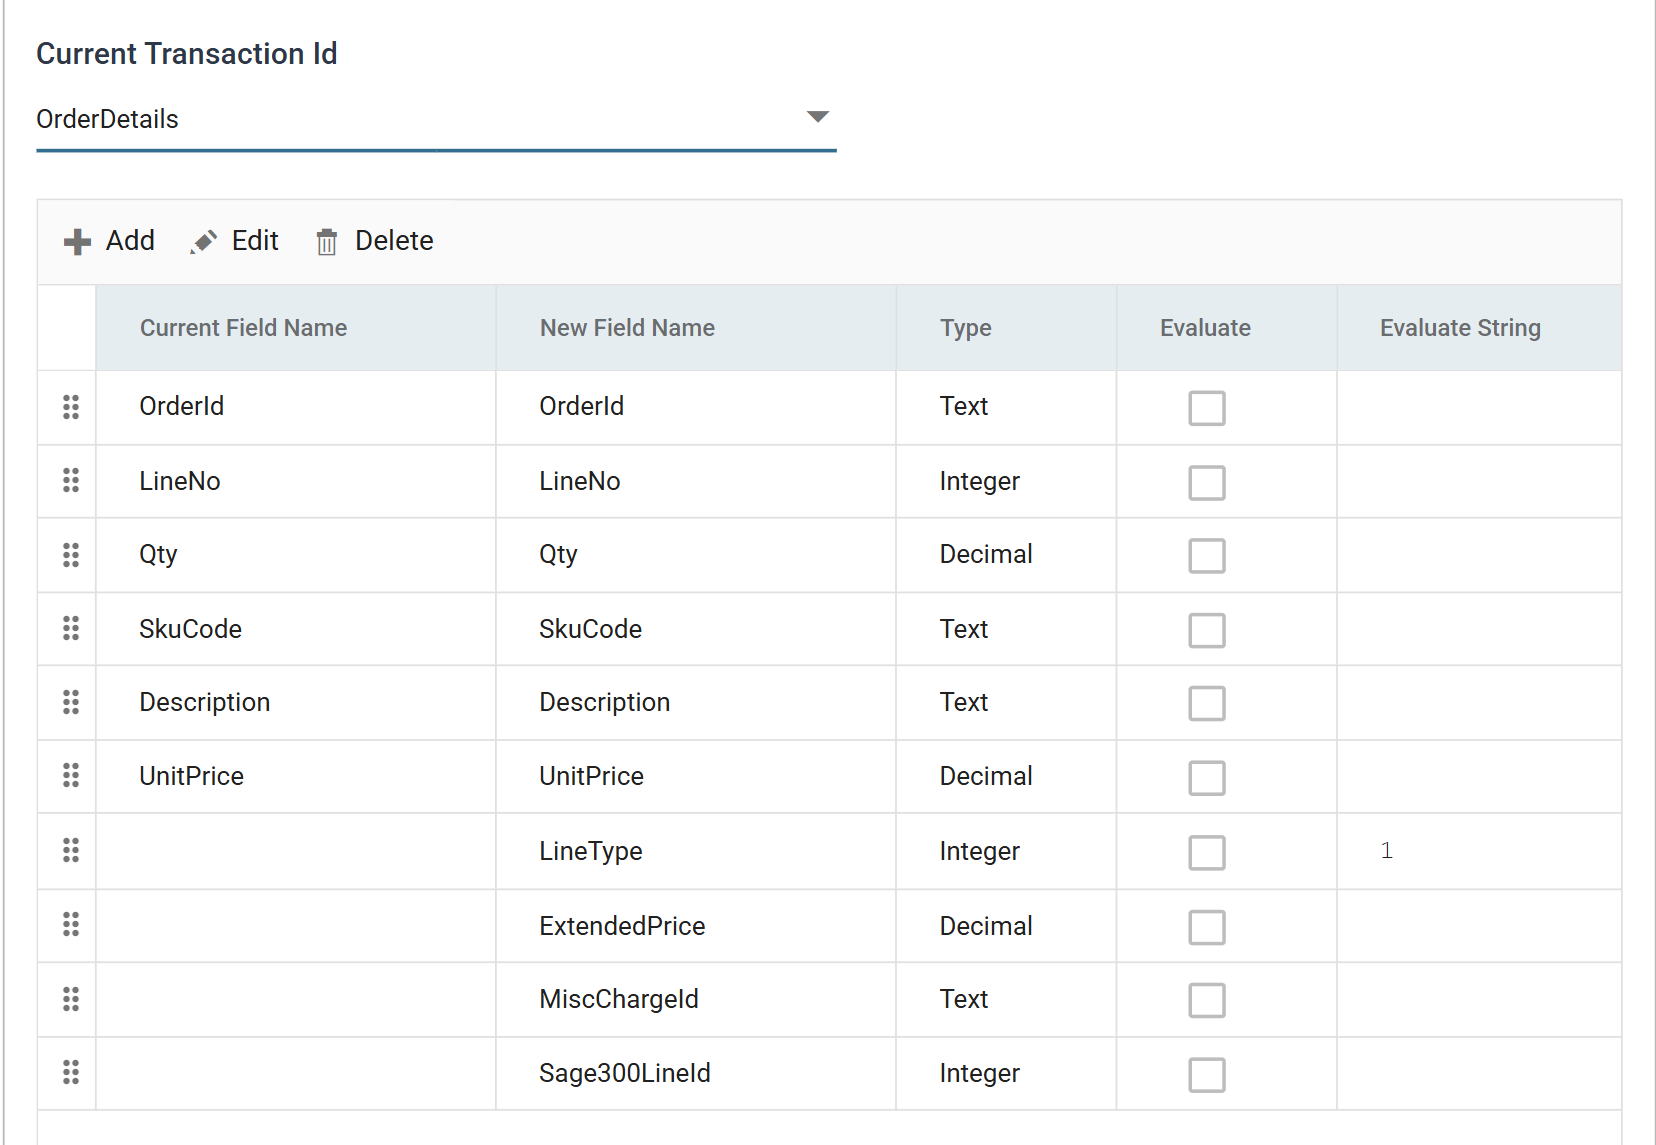
Press the green tick. The new field appears at the end of the grid.
-
Press Refresh, then Close to commit the transform, and save the integration.
An empty field mapped in the connector comes back populated
Sage300OrderNumber, which the Map already carries on the Orders
transaction, works the same way. When you map an empty field to a Sage 300
field in the connector, it comes back populated.
Sage 300 Order Connector > Field Mapping
- Open the Sage 300 Order connector and press Field Mapping.
- Set Current Transaction Id to
OrderDetails. - Press Edit, and on the
Sage300LineIdrow set Sage 300 Field toLine Number (LINENUM). -
Press Save on the grid.
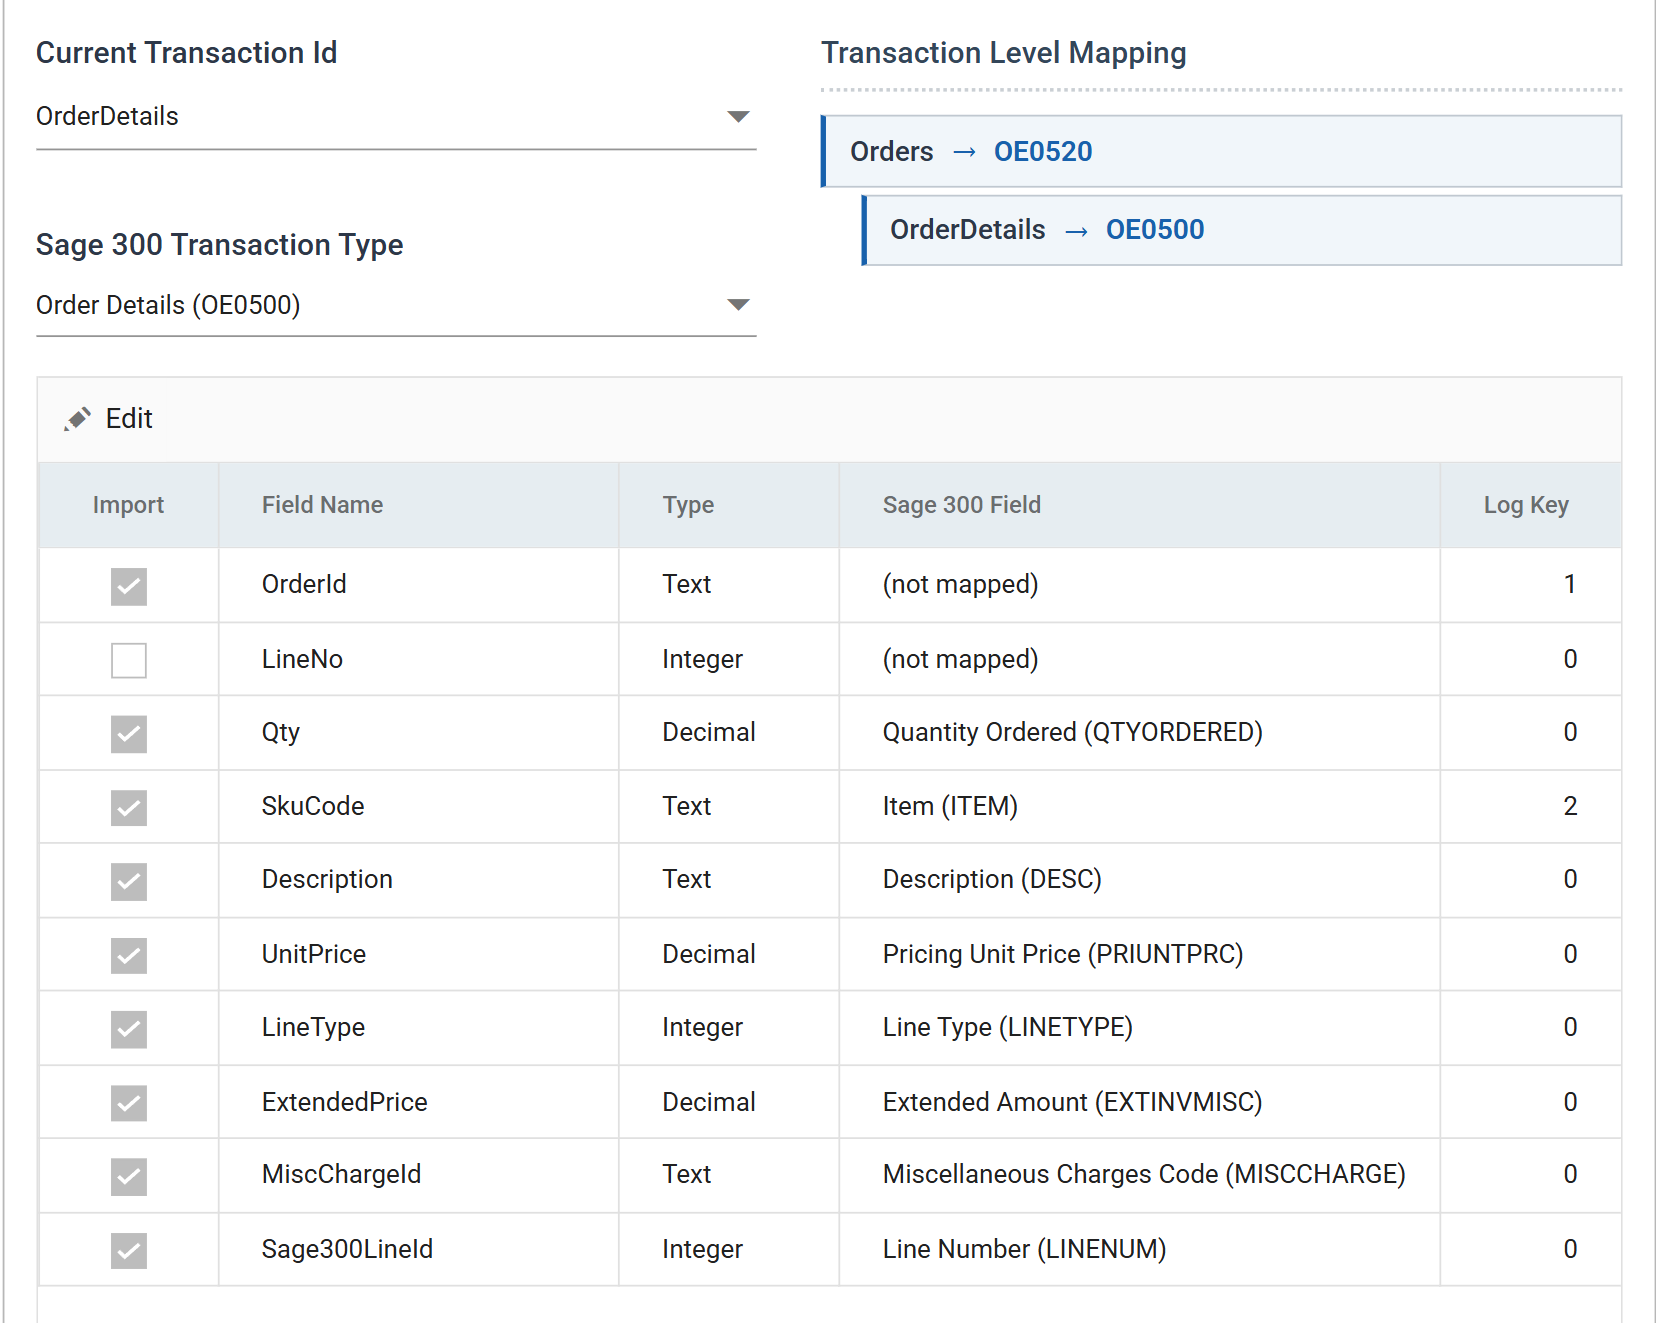
Choosing a Sage 300 field ticks that row's Import box for you. A field with Import ticked flows out of the connector to the transforms downstream.
The connector renames fields to their Sage 300 names on the way out
The connector renames fields to their Sage 300 names on the way out.
Downstream of this connector the transactions are OE0520 and OE0500, and
the field you just created appears as LINENUM, not as
Sage300LineId. You see the name you chose only here.
Without this mapping, LINENUM is not in the connector's output and the
shipment has nothing to match its lines against.
Press Refresh to re-generate the orders, then Close and save.
Design > Transform Setup
You need two fields to receive the shipment and invoice numbers, and one to ask Sage 300 for the invoice. They go in a separate Map transform connected to the order connector.
- Open the Transforms group in the palette and drag a Map onto the design surface, below the Sage 300 Order connector.
- Drag a Connector from the same group and join the order connector to it.
-
Save the integration. You cannot open a newly dropped transform until you do.
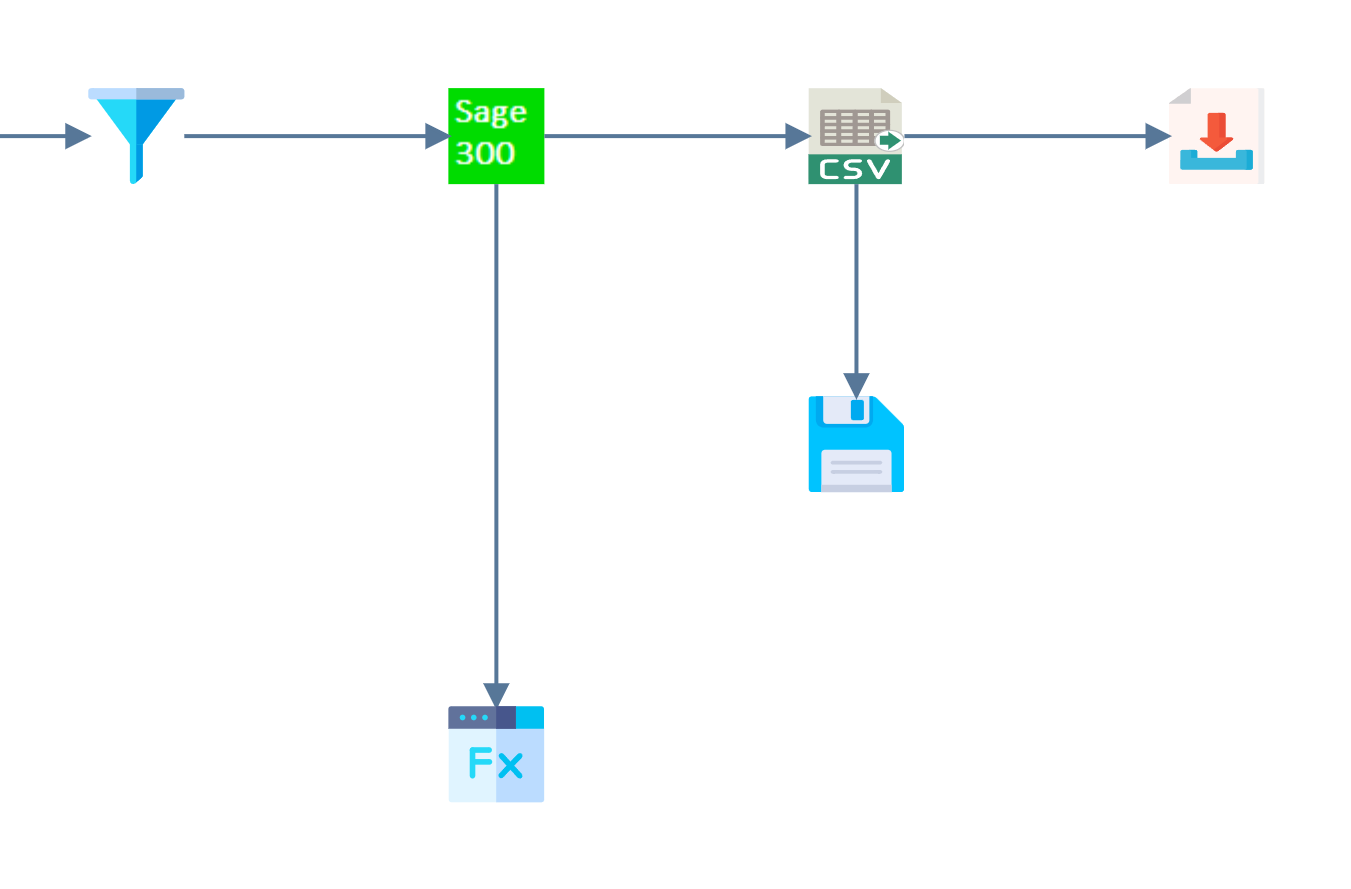
The order connector now feeds two branches: the CSV writer built in step 9, and this one.
Post Order Map > Field Mapping
Double-click the new transform to open it. On its Setup tab set
Transform Id to POSTORDERMAP. It arrives called Map_1, and the audit
report shows whatever id you give it.
Press Field Mapping and leave Current Transaction Id on OE0520, the
order header. Press Add three times, once per field:
- New Field Name
ShipmentNumber
- Type
- Text
- Evaluate
- Unticked
- Evaluate String
- Empty
- New Field Name
InvoiceNumber
- Type
- Text
- Evaluate
- Unticked
- Evaluate String
- Empty
- New Field Name
CreateInvoice
- Type
- Boolean
- Evaluate
- Ticked
- Evaluate String
True
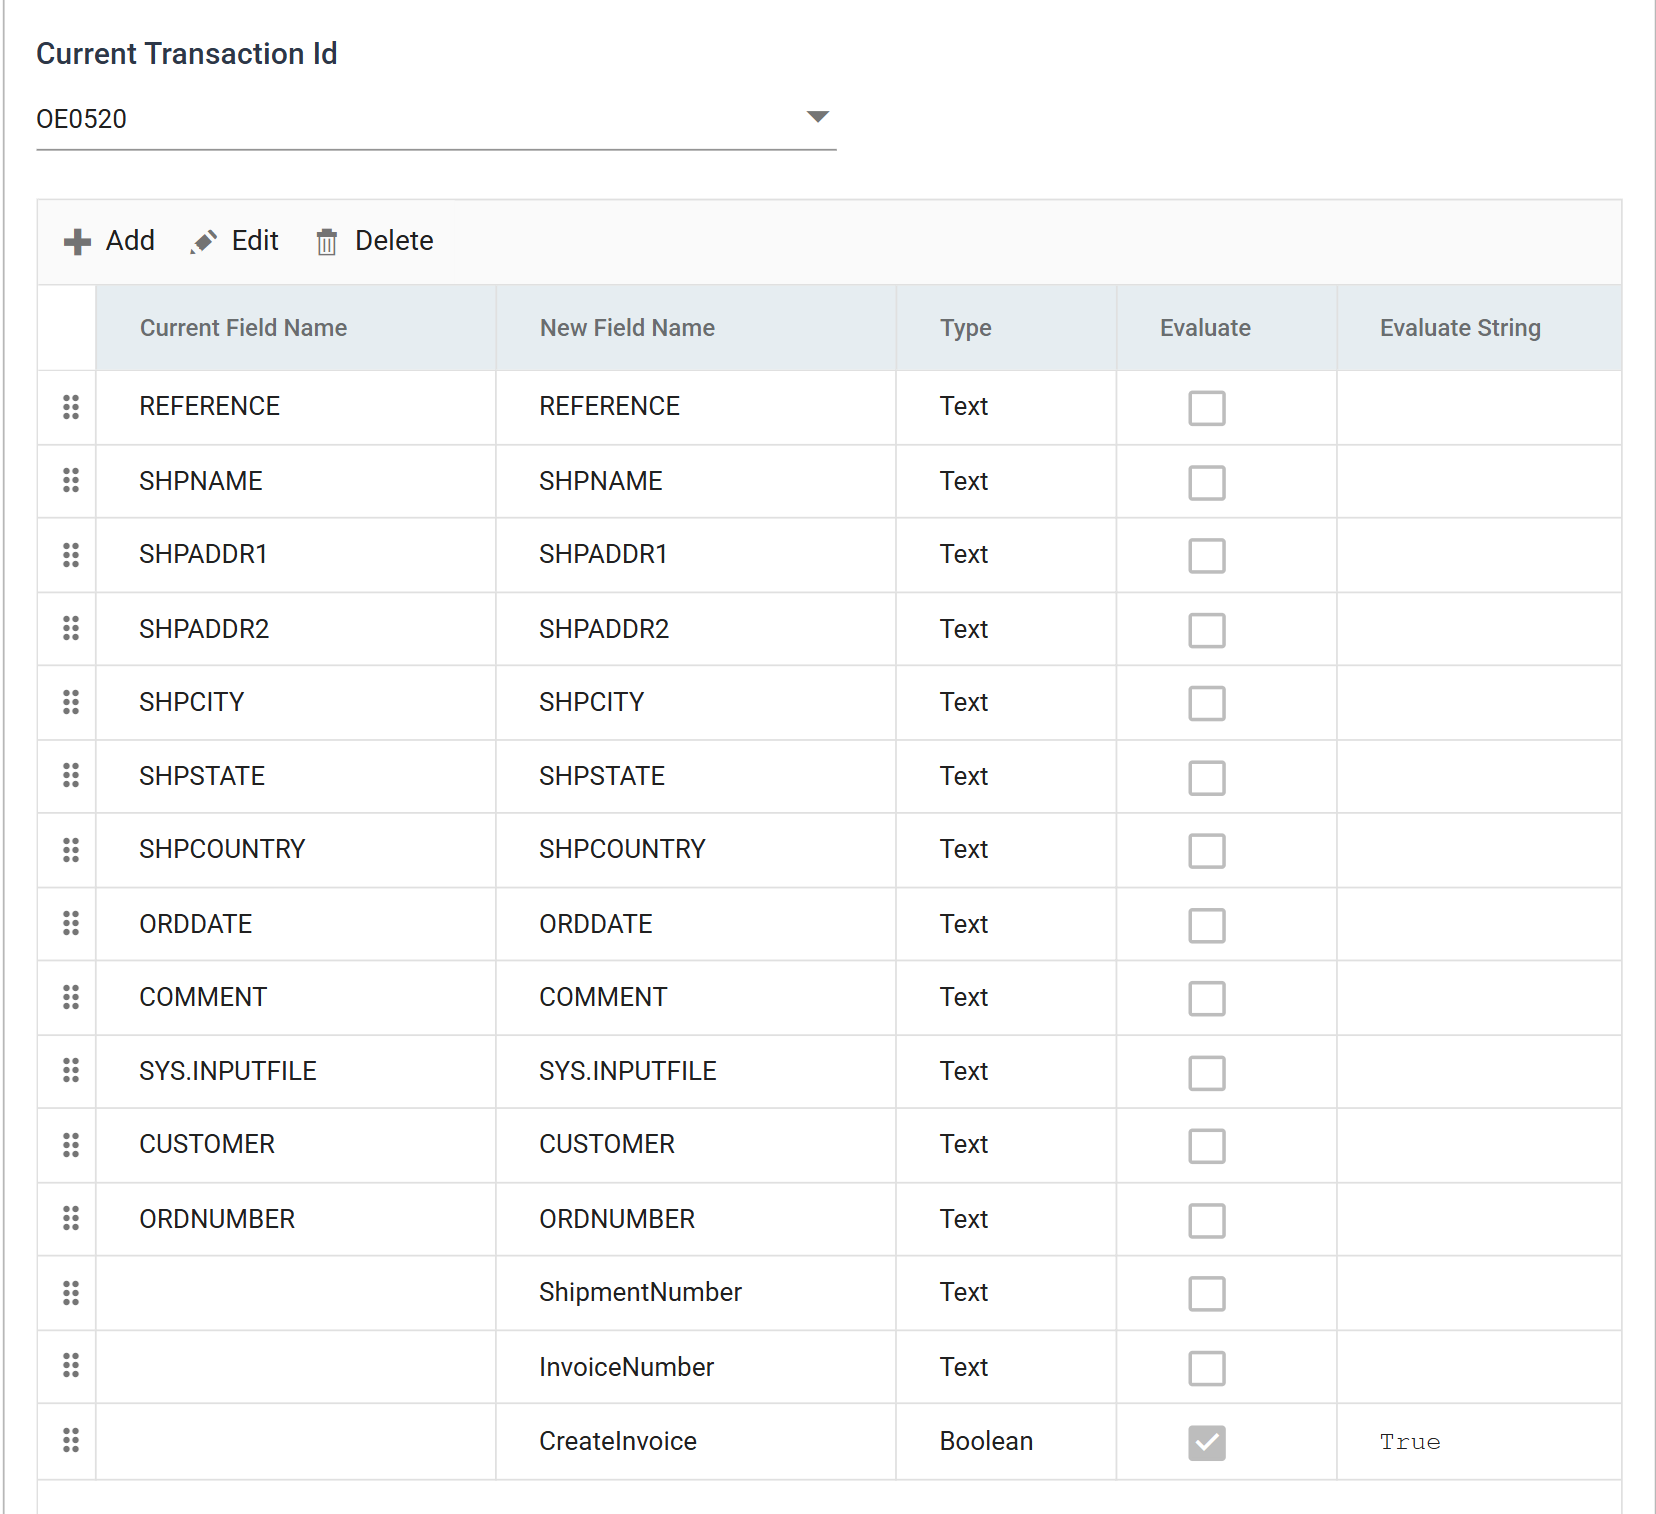
The first two are empty for the same reason as Sage300LineId. CreateInvoice
carries a value. It tells Sage 300 to raise an invoice from the shipment
straight away, instead of leaving the shipment to be invoiced later.
Press Refresh. The three new columns appear on the preview. The first two
are empty and the third is True.
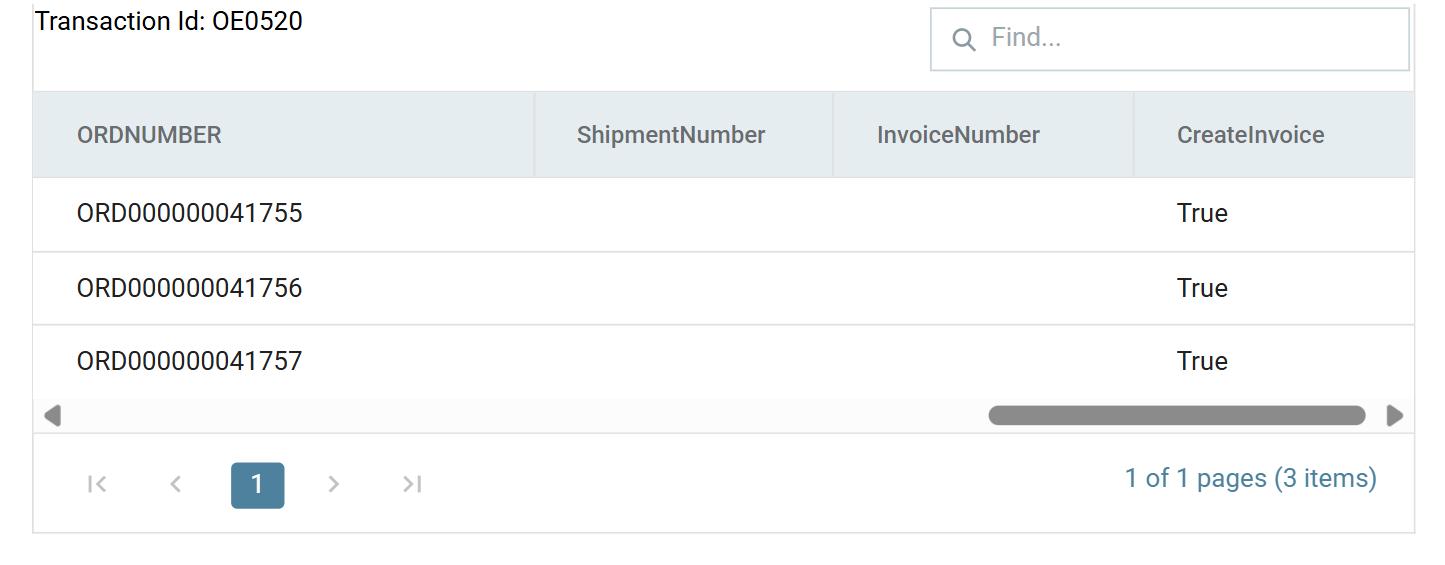
Press Close and save the integration.
Sage 300 Shipment Connector > Setup
- Open the Connectors group in the palette and drag a Sage 300 connector onto the design surface, to the right of the Map you just built.
- Join the Map to it with a Connector, and save.
- Double-click it to open it.
- Transform Id
- For training, enter:
SHIPMENT
- For training, enter:
- Sage 300 Connector
- The Sage 300 company to write to. Choose this first. Until it is set, the Import Type list below is disabled and empty.
- For training, select your Sage 300 SAMLTD connection.
- Sage 300 Import Type
- For training, select:
O/E Shipment
- For training, select:
- Update Operation
- For training, leave as: Insert
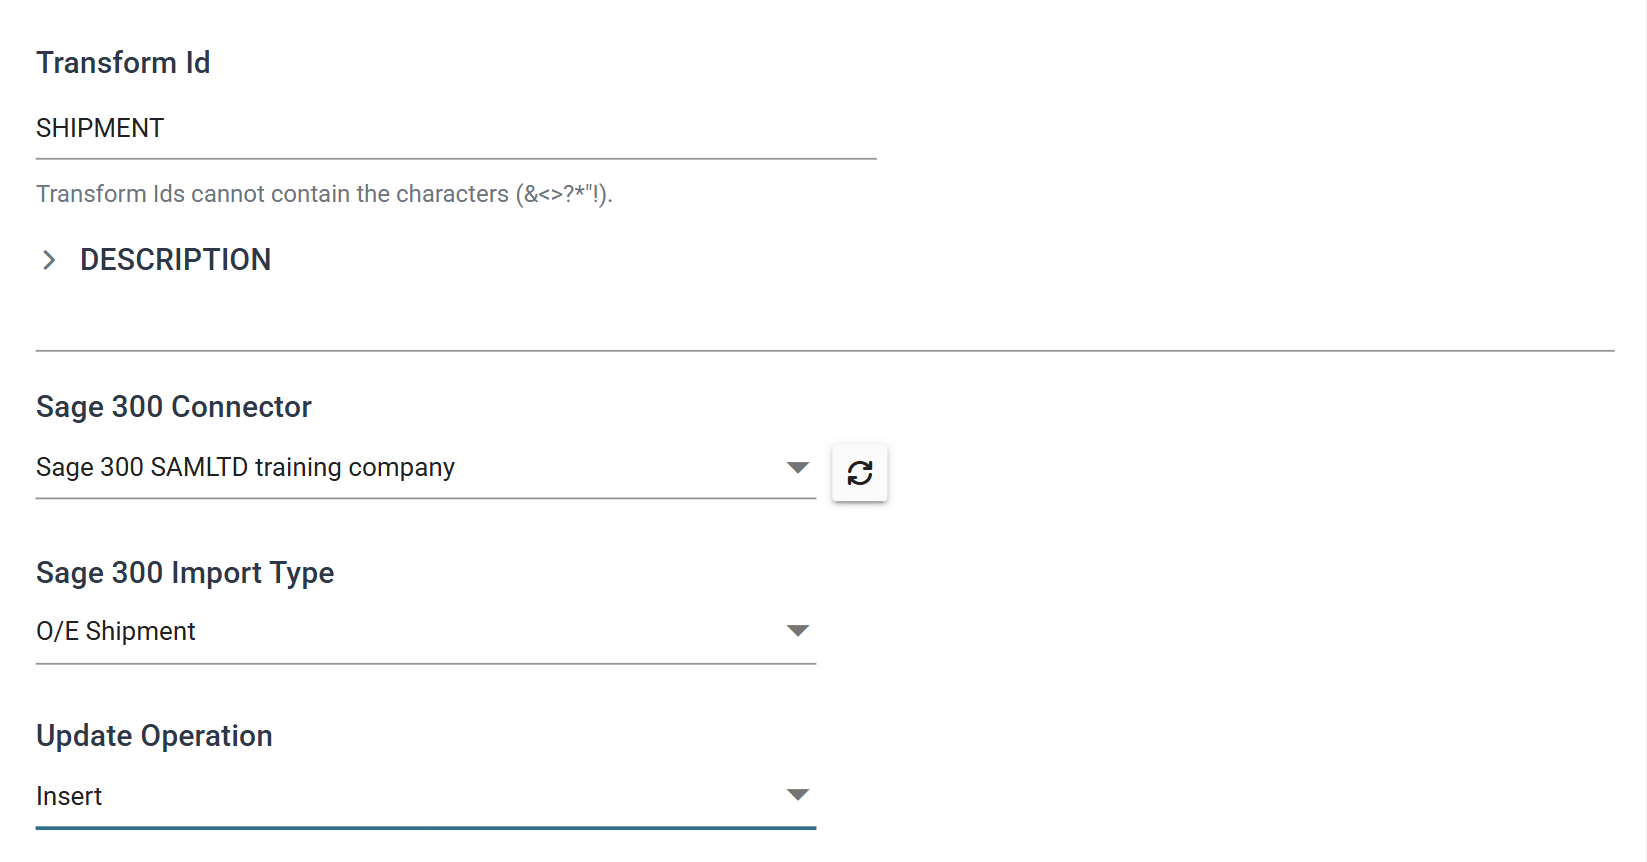
Set the import type before you build the mapping
Set the import type before you build the mapping. After you configure the connector the field is disabled, because a new type would invalidate every mapping underneath it. If you pick the wrong one, delete the transform and start again.
Sage 300 Shipment Connector > Field Mapping
The connector receives two transactions from upstream: OE0520, the order
header, and OE0500, the order lines. Map each one to the Sage 300 transaction
it becomes.
- Press Field Mapping. Current Transaction Id is on
OE0520. -
Set Sage 300 Transaction Type to
Shipments (OE0692).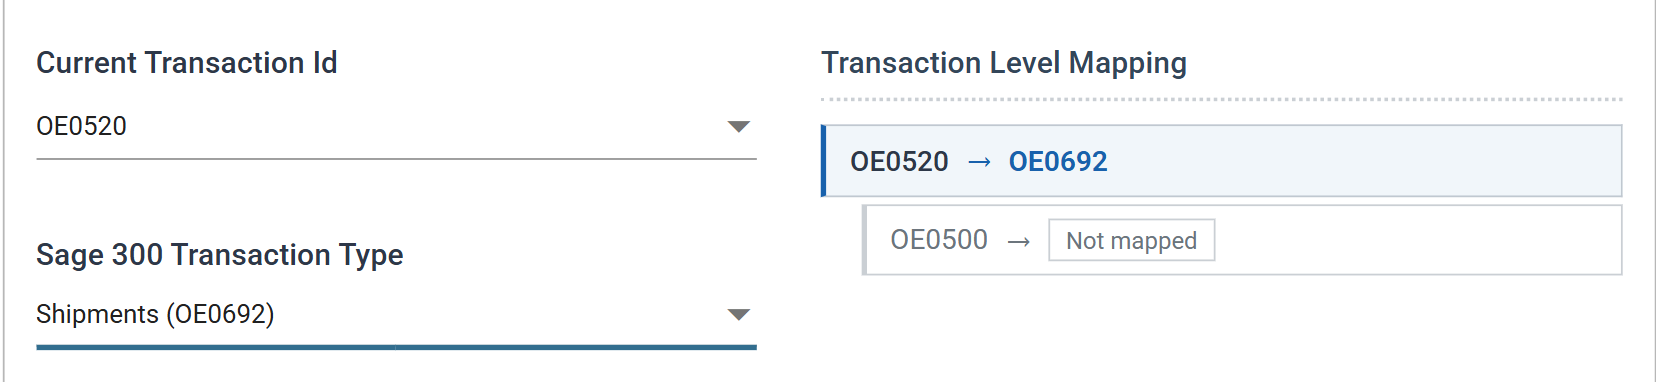
The Transaction Level Mapping panel underneath summarises what is mapped to what. Check it as you go.
-
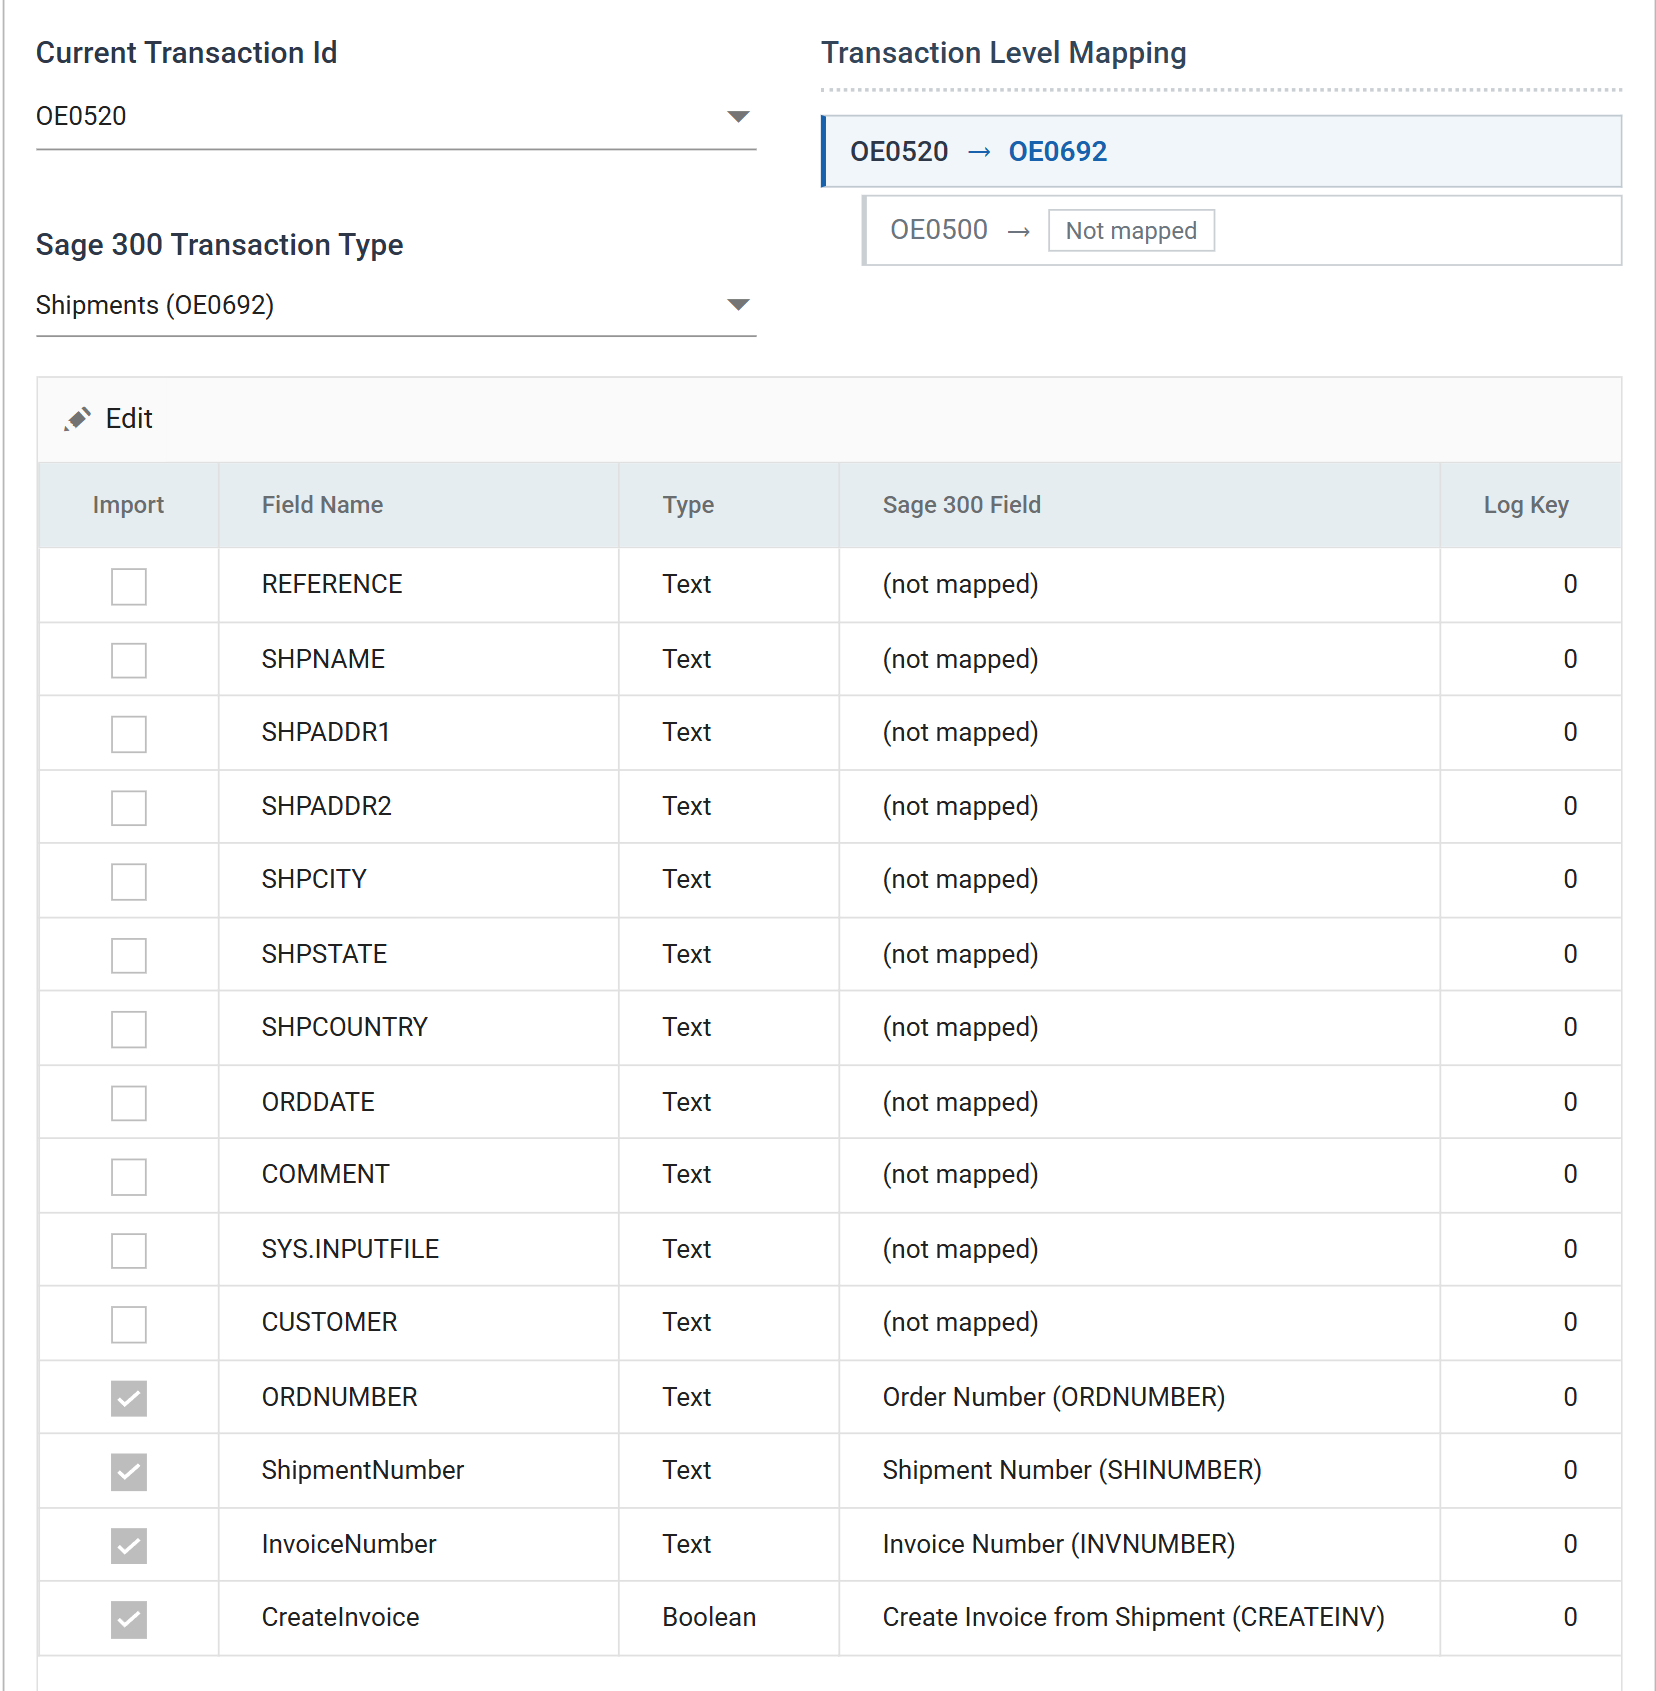
Press Edit and map the order header fields:
Incoming Field Map To Sage 300 Field ORDNUMBER Order Number (ORDNUMBER) ShipmentNumber Shipment Number (SHINUMBER) InvoiceNumber Invoice Number (INVNUMBER) CreateInvoice Create Invoice from Shipment (CREATEINV) -
Press Save on the grid.
-
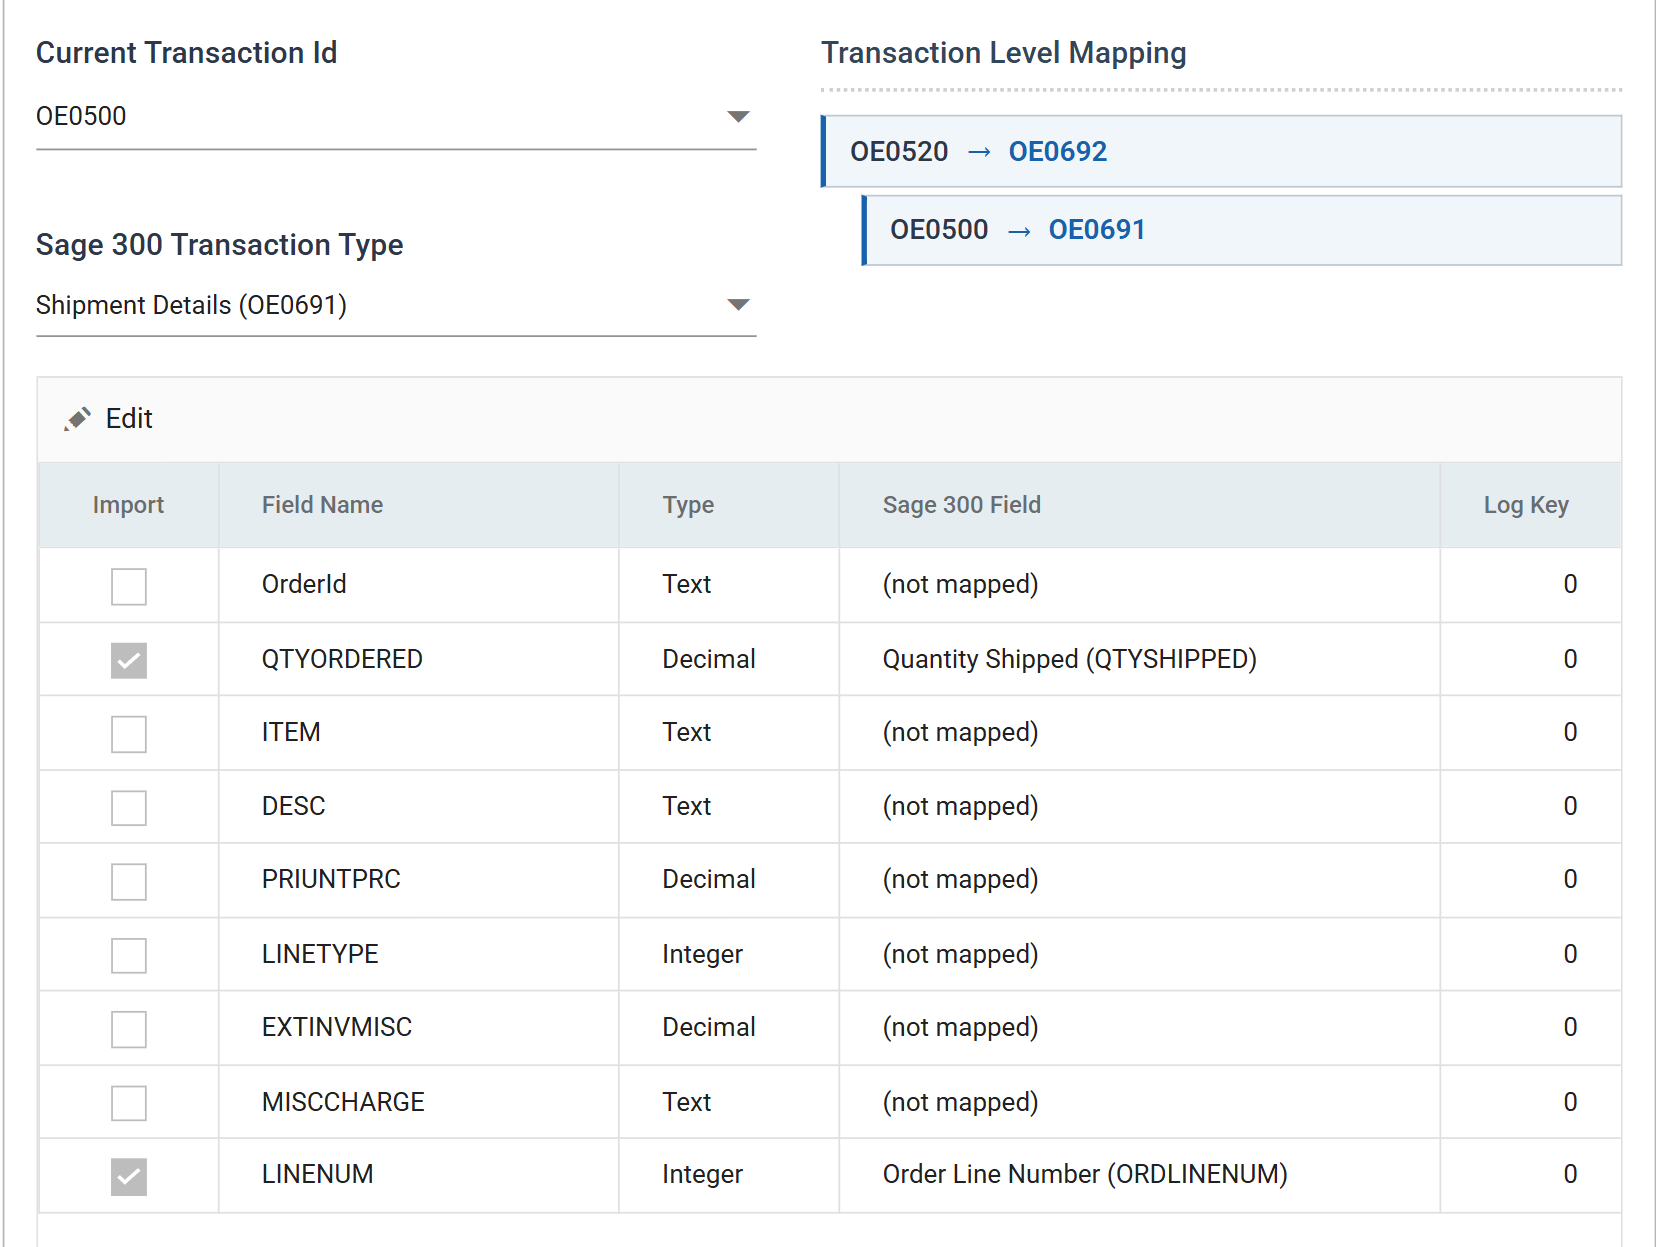
Change Current Transaction Id to
OE0500, then set Sage 300 Transaction Type toShipment Details (OE0691).
The two drop-downs do different jobs
To change which grid you are looking at, use the top drop-down, Current Transaction Id. The bottom one, Sage 300 Transaction Type, changes what the top one is mapped to.
-
Press Edit and map the order line fields:
Incoming Field Map To Sage 300 Field QTYORDERED Quantity Shipped (QTYSHIPPED) LINENUM Order Line Number (ORDLINENUM) -
Press Save on the grid.
Map to Order Line Number, not Line Number
Map LINENUM to Order Line Number, not to Line Number. Both exist
on the shipment detail and they mean different things. Line Number is the
shipment's own line. Order Line Number is the order line that this
shipment line fulfils. Only the second ties the quantity to the right
detail.
You created Sage300LineId at the start of this section for this purpose.
The Quick Start manual expands this scenario in SAMACCINTCO (Sample Sage300
Intercompany Processing Automation).
Running it
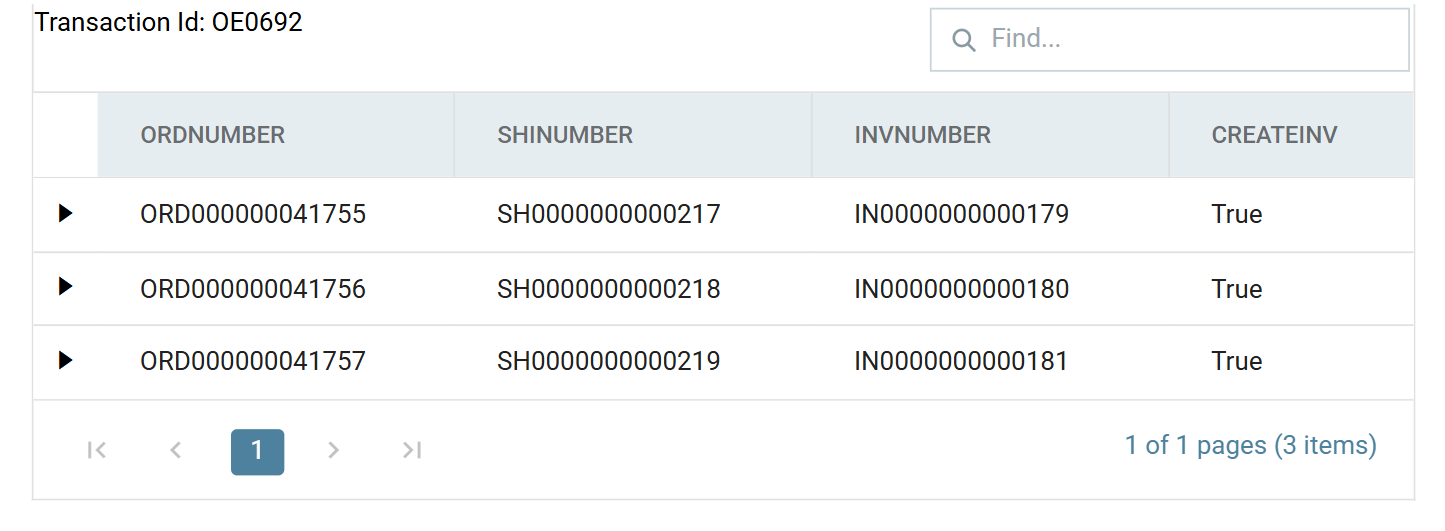
Press Refresh. Sage 300 creates the shipments and raises an invoice from each one. Both generated numbers come back onto the preview:
Press Close and save the integration.
Every Refresh of this connector ships and invoices again
Every Refresh of this connector ships and invoices again. That works while it receives new orders. It is a problem when the orders are not new.
Refreshing a transform downstream of this connector reuses a cached copy of the data before it, so the connector receives orders it has already shipped. Sage 300 does not report an error. It stops responding, with no message, no progress line and nothing in the log. Press Cancel to recover.
Refresh from the Excel Reader downwards, not from the middle. A run that starts at the reader produces a new set of orders, and every transform after it works.
Preparing to Generate the O/E Invoice
The next section prints the invoices to PDF. It needs two values the dataset does not yet carry: where to write each file and which report to use.
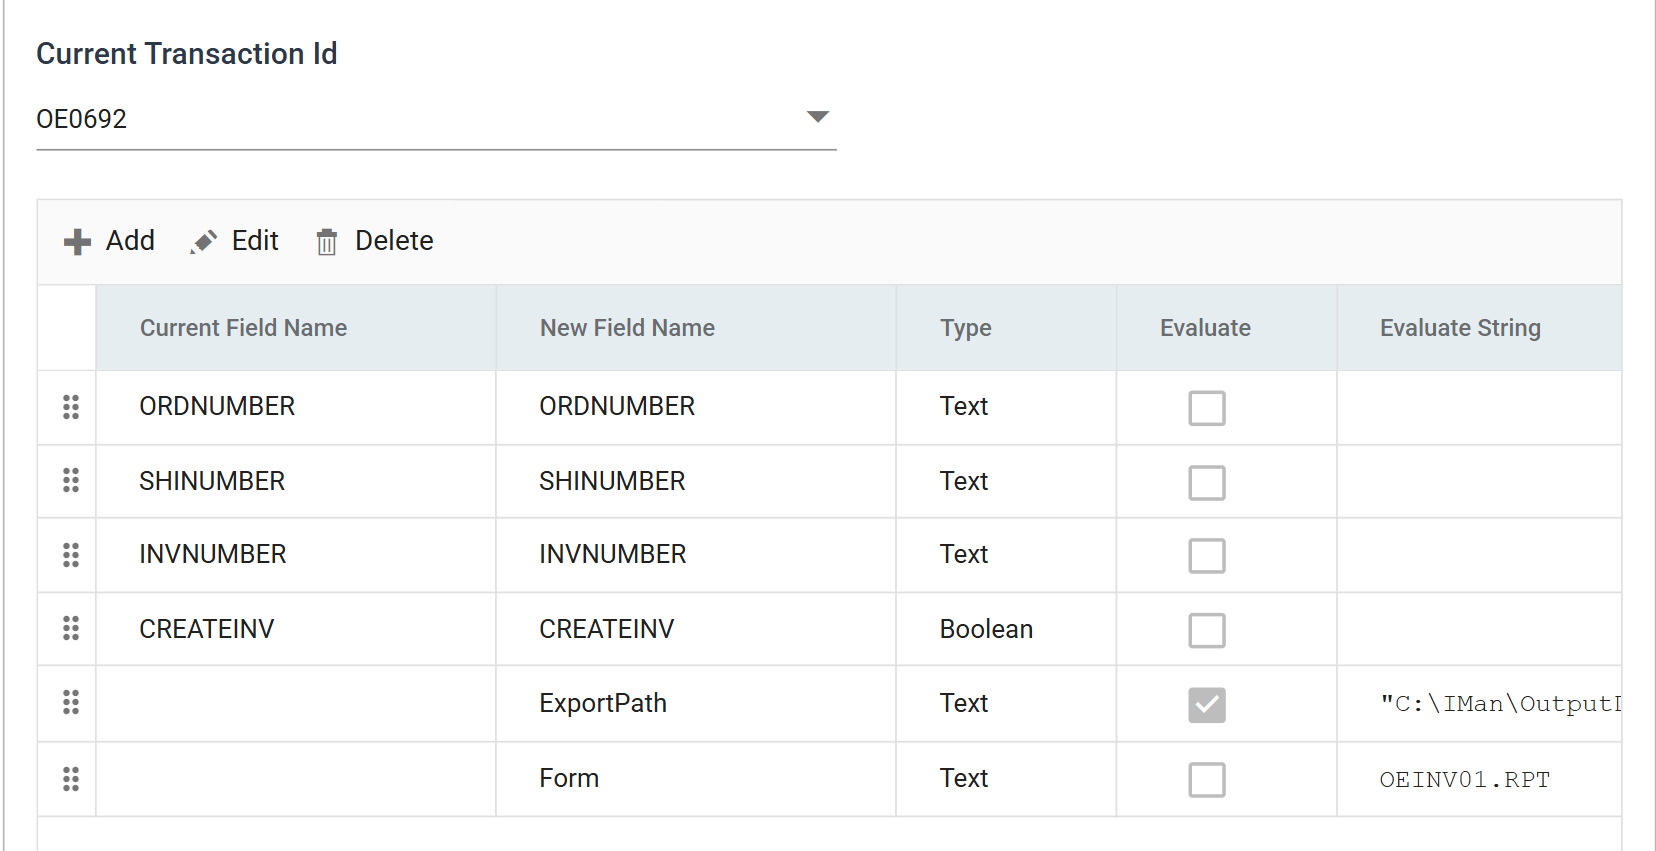
- Add another Map transform to the right of the shipment connector, join it and save.
- Open it, and on its Setup tab set Transform Id to
INVOICEPREP. - Press Field Mapping, leave Current Transaction Id on
OE0692and press Add twice:
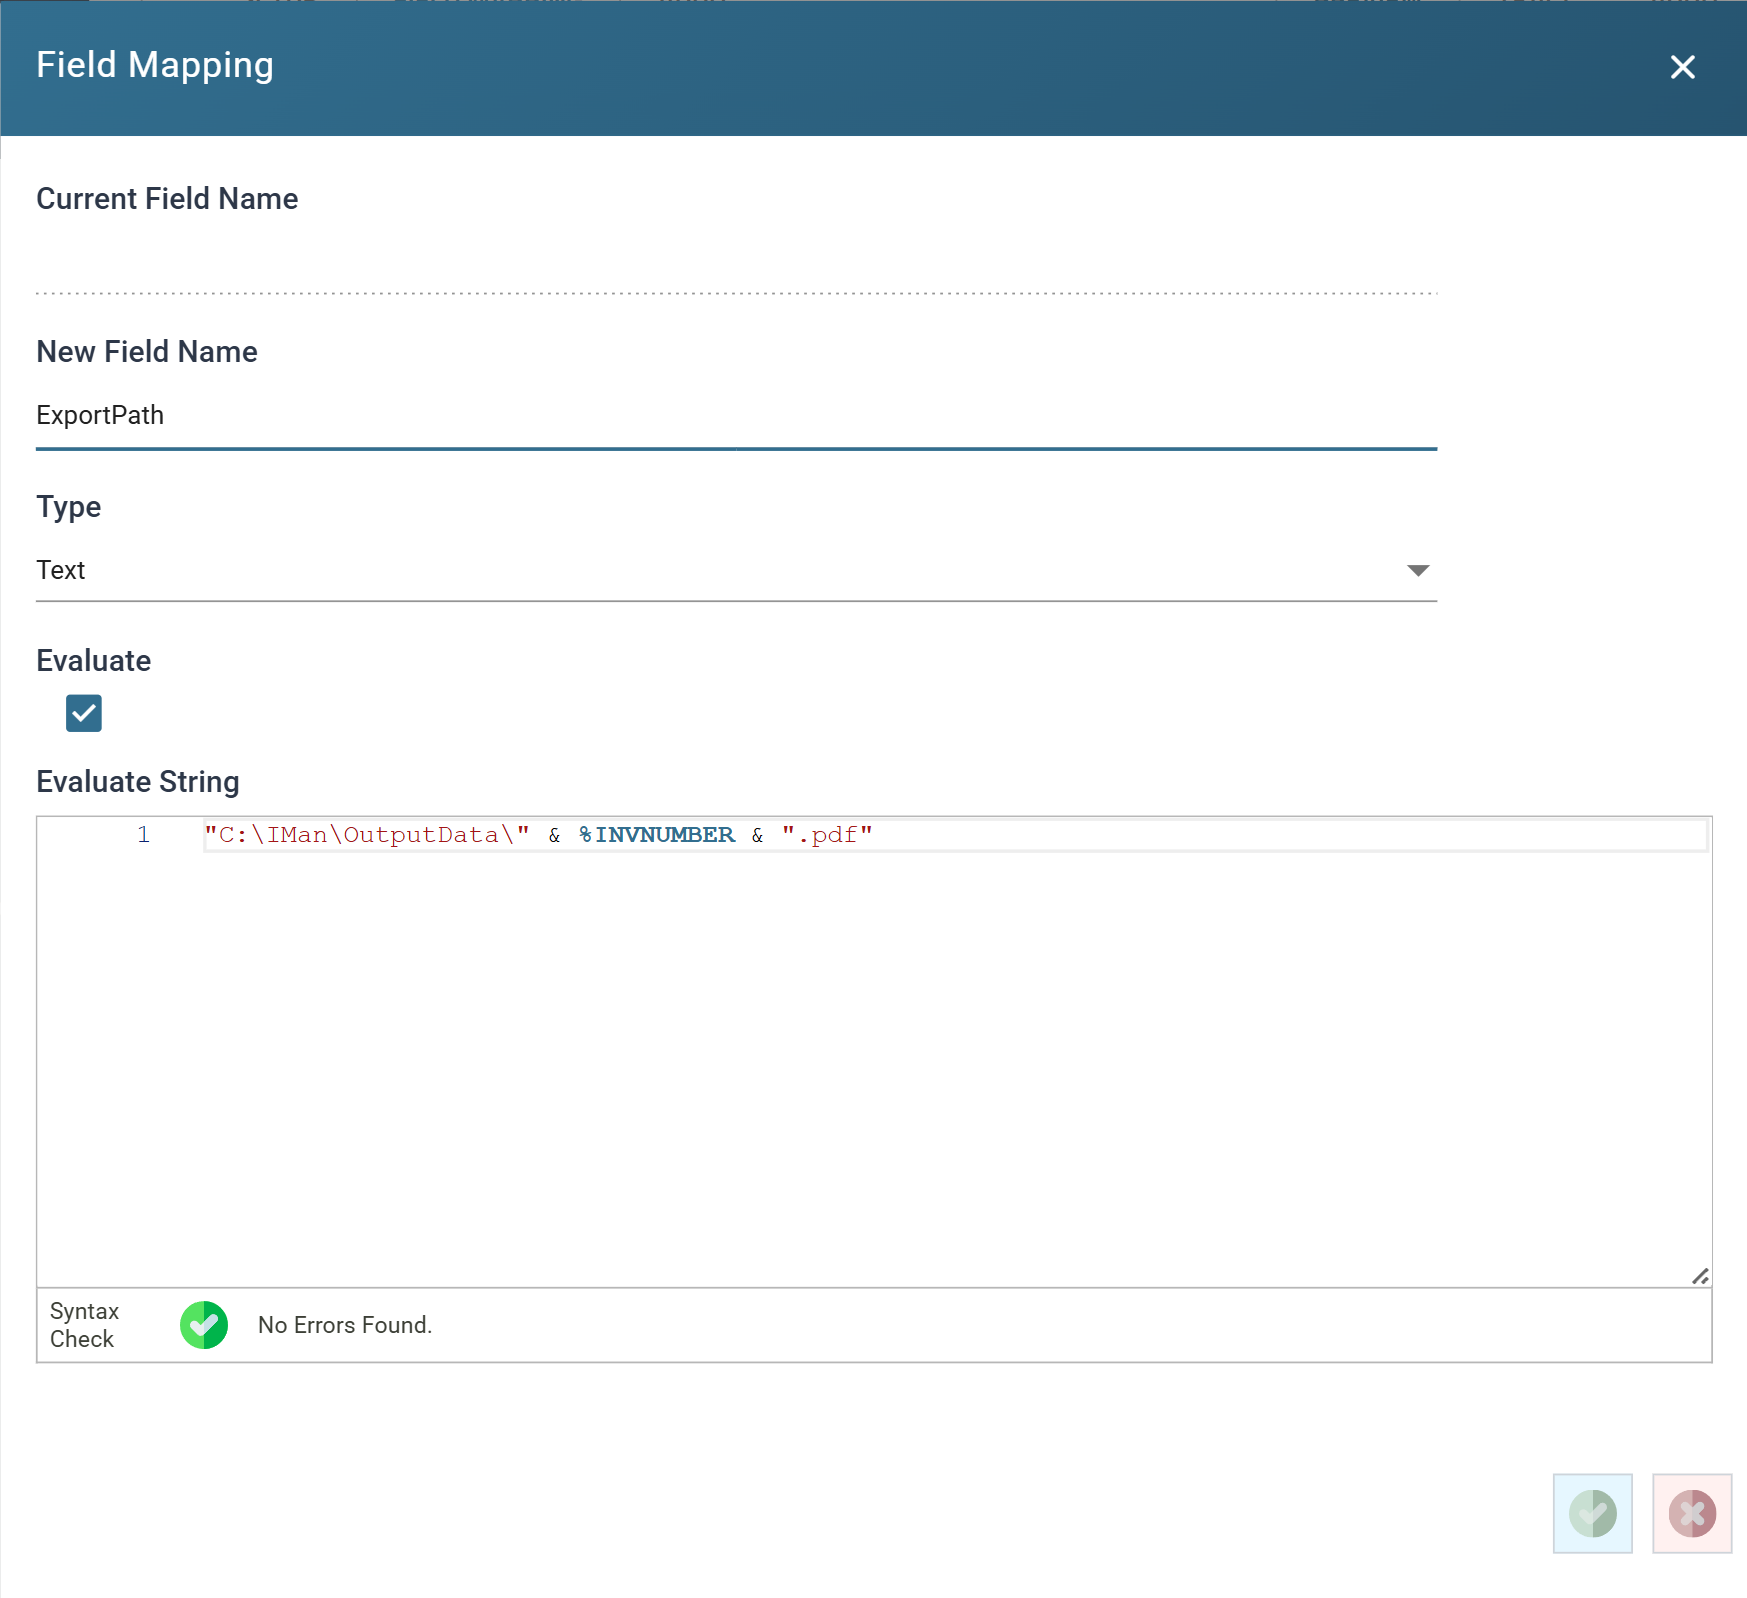
- New Field Name
ExportPath
- Type
- Text
- Evaluate
- Ticked
- Evaluate String
"C:\IMan\OutputData\" & %INVNUMBER & ".pdf"
- New Field Name
Form
- Type
- Text
- Evaluate
- Unticked
- Evaluate String
OEINV01.RPT
Use your own shared data directory if it differs
Replace the first part of the path with your own IMan shared data directory
if it differs. C:\IMan\OutputData is the folder step 9 wrote the order
status file to.
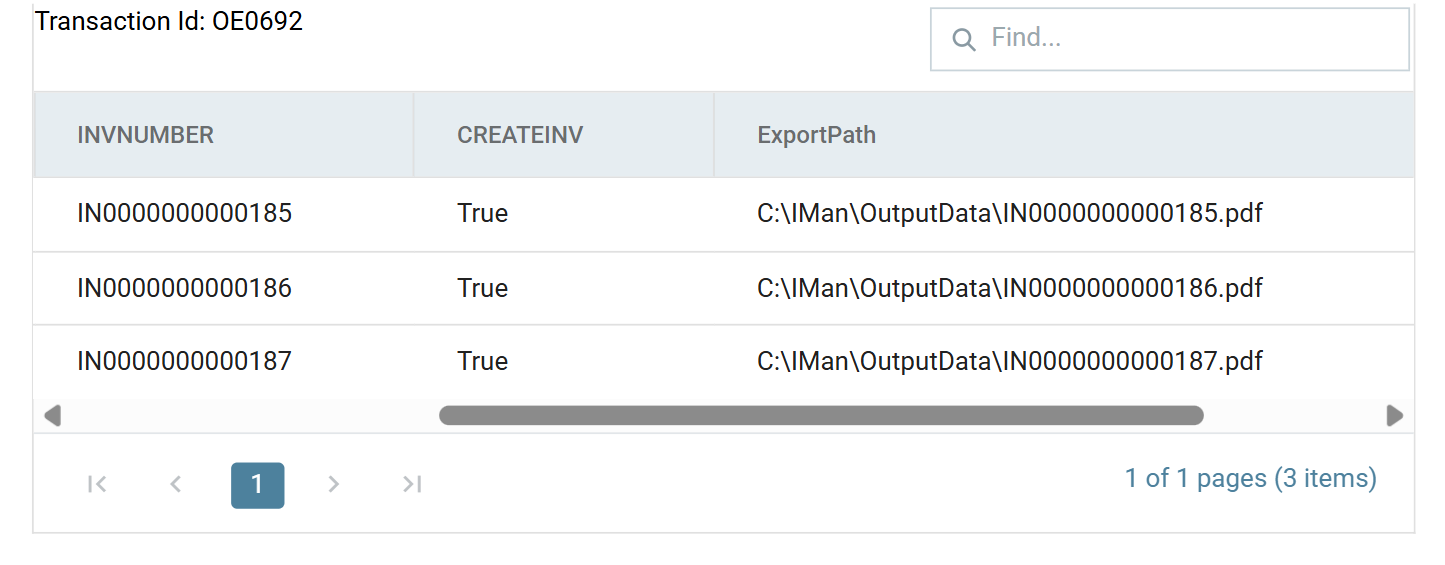
Press Refresh. ExportPath is evaluated, so each row now carries the full
path for its invoice:
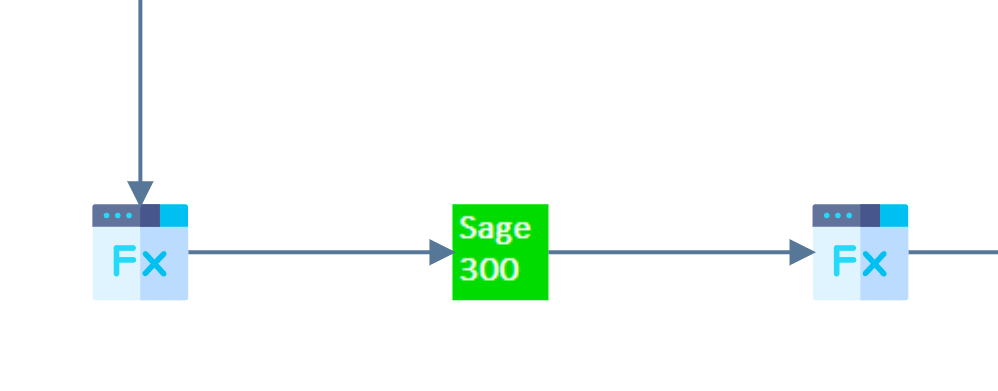
Press Close and save the integration. The branch now looks like this: