Step 5 – Sage 200 Customer Import
In this step you import the customers into Sage 200. The step has two parts:
- A System Connector, which holds the credentials and company IMan uses to talk to a Sage 200 installation.
- A Sage 200 connector on the design surface, which takes the transformed orders and writes a customer for each one.
The connector is the first transform in this training that changes anything outside IMan. Everything up to here has been a preview.
Setup > System Connector
You define a System Connector once, then choose it by name in any Sage 200 connector. This works like the database connection in Step 4.
- Save the integration, then press Setup at the top of the main screen.
-
Press System Connector in the left-hand menu, then press Add. To open an existing connector, select it and press Edit.
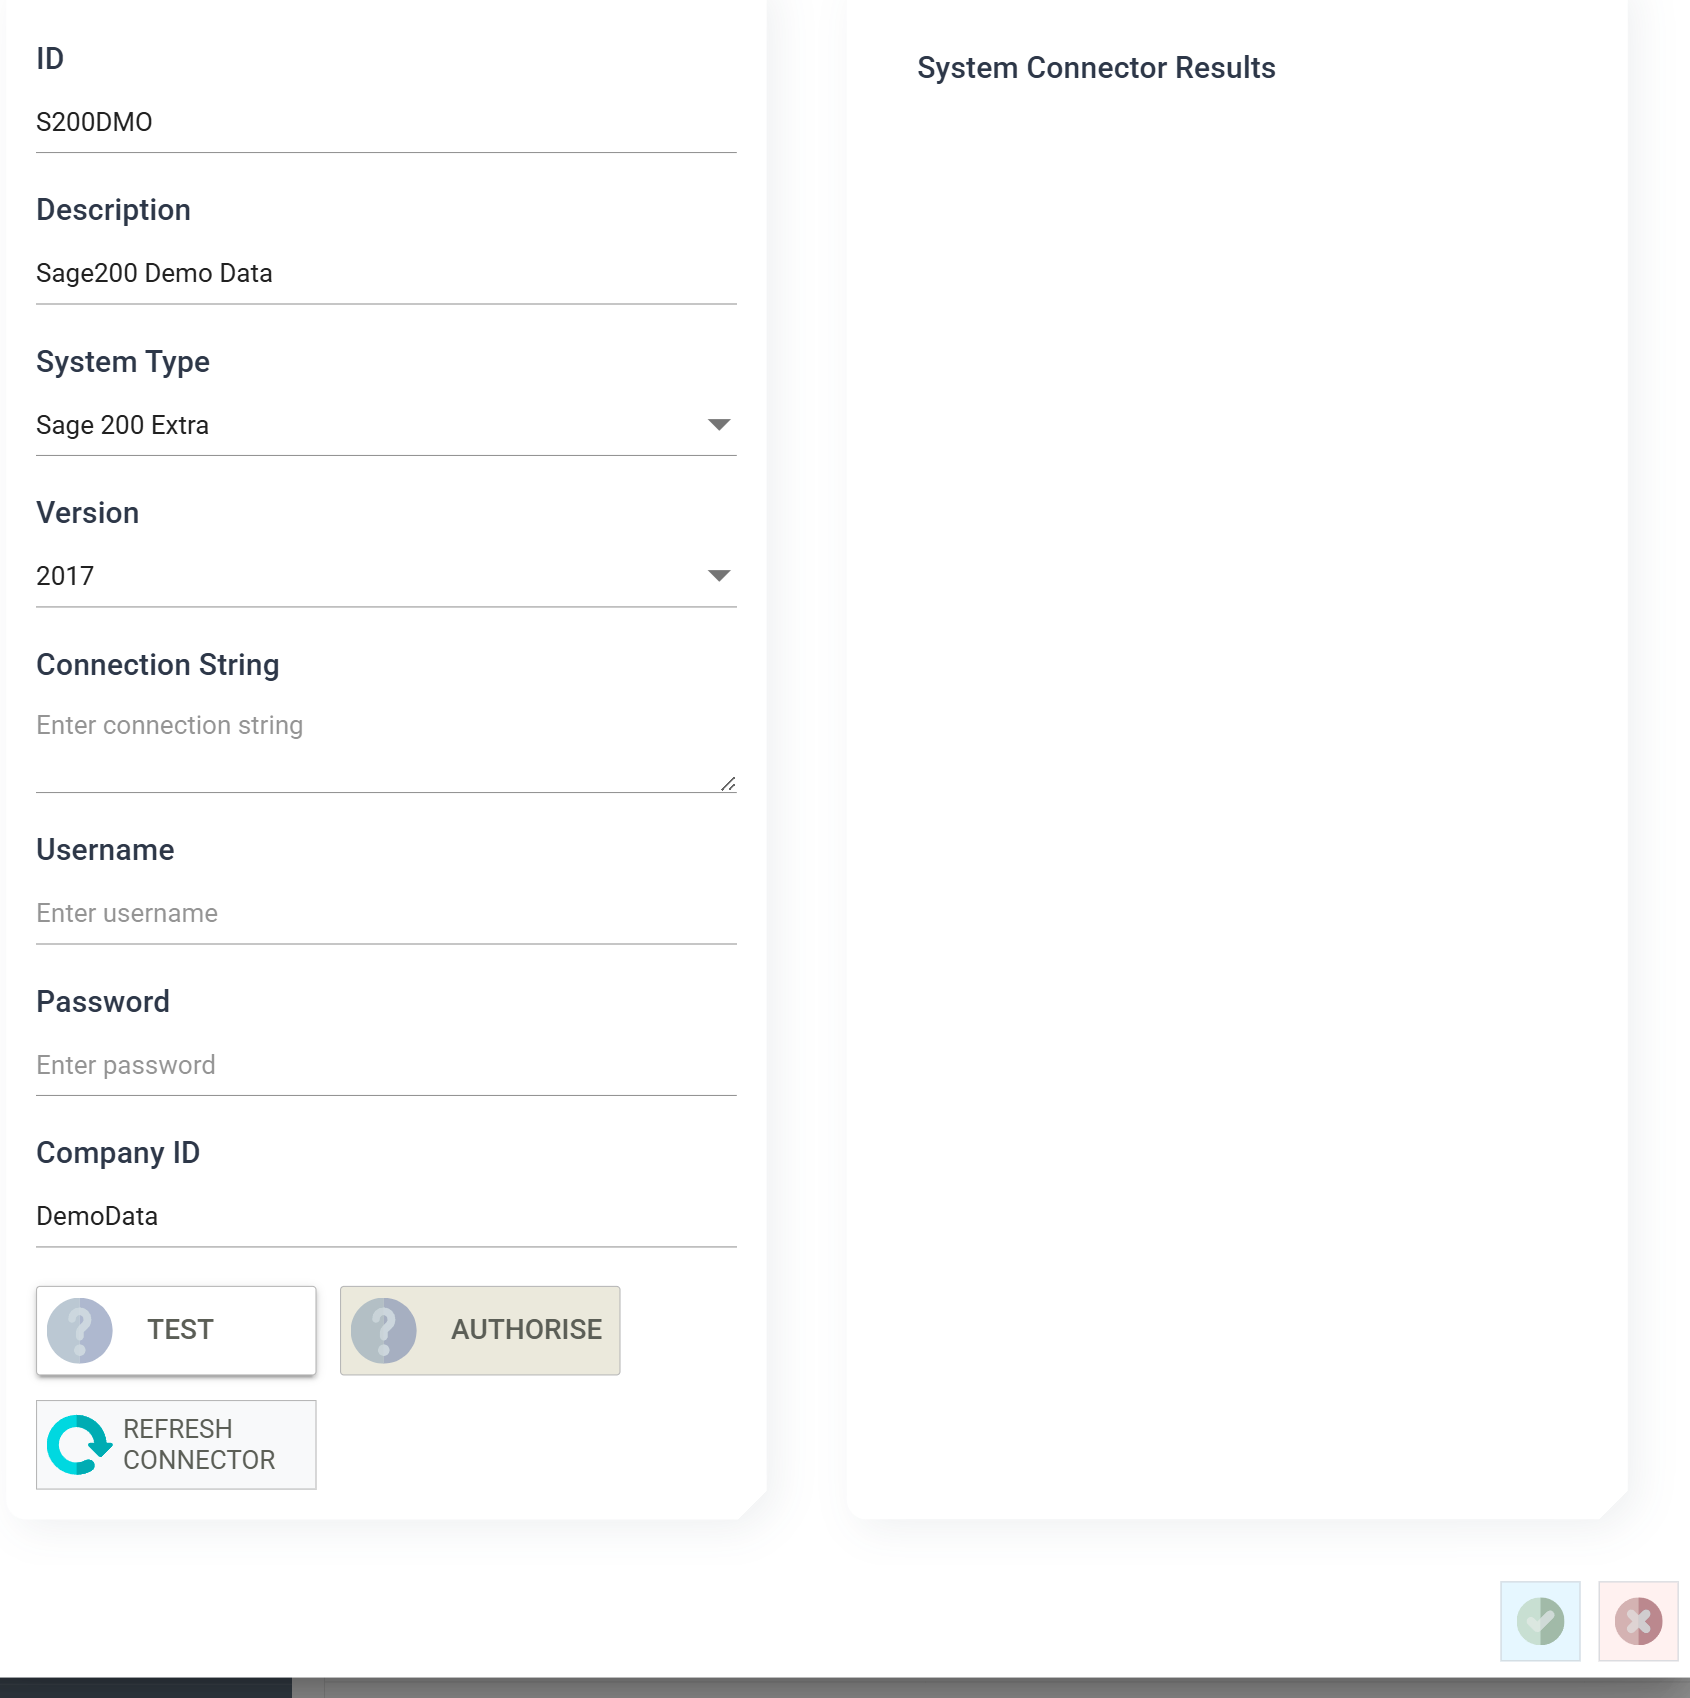
- ID
- Must be populated.
- For training, enter: S200DMO
- Description
- Always enter a recognisable description. The connector transform lists System Connectors by description, not by id, and a vague one is hard to find later.
- For training, enter: Sage200 Demo Data
- System Type
- Must be selected.
- For training, choose: Sage 200 Extra
- Version
- The Sage 200 release the connector talks to. Unlike the Sage 300 connector, the Sage 200 connector supports more than one release. Choose the one that matches the installation.
- For training, choose: 2017
- Connection String
- What goes here depends on the connector. See System Connectors.
- For Sage 200, leave blank.
- Username
- The Sage 200 user IMan signs in as.
- For training, leave blank.
- Password
- The user's password. The field hides it as you type.
- For training, leave blank.
- Company ID
- The Sage 200 company name — not the database id — as it appears when you sign in to Sage 200.
- For training, enter: DemoData
- ID
-
Press TEST.
- A tick on the button, and a second one in the System Connector Results panel, confirms that IMan reached Sage 200 with those details. If the ticks do not appear, fix the details before you go any further.
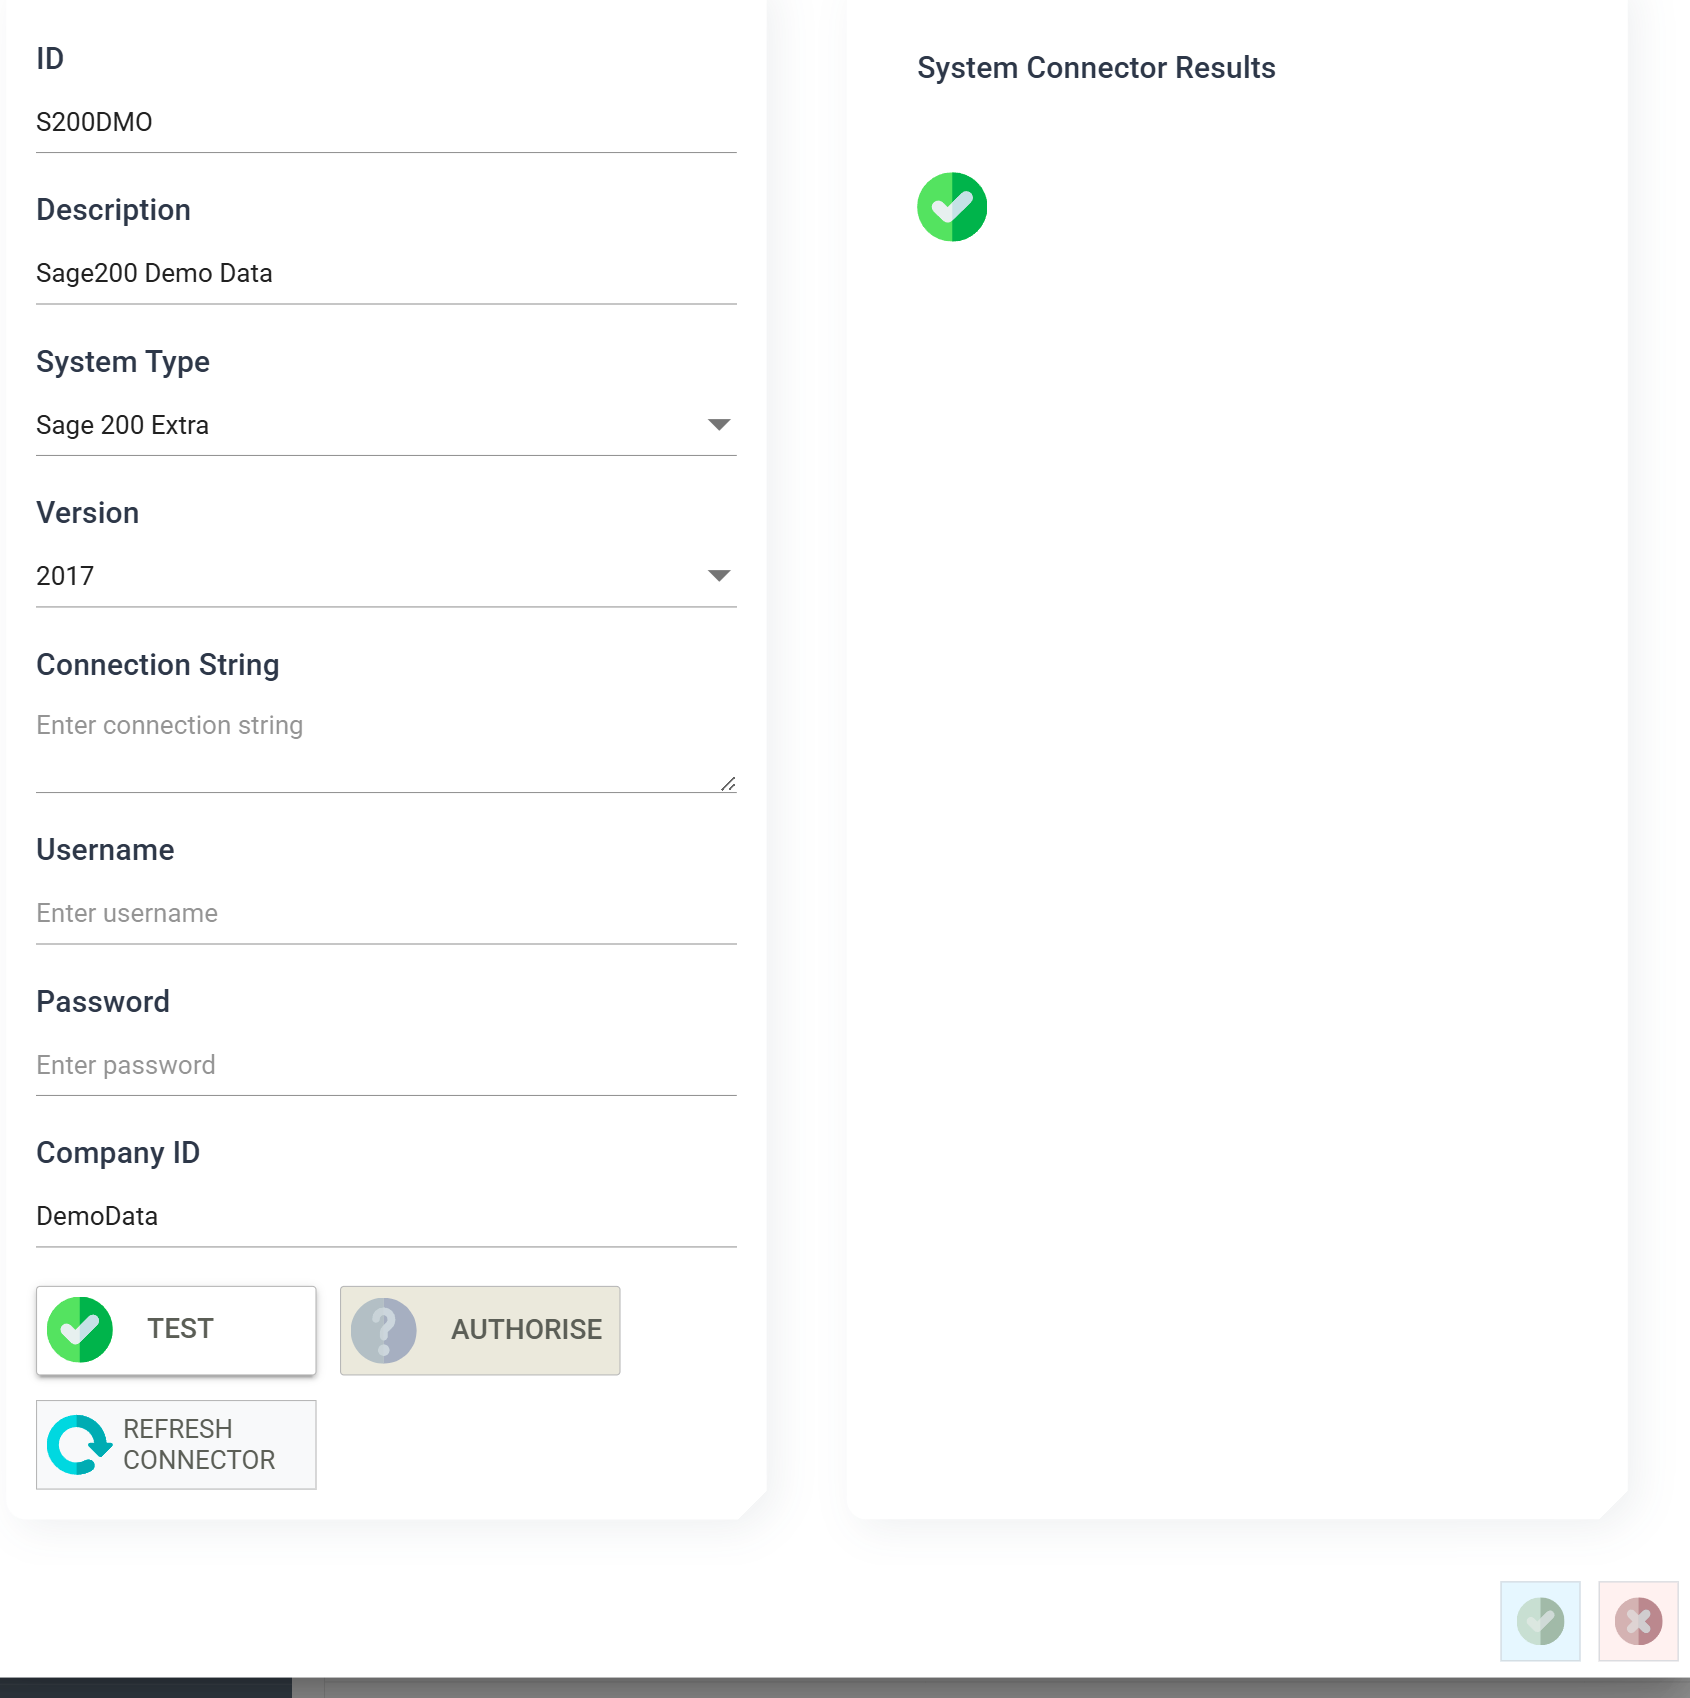
-
Press the green tick at the bottom right to save the record.
Design > Transform Setup
- Return to Design, load the integration, and press the Transform Setup tab.
- Open the Connectors group in the palette and drag a Sage 200 connector onto the design surface.
-
Drag a Connector from the Transforms group and join the Map transform to it.

-
Save the integration. The server does not know about a transform dropped from the palette until you save. If you configure the transform before you save, you lose the work.
Connector > Setup
-
Double click the Sage 200 connector to open it.
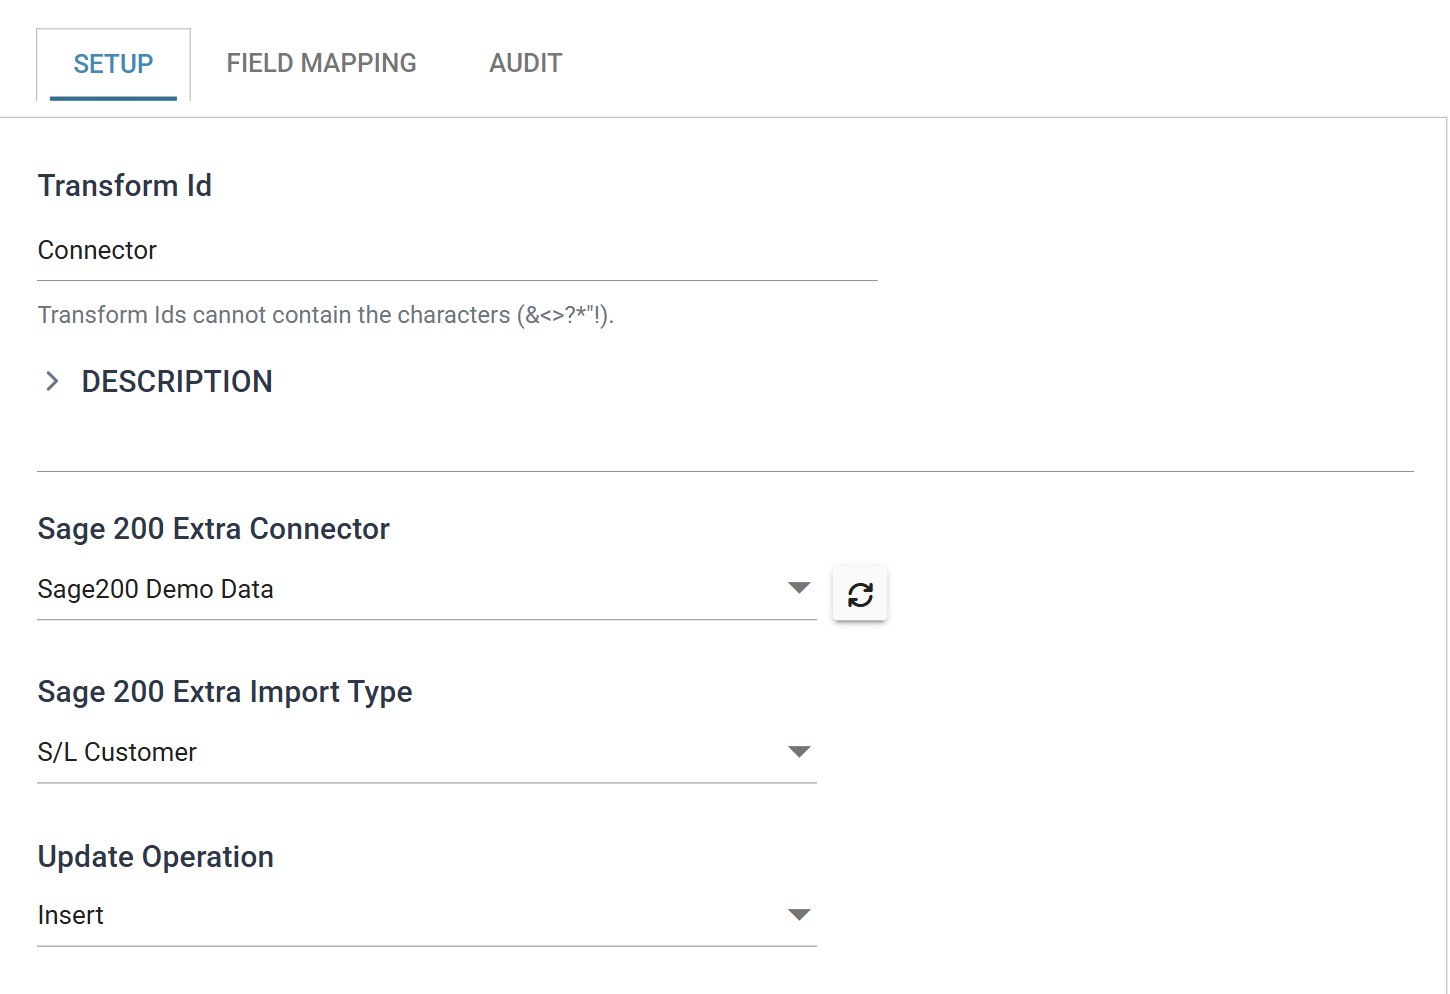
- Transform Id
- Identifies the transform in the audit report. A new connector is
already named
Connector. For training, leave it as it is.
- Identifies the transform in the audit report. A new connector is
already named
- Description
- A collapsed section for free text about the transform. Leave it empty for training.
- Sage 200 Extra Connector
- The System Connector defined above, listed by its description.
- For training, choose: Sage200 Demo Data
- The refresh button beside the list re-reads it. Use it if you have just added a connector in another tab.
- Sage 200 Extra Import Type
- The type of record to import. Sage 200 offers 33 import types, covering the ledgers, stock, SOP, POP, BOM and projects.
- For training, choose: S/L Customer
- Update Operation
- Whether to Insert new records, Update existing ones, or Insert/Update either as required.
- For training, leave as: Insert
- Transform Id
Connector > Field Mapping
- Press the Field Mapping tab.
- Make sure Orders is selected in Current Transaction Id.
-
Choose Customer from Sage 200 Extra Transaction Type.
- Transaction Level Mapping then shows which incoming transaction feeds
which Sage 200 record.
Ordersmaps toCustomer;OrderDetailsstays unmapped, because this step imports customers, not orders.
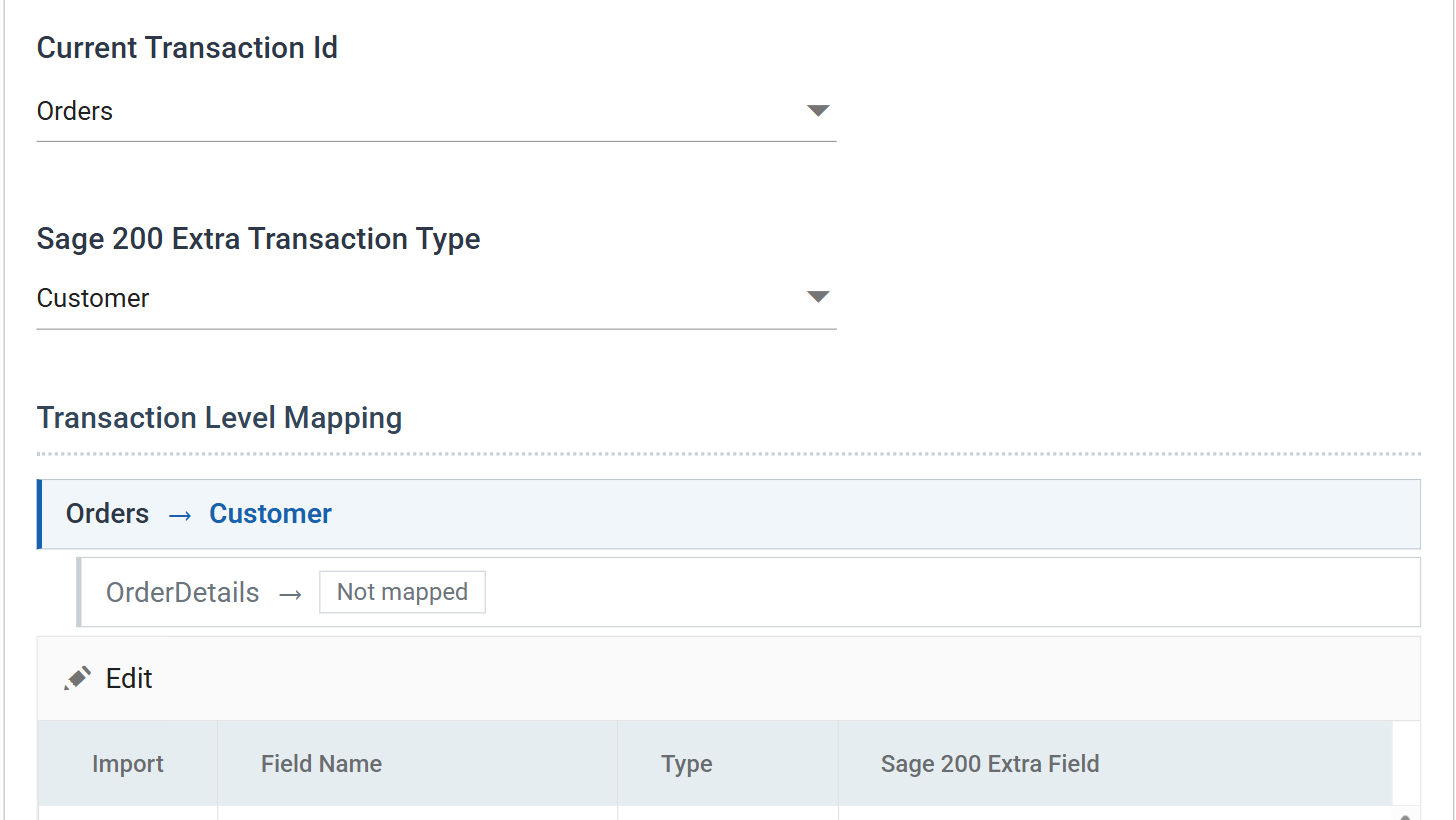
- Transaction Level Mapping then shows which incoming transaction feeds
which Sage 200 record.
-
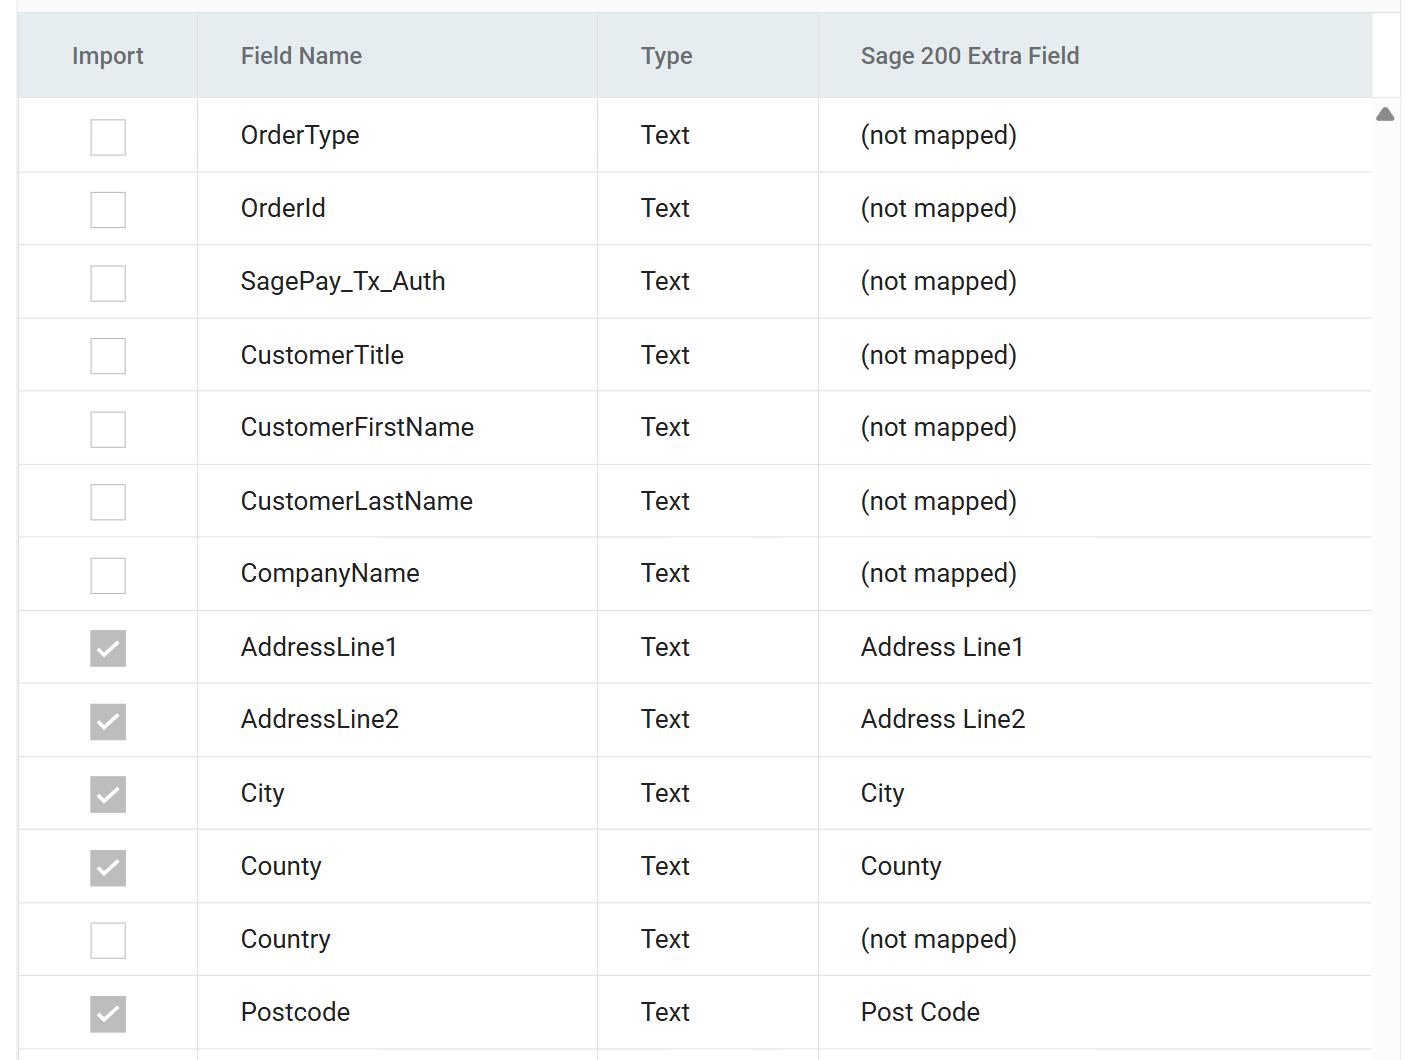
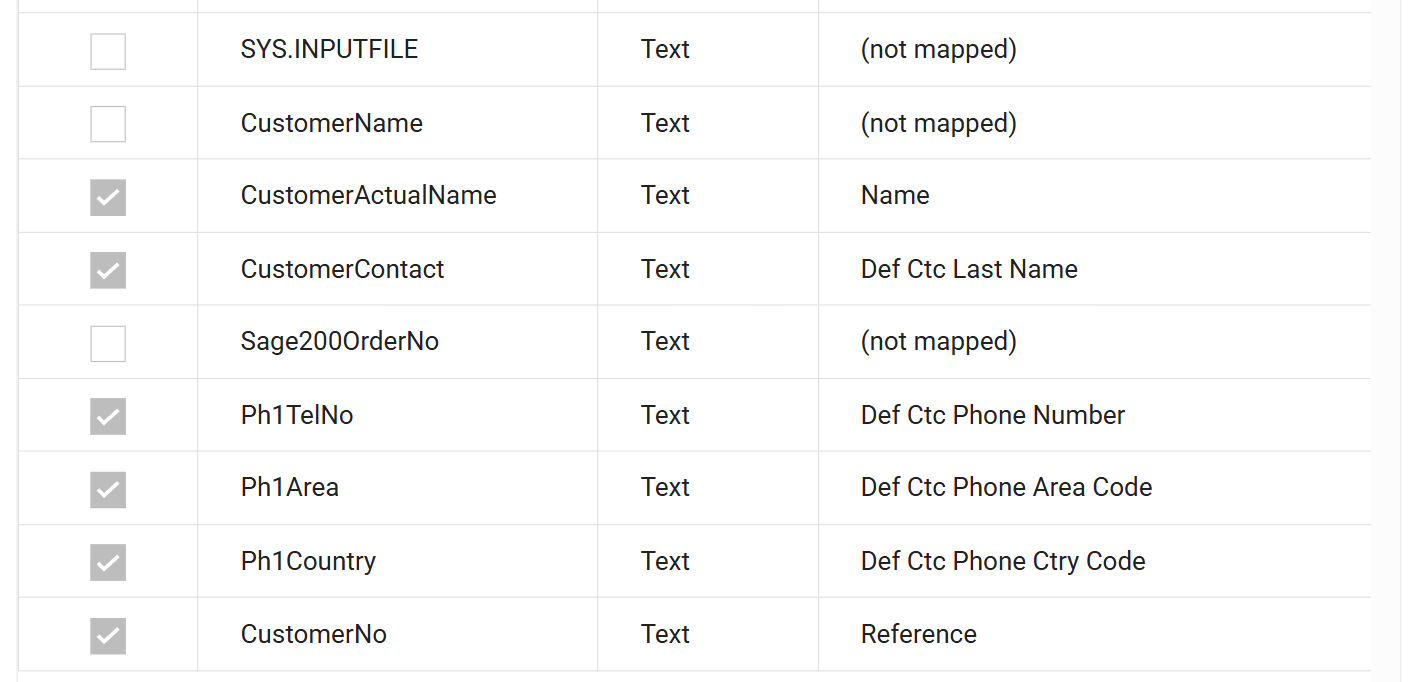
Press Edit above the grid, then set the Sage 200 Extra Field on each of these rows:
Incoming Field Sage 200 Extra Field AddressLine1 Address Line1 AddressLine2 Address Line2 City City County County Postcode Post Code Email Def Ctc Email CustomerActualName Name CustomerContact Def Ctc Last Name Ph1TelNo Def Ctc Phone Number Ph1Area Def Ctc Phone Area Code Ph1Country Def Ctc Phone Ctry Code CustomerNo Reference Address Line1andAddress Line2have no space before the digit, butPost Codehas one. The list has 89 fields and is not in alphabetical order. Read each entry; do not assume its spelling.- Sage 200 stores the country code, the area code and the subscriber number
separately, in the three
Def Ctc Phone …fields. That is why the Map transform splits the telephone number into three parts. - You do not need to tick Import. Choosing a Sage 200 field ticks the row for you.
- The grid is a single scrolling list with no pages. It holds every incoming field, including the seven the Map transform created.
-
Press Save above the grid.
Running the import
-
Press Refresh at the bottom of the pane.
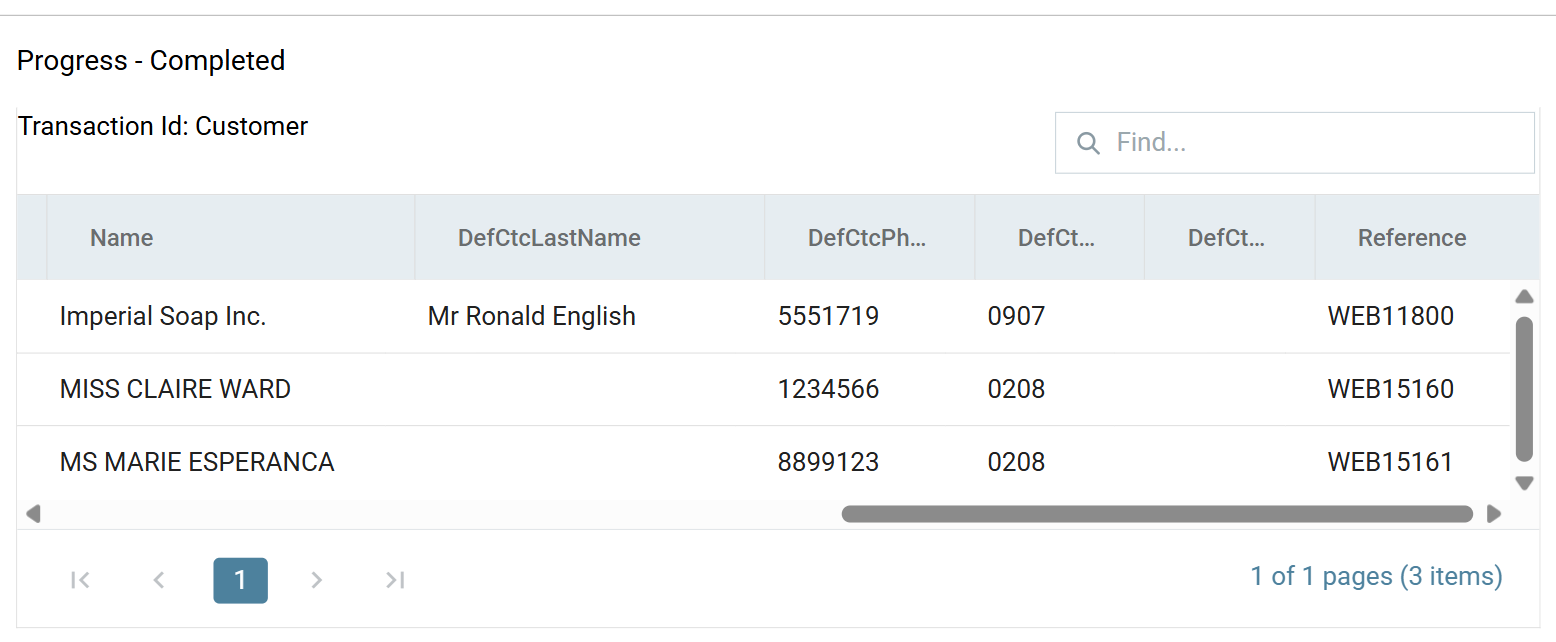
- This run writes to Sage 200, so it takes longer than the previews. When the status reads Progress - Completed, the customers are in Sage 200.
- The preview now shows the values as Sage 200 received them, under Sage
200's field names (
Name,DefCtcLastName,Reference) instead of the names the Map gave them.
Drag a column edge to read a long header
Preview columns are 150px wide and cut a longer header short with an ellipsis. Drag a column edge to read one in full.
Proving the customers were created
-
Re-open the Map transform and press Refresh twice.
CustomerNono longer changes between refreshes. Before the import, the lookup found nothing for two of the three orders, and the counter allocated a new number on every refresh. Now the lookup finds the customer the import created and returns its account number, and IMan does not call the counter.
-
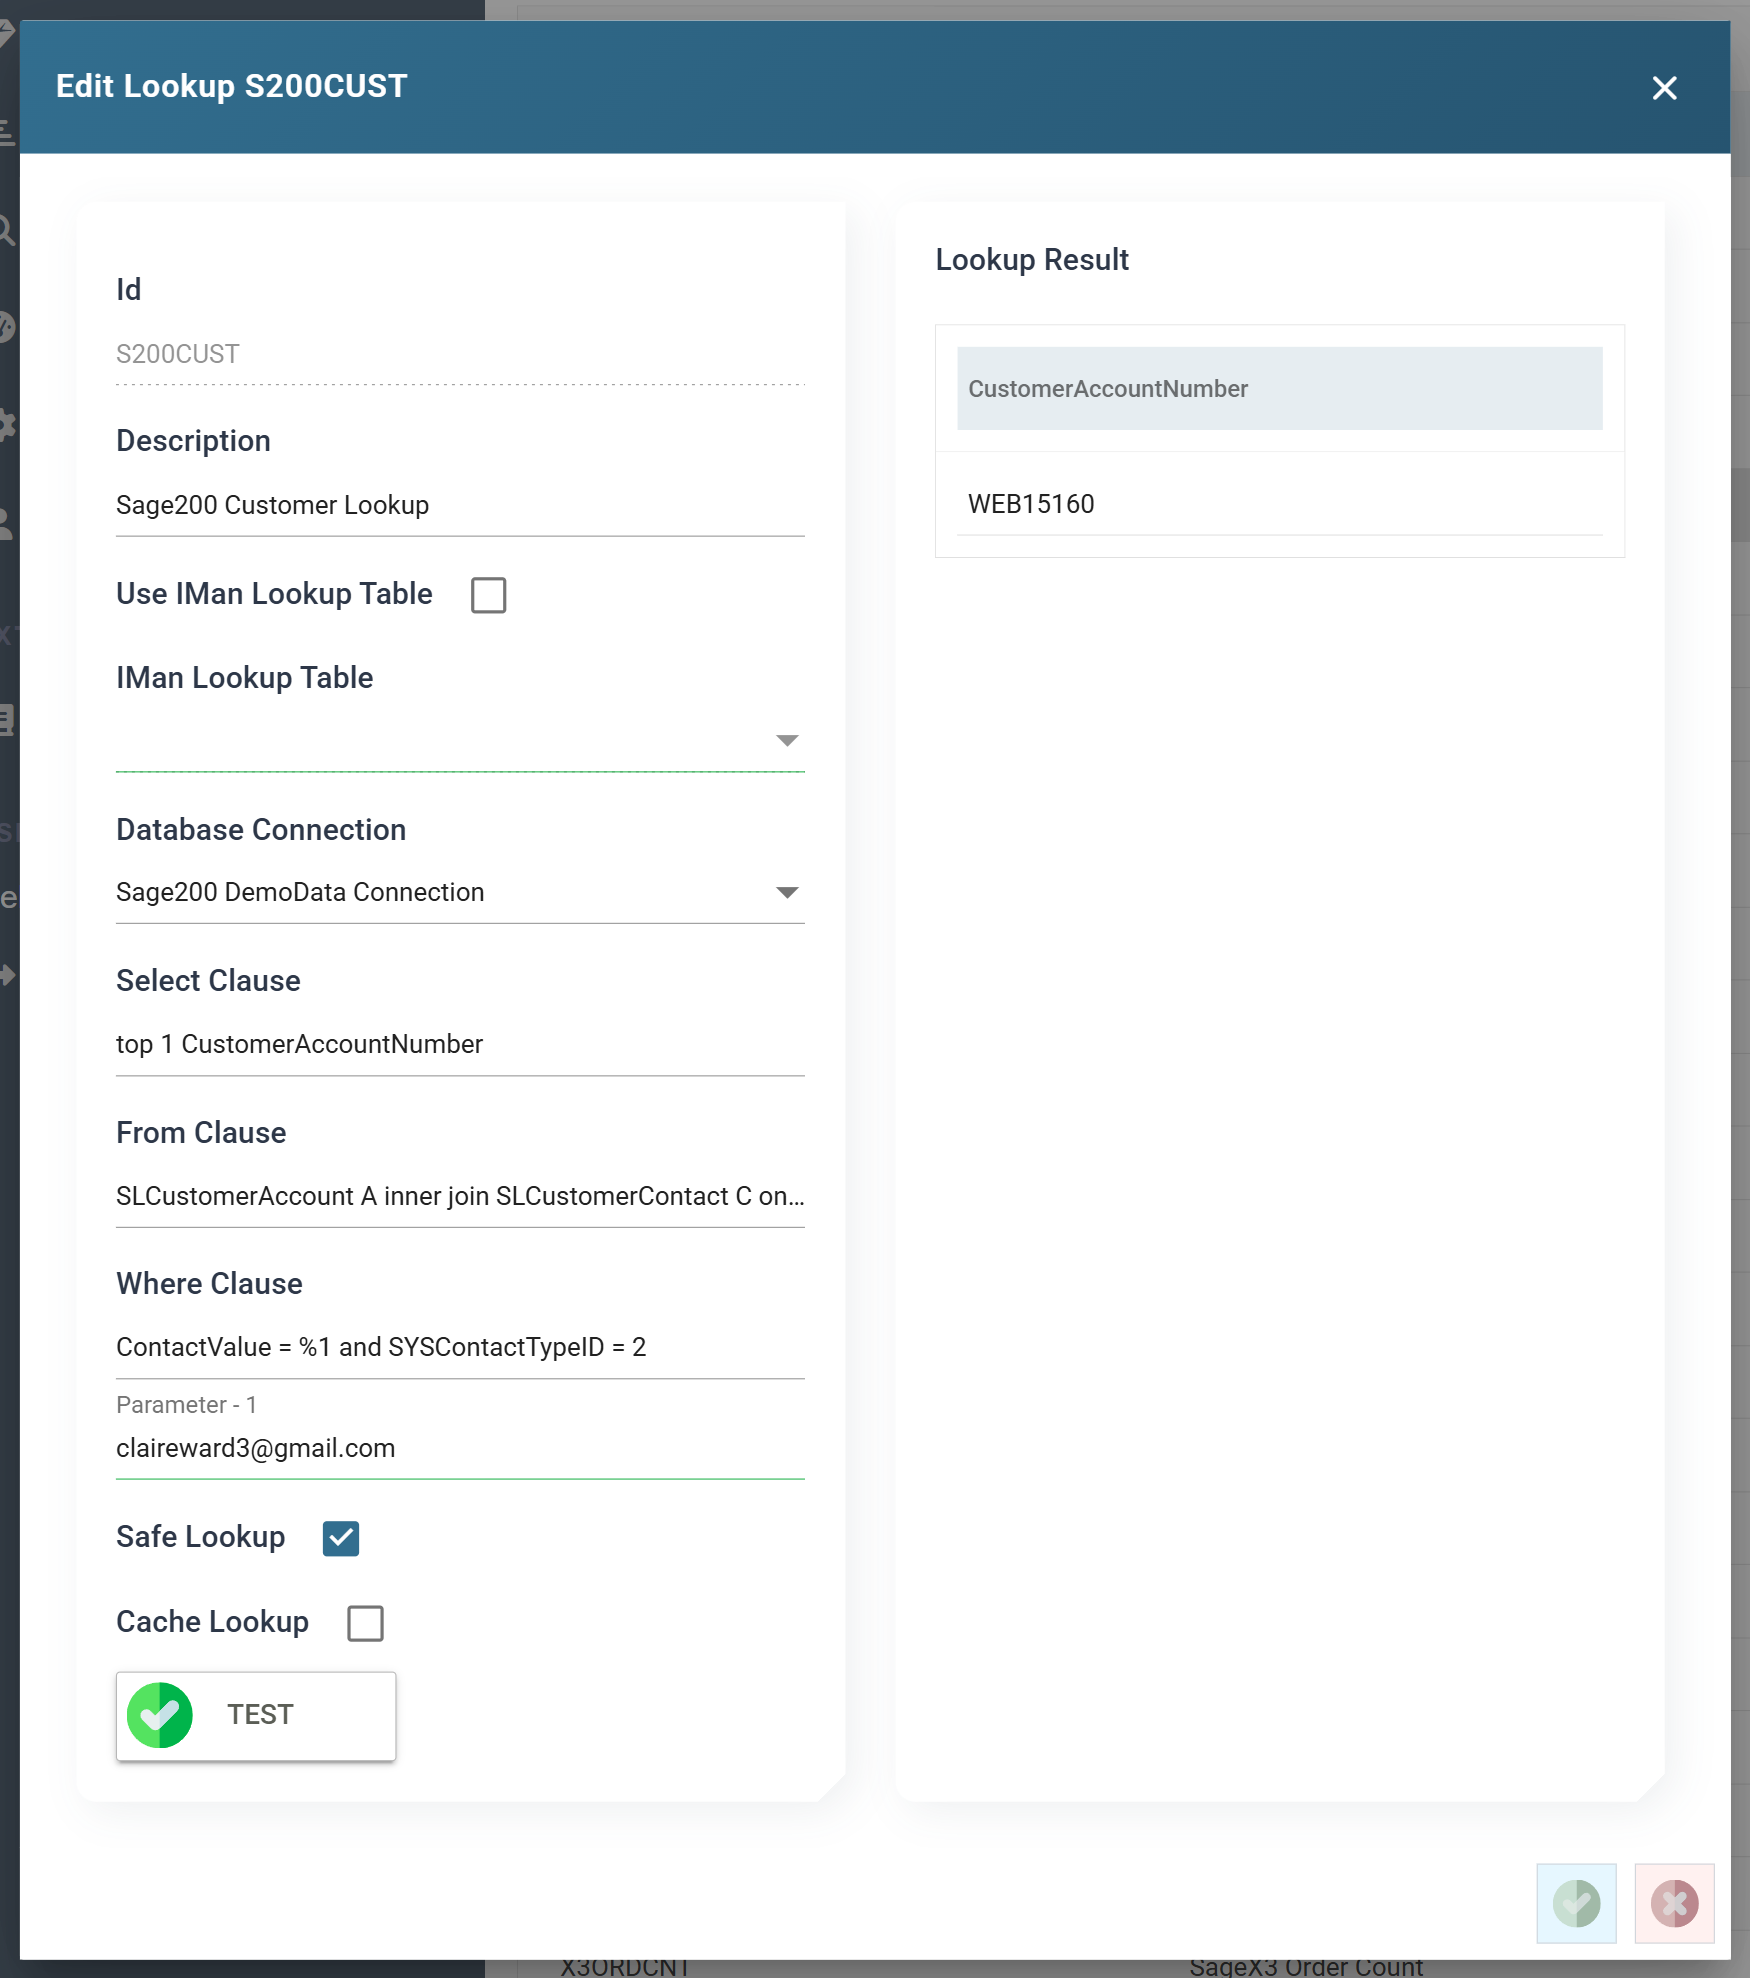
To check this directly, go to Setup > Lookups, select
S200CUSTand press Edit. Enter one of the imported email addresses as the parameter and press TEST.- The lookup returns the customer account number the import allocated. The record exists in Sage 200.
Your generated numbers will not match the screenshots
The generated numbers will not match the ones in these screenshots. The
CUSTNO counter advances on every preview refresh, not only on the runs
that reach Sage 200. By the time you get here, the sequence has moved on.