8 - Auditing
One of the key features of IMan is the ability to tailor and configure the Audit Report which is produced each time an integration runs.
In this step you will learn how to set up and configure these functions. See Audit Report, Auditing, and Log Keys in the IMan User Guide for more details.
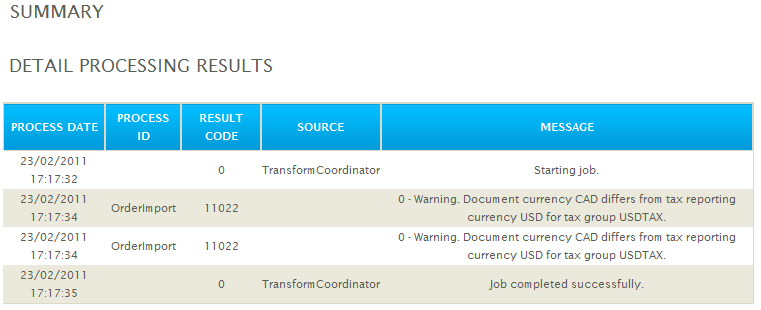
If we save the integration and run it from the scheduler, you will receive an audit report similar to the following. It lists a couple of warnings, but does not let you know the details of customers or orders you imported.
Successful integrations are ones that not only work, but guide users to the offending data when they do not.
Action On Transform Error
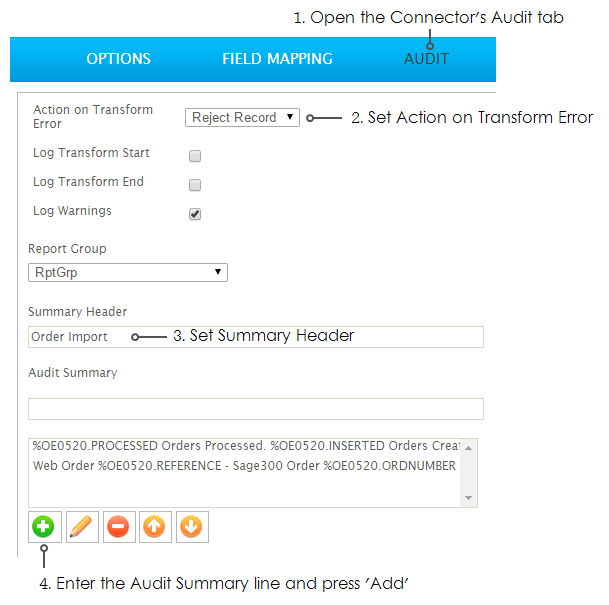
At the very top of the Audit tab is a drop-down which controls error handling.
In most transforms you would leave the Action set to Abort, which means the transform will abort, causing the whole integration to stop processing.
On Connectors you need to think about how you want IMan to handle errors. IMan has three possible settings:
- Abort
- The whole process will stop.
- Reject Record
- This will cause IMan to process the valid transactions but reject erroneous transactions.
- IMan understands the concept of an atomic transaction i.e. an Order, Despatch, Customer or Item, and will not leave half written records, ever! If an Order has an invalid item code the entire order will be rejected, not just the invalid lines.
- If, for example, you were importing I/C Items with associated units of measure and one unit of measure as supplier, the import would reject the entire item not leave a half written item.
- Continue
- Deprecated. DO NOT USE.
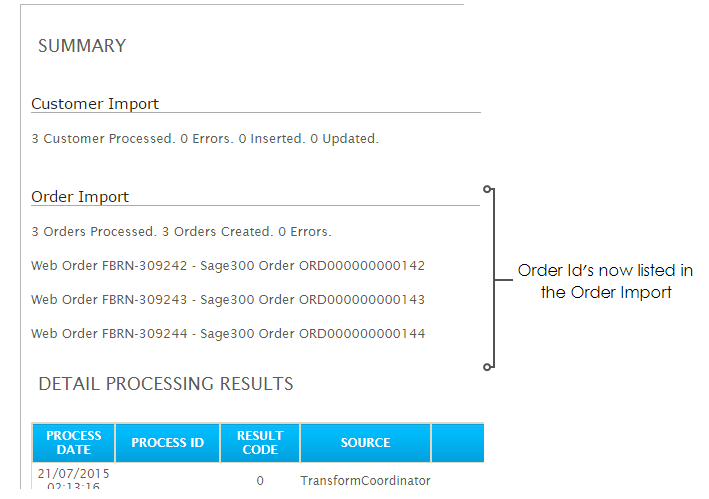
Add Customer Import Summary
In this step we will add a summary to show the number of customers that were imported and the number of errors.
- Go back to the designer and open the Sage300 connector for the Customer import.
- Click on the Audit Tab and enter the following:
- Summary Header
- Customer Import
- In the Audit Summary (should be entered as a single line):
- %AR0024.PROCESSED Customer Processed. %AR0024.ERRORS Errors. %AR0024.INSERTED Inserted. %AR0024.UPDATED Updated.

- Save and re-run the scheduler and you will now see in the summary some count information regarding the Customer Import.

Add Order Import Summary
In this step we will:
- Add a summary for the number of orders processed, orders created and errors.
- Create a list to show the incoming order Id against the Sage300 order Id.
Connector > Audit
- Go back to the designer and open the Sage300 connector for the Order import and click on the Audit tab:
- Action On Transform Error
- Set to Reject Record.
In our integration, the Order Import will be set to Reject Record whereas the Customer import was left to Abort. The effect as follows:
- Order Import - Reject Record
If the Action on Transform Error is set to Abort on the Order Import, the process will stop at that point, leaving the Orders in Sage that were successfully processed up to the point of the error. The successfully processed orders would probably need deleting prior re-running the import, otherwise duplicates could occur. By setting to Reject Record, any erroneous Orders will be rejected, but processing will continue and complete. Erroneous orders will need remedial action.
- Customer Import - Abort
If there is an error during the Customer import stage, the entire integration will stop.
The Customer import can be run multiple times without their being a risk of duplicated data.
The Customer import will insert ONLY new records and update existing ones.
It is worth noting that there are more advanced scenarios than described in this training, involving filters and lookups to prevent duplicates.
- In the Summary Header enter:
- Order Import
- In the Audit Summary:
- %OE0520.PROCESSED Orders Processed. %OE0520.INSERTED Orders Created. %OE0520.ERRORS Errors.
- Add a second audit summary which will list the orders processed and the corresponding Sage300 order number.
- Web Order %OE0520.REFERENCE - Sage300 Order %OE0520.ORDNUMBER
Connector > Field Mapping
We will also set the log key fields to help identify the Order transaction (and details) in the detail audit log whenever there is a warning or error.
- Click on the Field Mapping tab and press the Edit button for the Order transaction type.
- Change Log Key value to '1' for the 'OrderId' field.
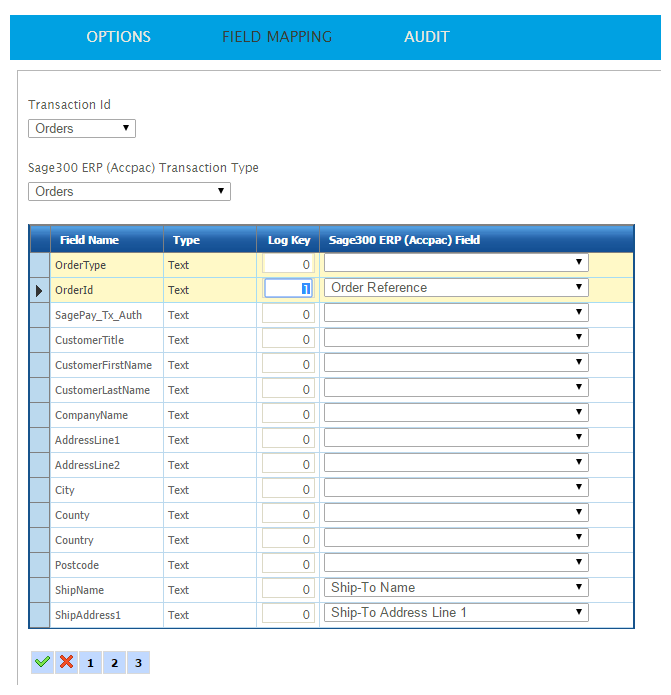
- Save by pressing the Green Tick.
- Select the 'OrderDetail' transaction Id and press Edit:
- OrderId
- Set LogKey to'1'
- SkuCode
- Set LogKey to '2'
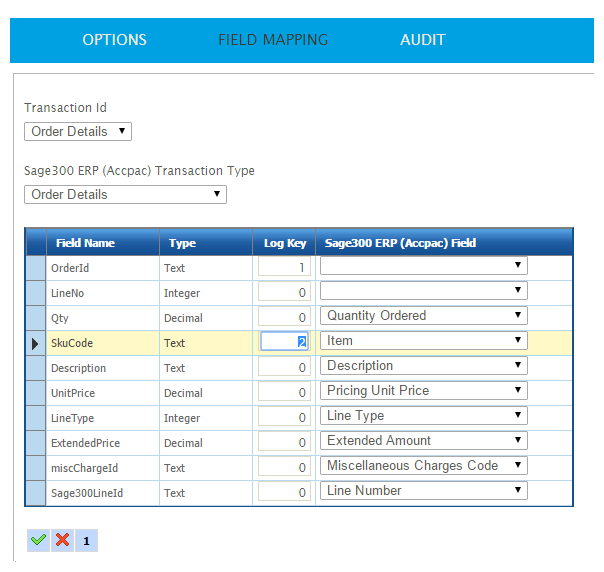
- Save, and go to the Scheduling tab and run the integration (see Scheduling and Running Integrations for instructions).
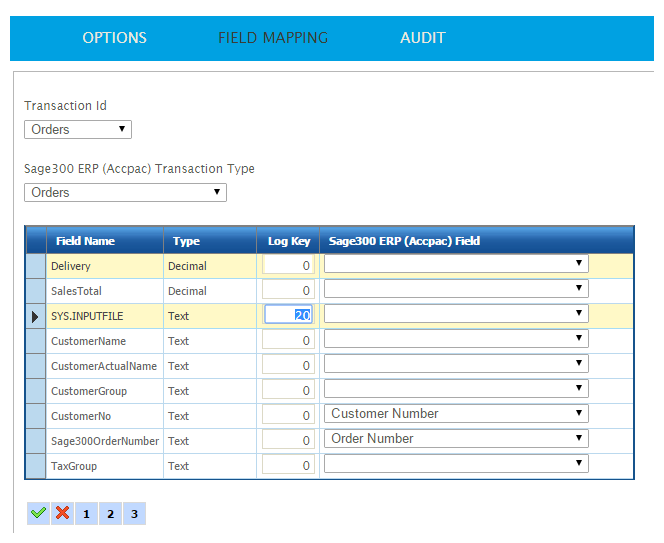
Using the Log Key for Unmapped Fields
In the previous section, it was noted that fields which are not mapped in the connector do not flow out the other side of the connector.
An unmapped field can be made to flow out the other side by setting the logkey to a non-zero value.
If the logkey value of the field is set incrementally starting from 1 it will become part of the value which is written to the source column on the event of an error or warning.
To make a field ‘flow’ but not set have it be part of the Source column set the value to a non-linear value. I.e. Set the value to 20 and increment for every field thereafter.