Step 4 – Map Transform
The Map transform can:
- Apply expressions or formulas to fields, which may be static values or formulas to each of the fields.
- IMan uses a derivation of the VBScript/VBA language for formulas. Please see IMan (VB)Script Language Reference in the IMan User Guide for a more in-depth discussion.
- Add fields to each of the transaction types.
The Map transform cannot:
- Delete fields
In this step we will use the map transform to:
- Create functions to derive the customer name and customer contact fields.
- Lookup the customer number for existing records or generate a one for new records.
Add a Map Transform
![]()
- Drag a Map transform onto the palette.
- Drag a connector onto the palette and connect it to the previous hierarchy transform.
- Double click the Map transform to open its setup.
- Enter a friendly name (e.g. Map) into the Transform Id and press the Apply button to save.
Transform > Field Mapping
In this step, we will create fields to capture some customer details. We will do this using some simple formulas and some more complex to demonstrate what the Map transform is capable of.
- Click on the Field Mapping tab.
- Ensure ‘Orders’ is selected from the ‘Current Transaction’ drop down.
- Double click the top row of the table to create a new field.
![]()
![]()
- Enter the following:
- New Field Name
- CustomerName
- Enable Script Evaluation
- Checked
- Formula
- %CustomerTitle & " " & %CustomerFirstName & " " & %CustomerLastName
- Press green tick below the form to save the field.
- Repeat steps 3 and 4 to create the following fields:
- Field Name
- CustomerActualName
- Enable Script Evaluation
- Checked
- Formula
- IIf(%CompanyName <> "", %CompanyName, %CustomerName)
- Field Name
- CustomerContact
- Enable Script Evaluation
- Checked
- Formula
- IIf(%CompanyName <> "", %CustomerName, "")
- Field Name
- CustomerGrp
- Enable Script Evaluation
- Unchecked
- Formula
- WHL
- Press 'Refresh' to view the results.
![]()
- Press the Apply button and close the Map transform setup window.
- Save the integration by pressing the Save button at the bottom right of the Design Palette on the Transform Setup tab or the bottom right on the Options tab.
![]()
Lookup Setup
Lookups are a key feature of IMan
Example
Problems:
- The input data file does not have the customer Id, so we would like to check the customer table using the email address supplied to see if the customer record exists.
- Sage300 does not have any facility to auto generate new customer Ids.
Solutions:
- Use the IMan lookup function for checking.
- Use the IMan counter function to assist in generating new sequential Ids.
Setup > Lookups
- Save the integration and click on the Setup tab at the top of the main screen.
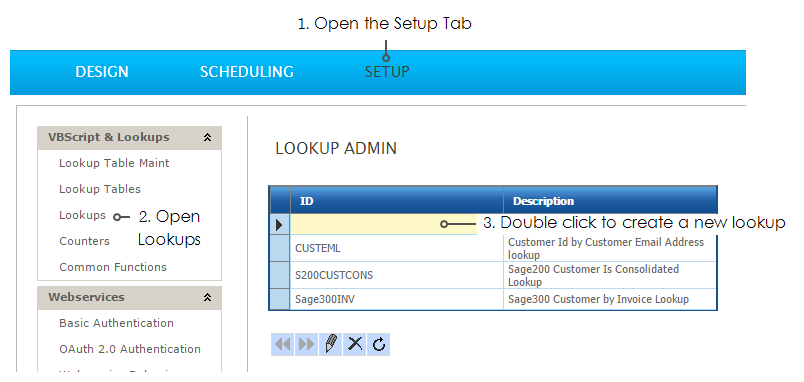
- Click on Lookups item in the left hand menu and double click the top row to create a new record.
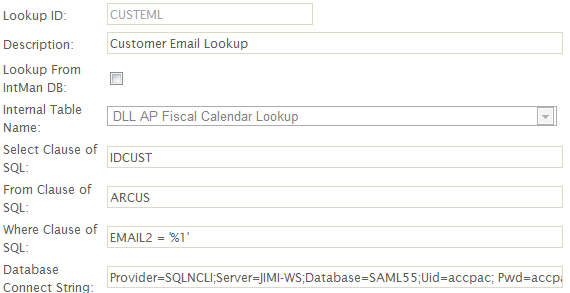
- Lookup Id
- Used to identify the lookup.
- For training, enter: CUSTEML
- Description
- A recognisable name.
- Lookup From IntMan DB
- IMan provides an internal lookup table facility which can store 20 fields per lookup.
- For training: Deselect. We are querying the Sage300 database.
- Select Clause
- Enter one or more fields to return from the query.
- For training, enter: IDCUST
- From Clause
- The ‘From’ clause of the SQL query. This may be a single table or a complex join involving many tables.
- For training, enter: ARCUS
- Where Clause
- The ‘Where’ clause of the SQL query.
- To parameterise the query enter %1, %2, %3, for each of the parameters. The parameter values will then be passed in when we call the lookup query.
- For training, enter: EMAIL2 = '%1'
- Connection String
- Enter the database connection string. The connection string must be either OleDb or ODBC; DotNet Native connection strings are not supported.
- Use www.connectionstrings.com to help create all connection strings.
- For training, enter:
- Provider=SQLNCLI10; Server=<computer>; Database=<DBID>; Uid=<user>; Pwd=<password>
| Where: | |
|---|---|
| <computer> | Replace with your SQLServer\Instance; this assumes Sage300 is using a SQLServer database. |
| <DBID> | Replace with the ID of the Sage300 database. |
| <user> | Replace with the SQL User with sufficient rights to query the database. |
| <password> | The password for the SQL User. |
- Save the lookup by pressing the Green tick.
Counter Setup
Counters allow you to generate a sequential number, or sequence, which is persisted by calls.
Counter Setup allows you to format the generated sequence by length, prefix, suffix and length.
Setup > Counters
- Click on the Counters item on the left hand menu and double click the top row to create a new Counter:
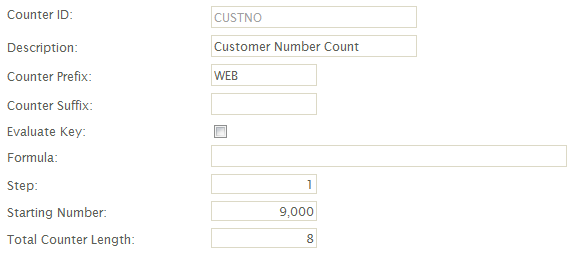
- Counter Id
- Used to identify the Counter.
- For training, enter: CUSTNO
- Description
- A friendly name.
- Counter Prefix
- A static prefix incorporated into the returned value.
- For training, enter: WEB
- Counter Suffix
- A static suffix incorporated into the returned value.
- For training: Leave blank
- Evaluate Key
- A single counter has facility to maintain one or multiple sequences.
- When the evaluated key is selected, the formula field is evaluated to obtain reference to a counter detail record. The counter detail sequence is identified using the result of the formula field.
- If a record is found, the counter formula obtains the next number, otherwise a new detail record is created and the return value is set to the counter’s starting value.
- For training: Unchecked
- Step
- How much to increment for each call to the counter.
- For training, enter: 1
- Starting Number
- The starting number of the counter (or internal sequence).
- For training, enter: 9000
- Total Length
- The total length of the counter.
- For training, enter: 8
- Save the counter by pressing the Green tick.
Map > Field Mapping
In this step we will apply formulas / functions to the dataset.
The lookup function takes four parameters:
- Lookup Id ("CUSTEML")
- This is the ID of the Lookup defined in the Setup.
- Return Field ("IDCUST")
- This is the field you wish to return from the Lookup.
- Parameters (%Email)
- These are the values you wish to parameterise the Lookup’s where clause.
Example
'%Email' corresponds to '%1'.
- Must Return (False)
A true/false value indicating whether a matching result must be returned.
- Reload the integration by selecting it from the Job Id drop down and pressing the Edit button.

- Re-open the Map transform by clicking the Transform Setup tab & then double clicking the Map transform.
- Click the Field Mapping tab and double click the top row to create a new field with the following details:
- Field Name
- CustomerNo
- Enable Script Evaluation
- Checked
- Formula
- Lookup("CUSTEML", "IDCUST", %Email, False)
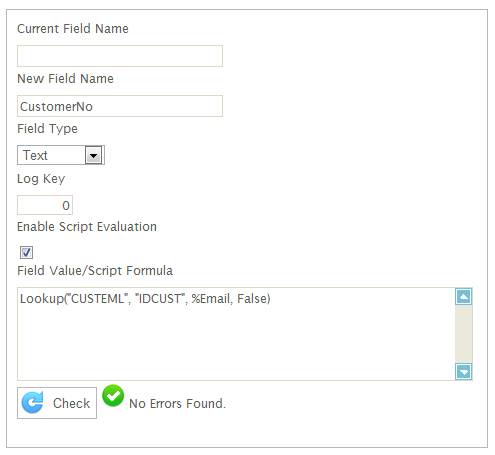
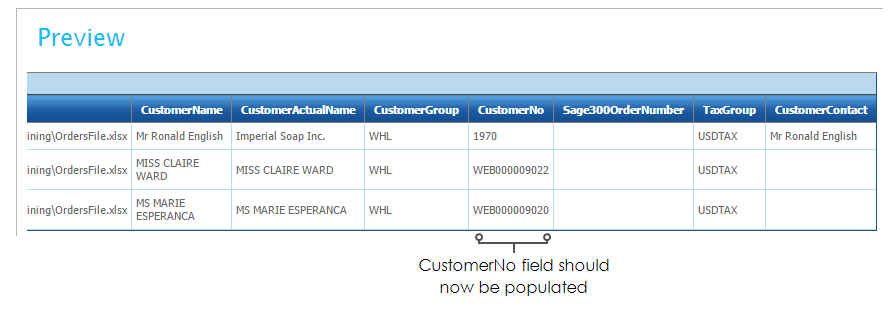
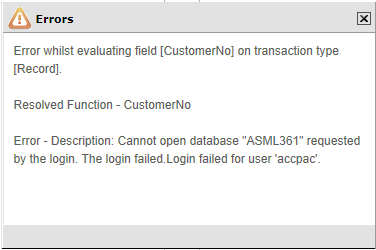
- Save the field and press refresh. If correct the first customer will have a reference.
- If there’s an error with the lookup (e.g. an invalid field, SQL statement or database connection string) an error box will appear:
- We will now edit the existing formula by generating a new sequence from the Counter when there are no matching records returned from the lookup.
- To generate a new sequence call GetCounterSequence and pass the user defined Id of the counter to the function:
- Re-open the CustomerNo field
- Edit the formula to:
- Dim Result
Result = Lookup("CUSTEML", "IDCUST", %Email, False)
If Result = "" Then
Result = GetCounterSequence("CUSTNO")
End If
Result
- Press refresh and the 'CustomerNo' column should look like the following: