WebAPI Integration Setup & How-to
This page describes the steps for creating/designing an integration to work with the WebAPI module.
Recommended Reading
Before creating a WebAPI module the following two articles are recommended reading.
- Anatomy of an http Request & response
- User Property & Request Relationship
- WebAPI Sample Integrations
Endpoint Setup & Integration Design
The basic steps for creating an integration with WebAPI are described below.
Read further for a detailed step-by-step guide.
- Endpoint Setup
- The endpoint must first be defined and with any desired security. The endpoint and user based security are maintained through the WebAPI Setupscreens.
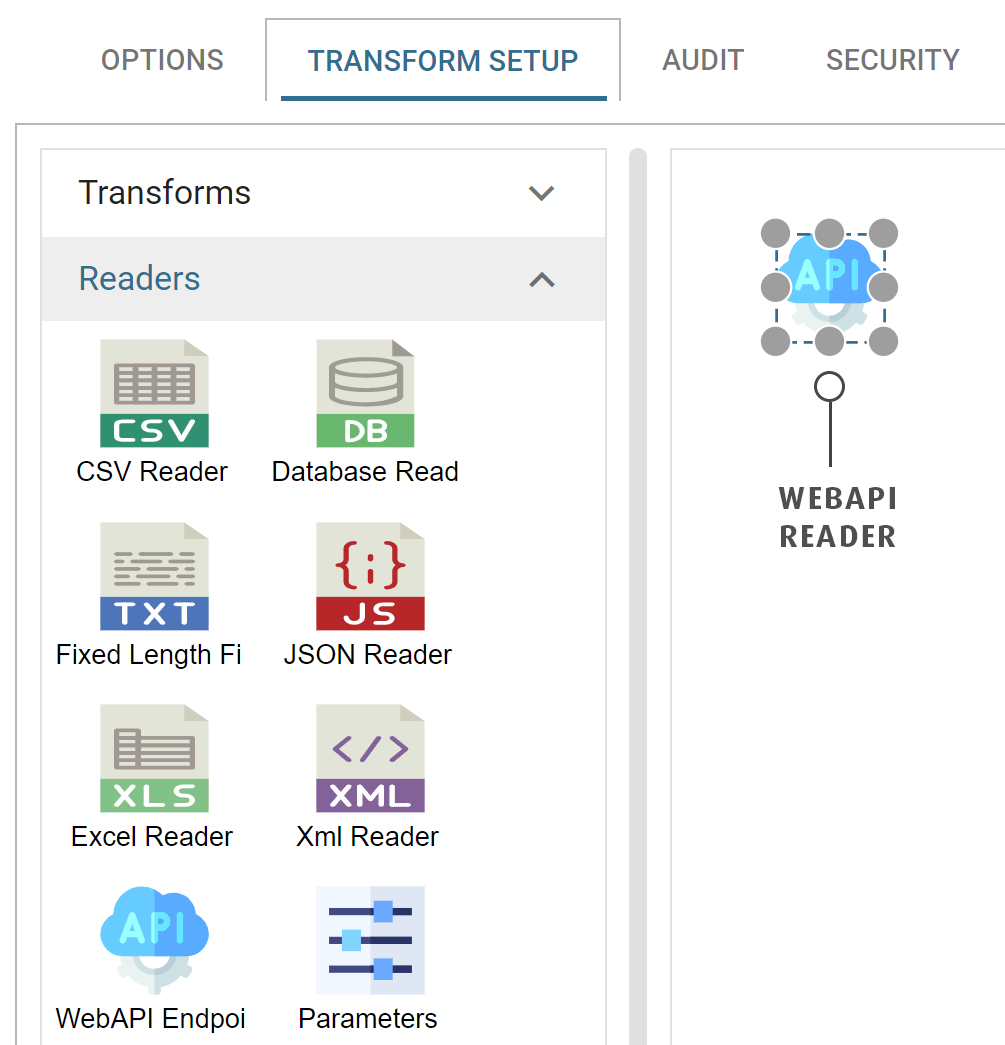
- Add Web API Reader
- The WebAPI Reader provides the entry point for any integration.
- Processing the request
- Irrespective of whether a request is to query an existing resource or creating a new resource/updating an existing one, a Reader will take the request and do something with it.
- Standard Transform Logic
- Use standard transform logic to complete the desired action.
- Sending the Response
- Write the response back to the client with a writer.
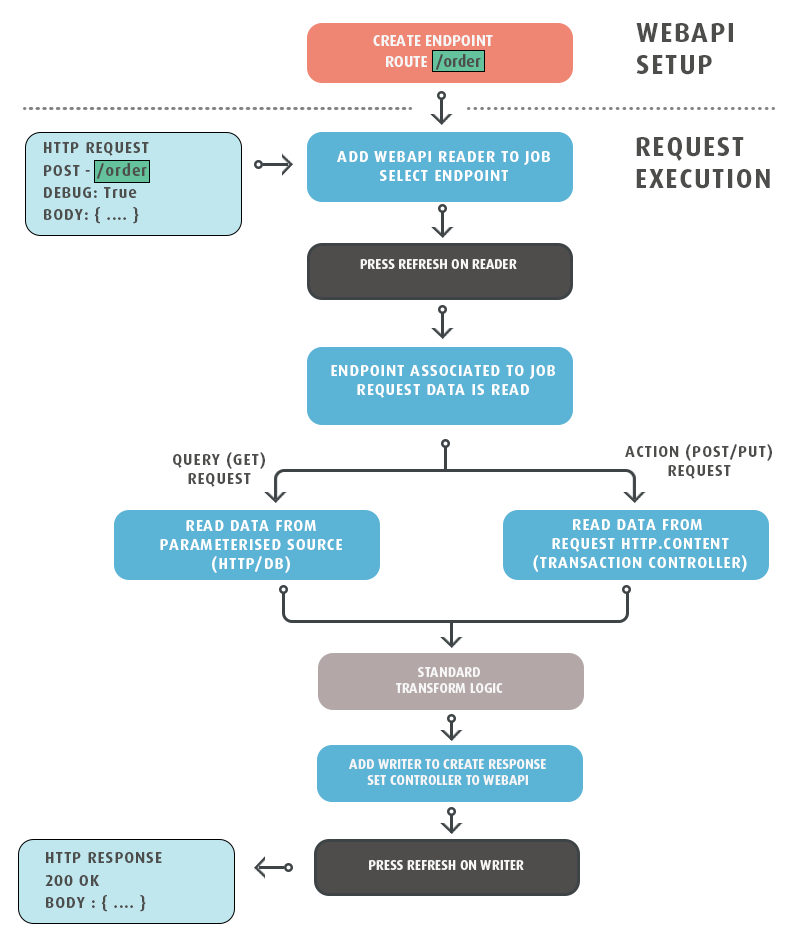
This translates to a standard, linear integration.
Postman (or other rest client)
To interact/test an API you will need a REST client to send requests (and ultimately receive responses).
The most well-known client (not necessarily the best) is Postman, but there are other similar solutions available.
This guide uses screenshots from Postman and Postman can be downloaded from their site.
Endpoint Setup
- Create an WebAPI Endpoint.
On the initial setup, we recommend the endpoint is unsecured by allowing Anonymous requests. - In Postman (or whichever client you use) setup a request to the endpoint (as defined by the route).
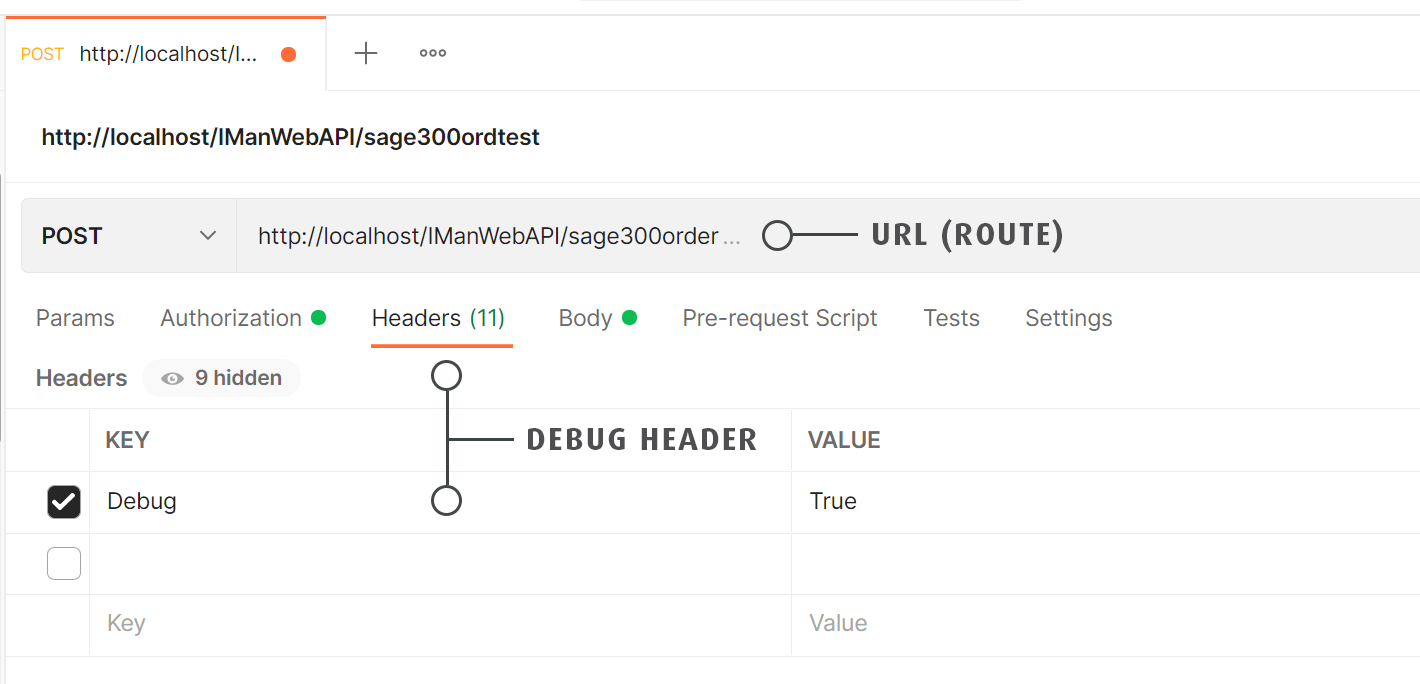
what is the url?
The URL to send any request is comprised of three parts:
- Scheme & Server - If you are testing/designing on the local PC, this will typically be http://localhost. If IMan is located on another server localhost will need to be changed to the server name, DNS name or IP.
- WebAPI Application Path - The WebAPI Application Path is the segment directly after the server and is set when IMan is installed. By default this is IManWebAPI.
- Remaining Route/Path - Defined by the route on the endpoint.
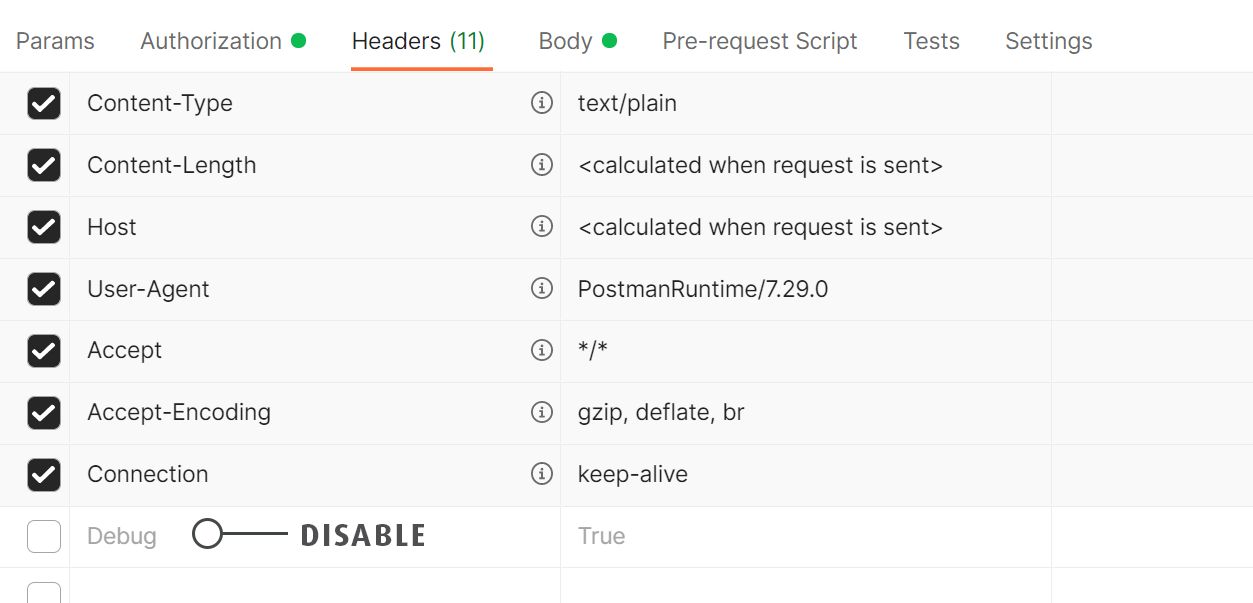
Debug Header
To allow the request to be piped to the preview screen set a header with the name ‘Debug’ and the value to ‘True’.
Authorization Header for Basic Authorization
If authentication for the endpoint has been enabled, both the X-User-Token and the Authorization header along with the username/password will need to be passed with the request otherwise a 401 error will occur.
- Send the request. You should at this point receive an (expected) 500 error indicating the endpoint is not associated with an integration.
Changes to the Endpoints are immediate, therefore a request can be made after adding the endpoint.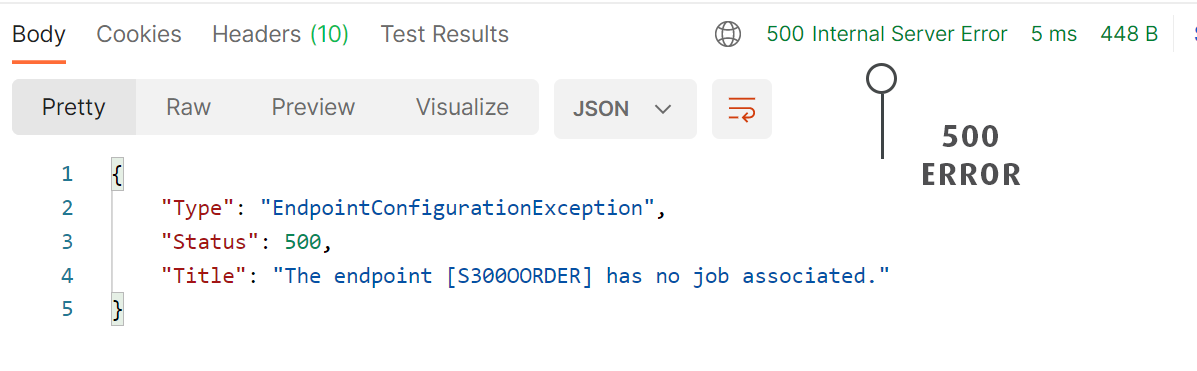
Integration Design
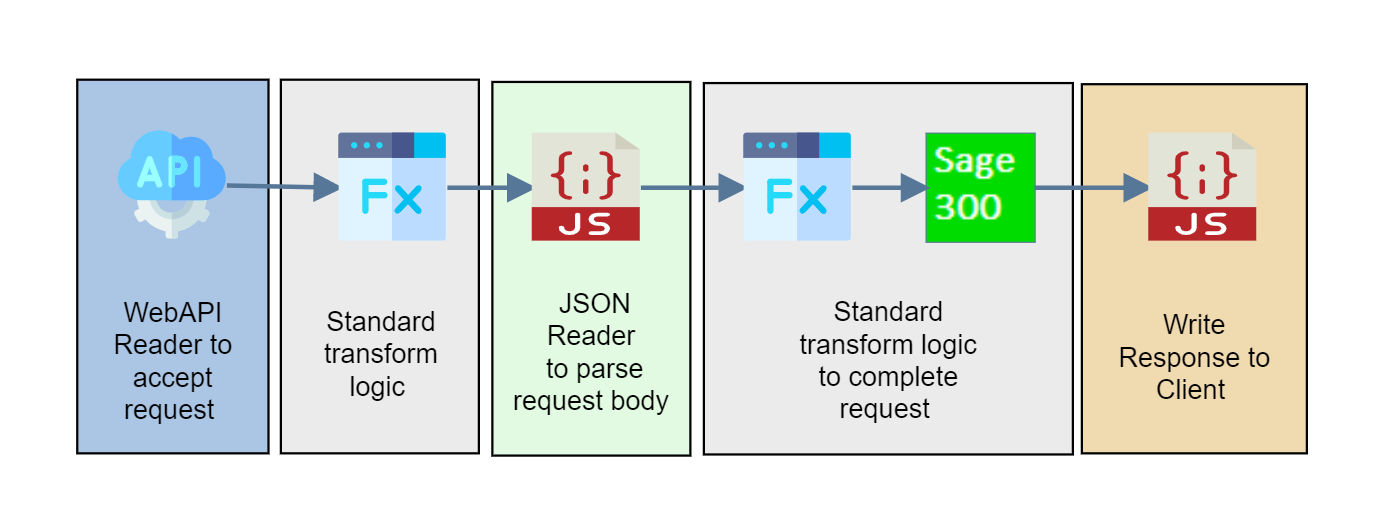
Add Web API Reader
The first transform in a WebAPI integration is the WebAPI Reader; the WebAPI reader associates the endpoint with an integration and parses the request into fields.
- Create a new integration and add a WebAPI Reader.
- Open the Reader and select the desired endpoint from the Endpoint drop-down.
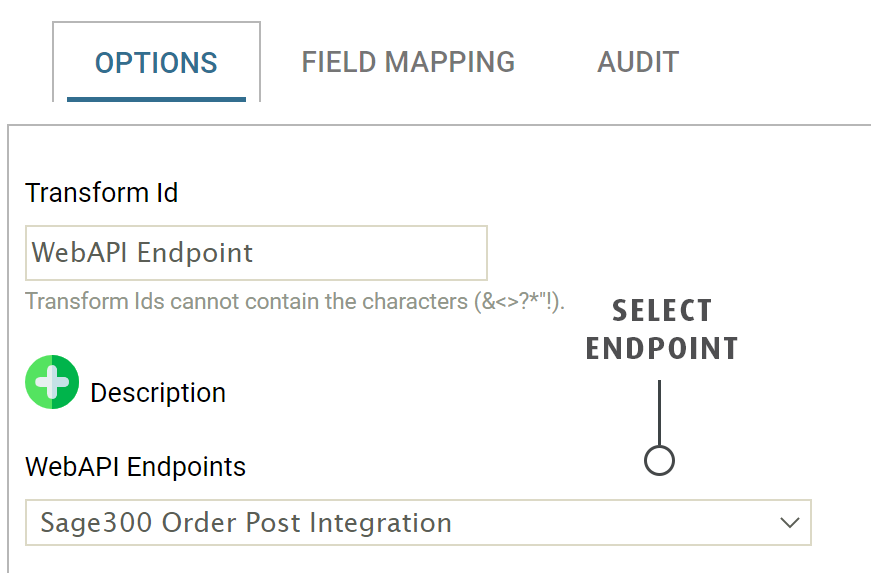
- Press Refresh on the Reader. This will associate the endpoint with the integration, allowing any requests to be routed.
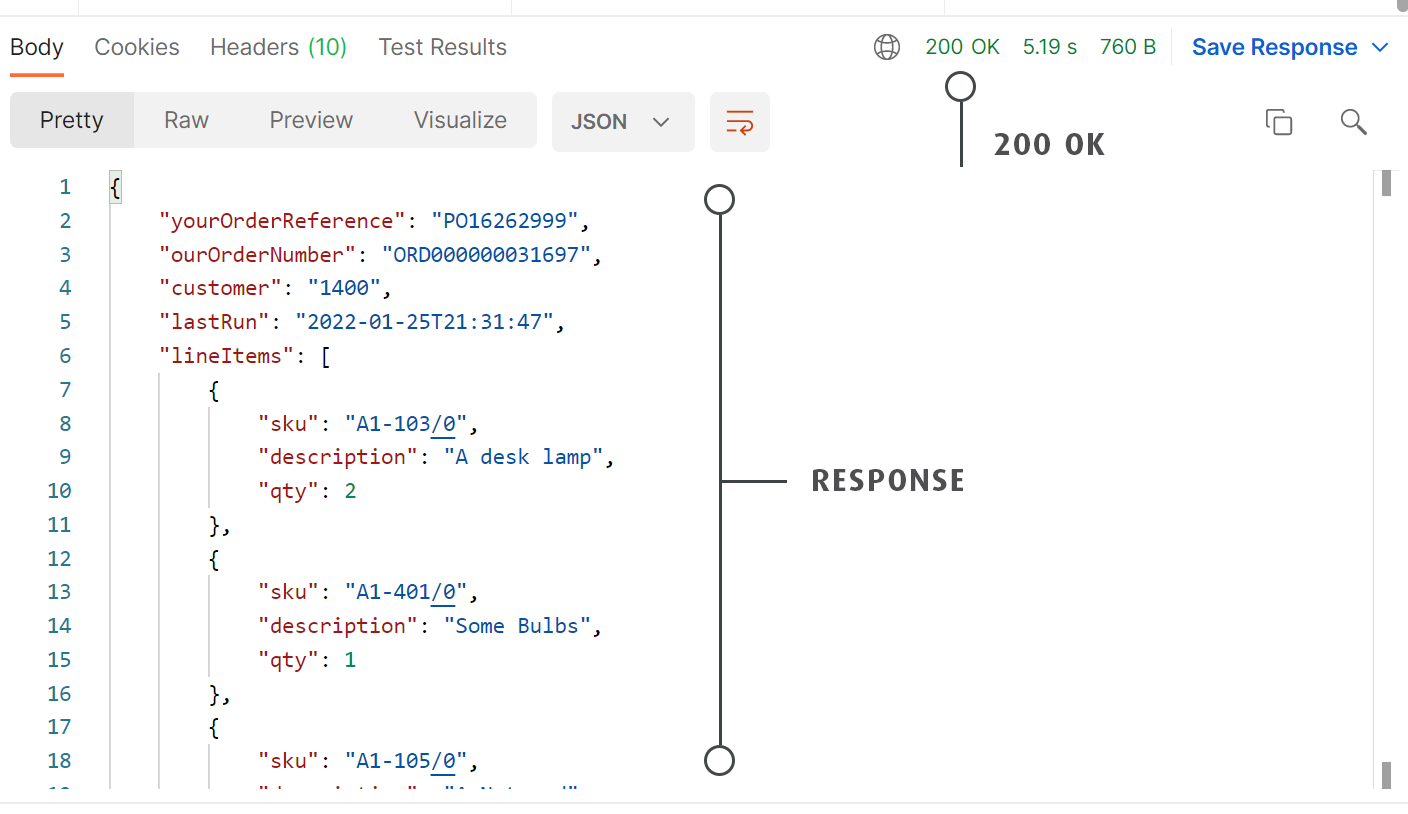
- Send a request from Postman.
- After a few seconds the Preview screen should populate.
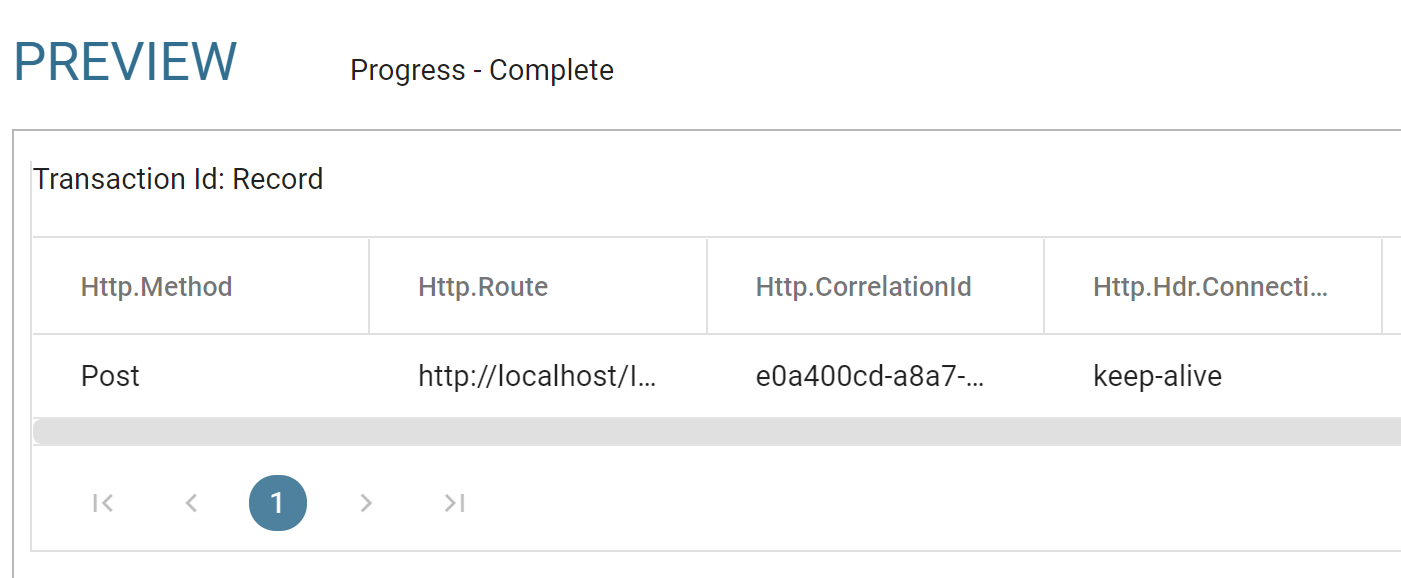
- The client will be waiting for a response. This is normal; there will be no response until either the request times out (after 180 seconds) or a writer sends the response.
- After a few seconds the Preview screen should populate.
Processing the request
The request type (GET or POST/PUT) will determine the next transforms of the integration.
Irrespective of the request type a reader needs to be added after the WebAPI reader allowing you to consume/uses the data from the request.
GET Requests -> Querying a Resource
GET requests typically represent a request for a resource or set of resources.
A GET request will normally have one or more route parameters and/or a set of query parameters (defined by the endpoint’s route) which allow the client to specify the range of data to query.
Both the Database Reader and the HTTP IO Controller provide the ability to parameterise requests.
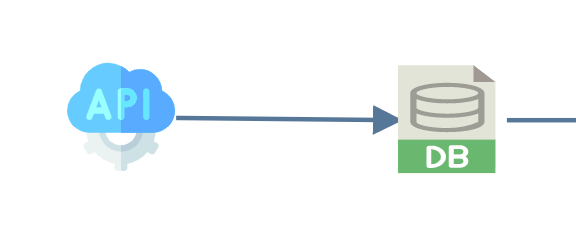
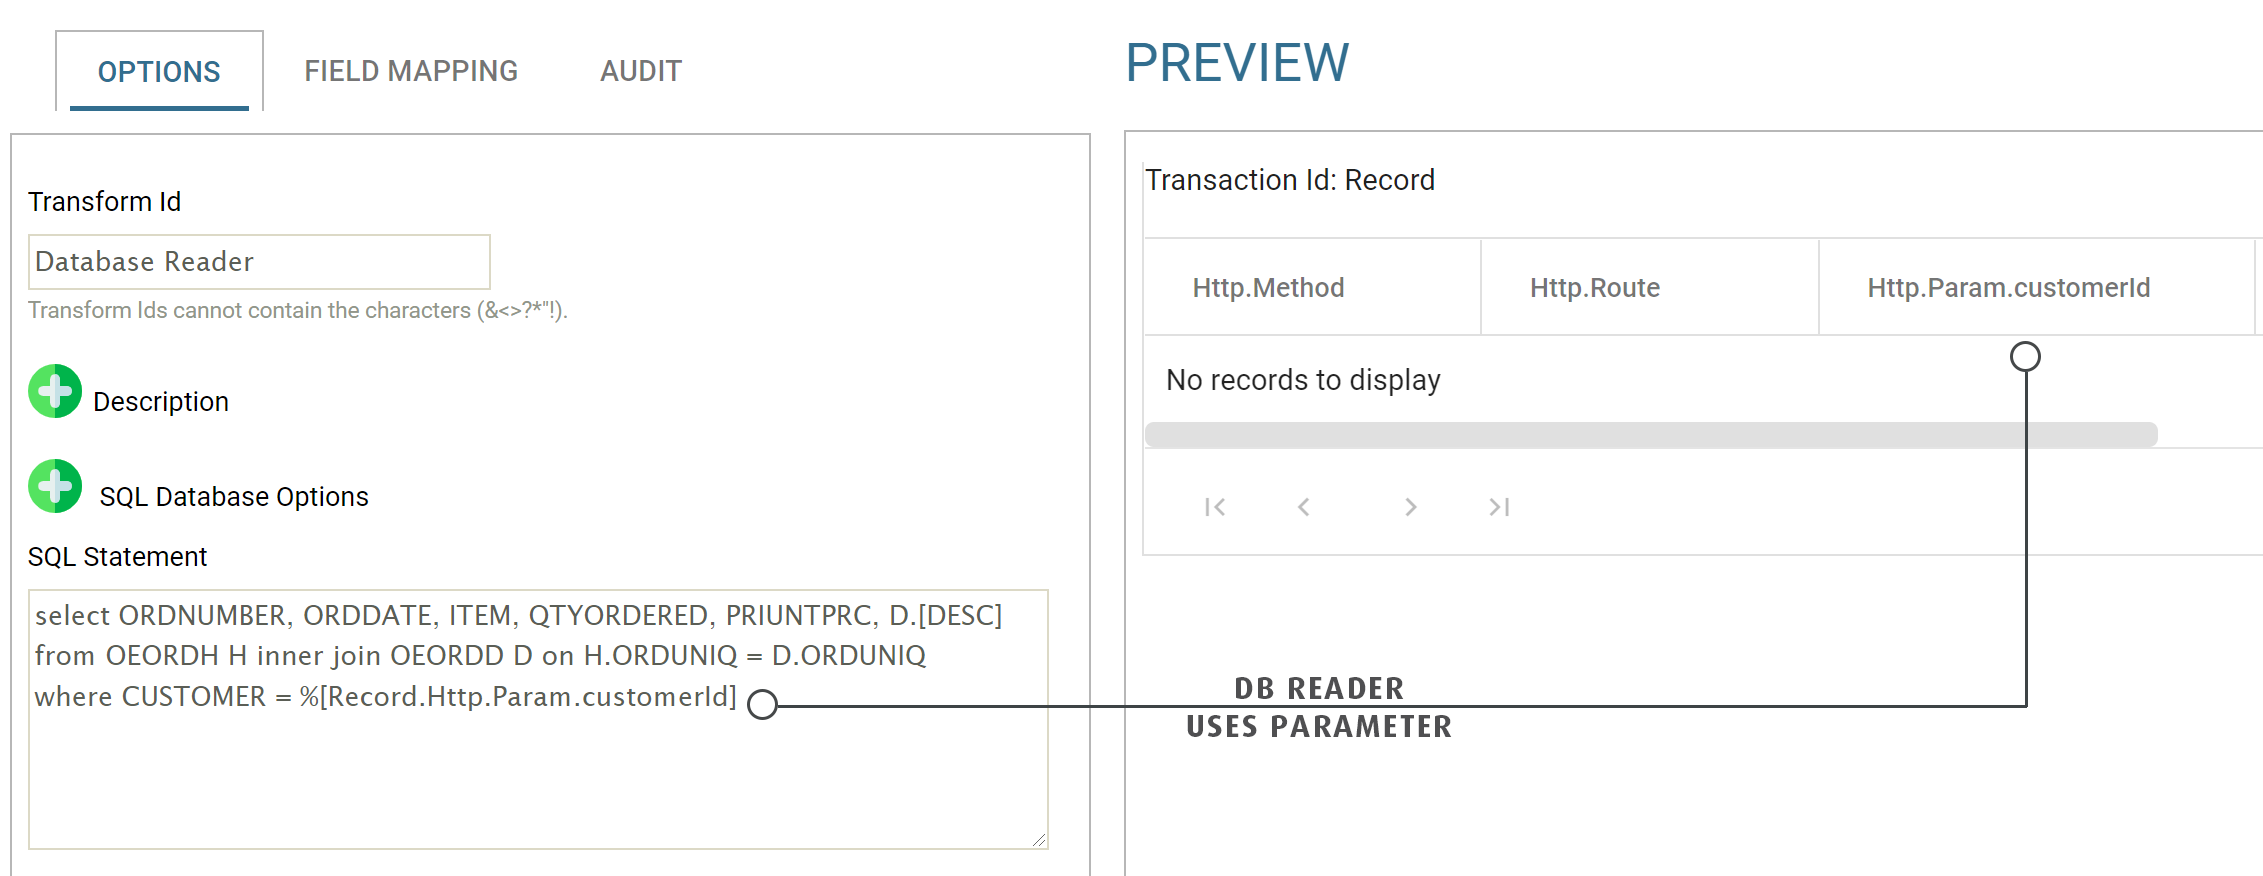
Database Queries
-
Add a database reader if the resource being queried resides on a database.
-
The database reader is parameterised using the standard expando syntax.
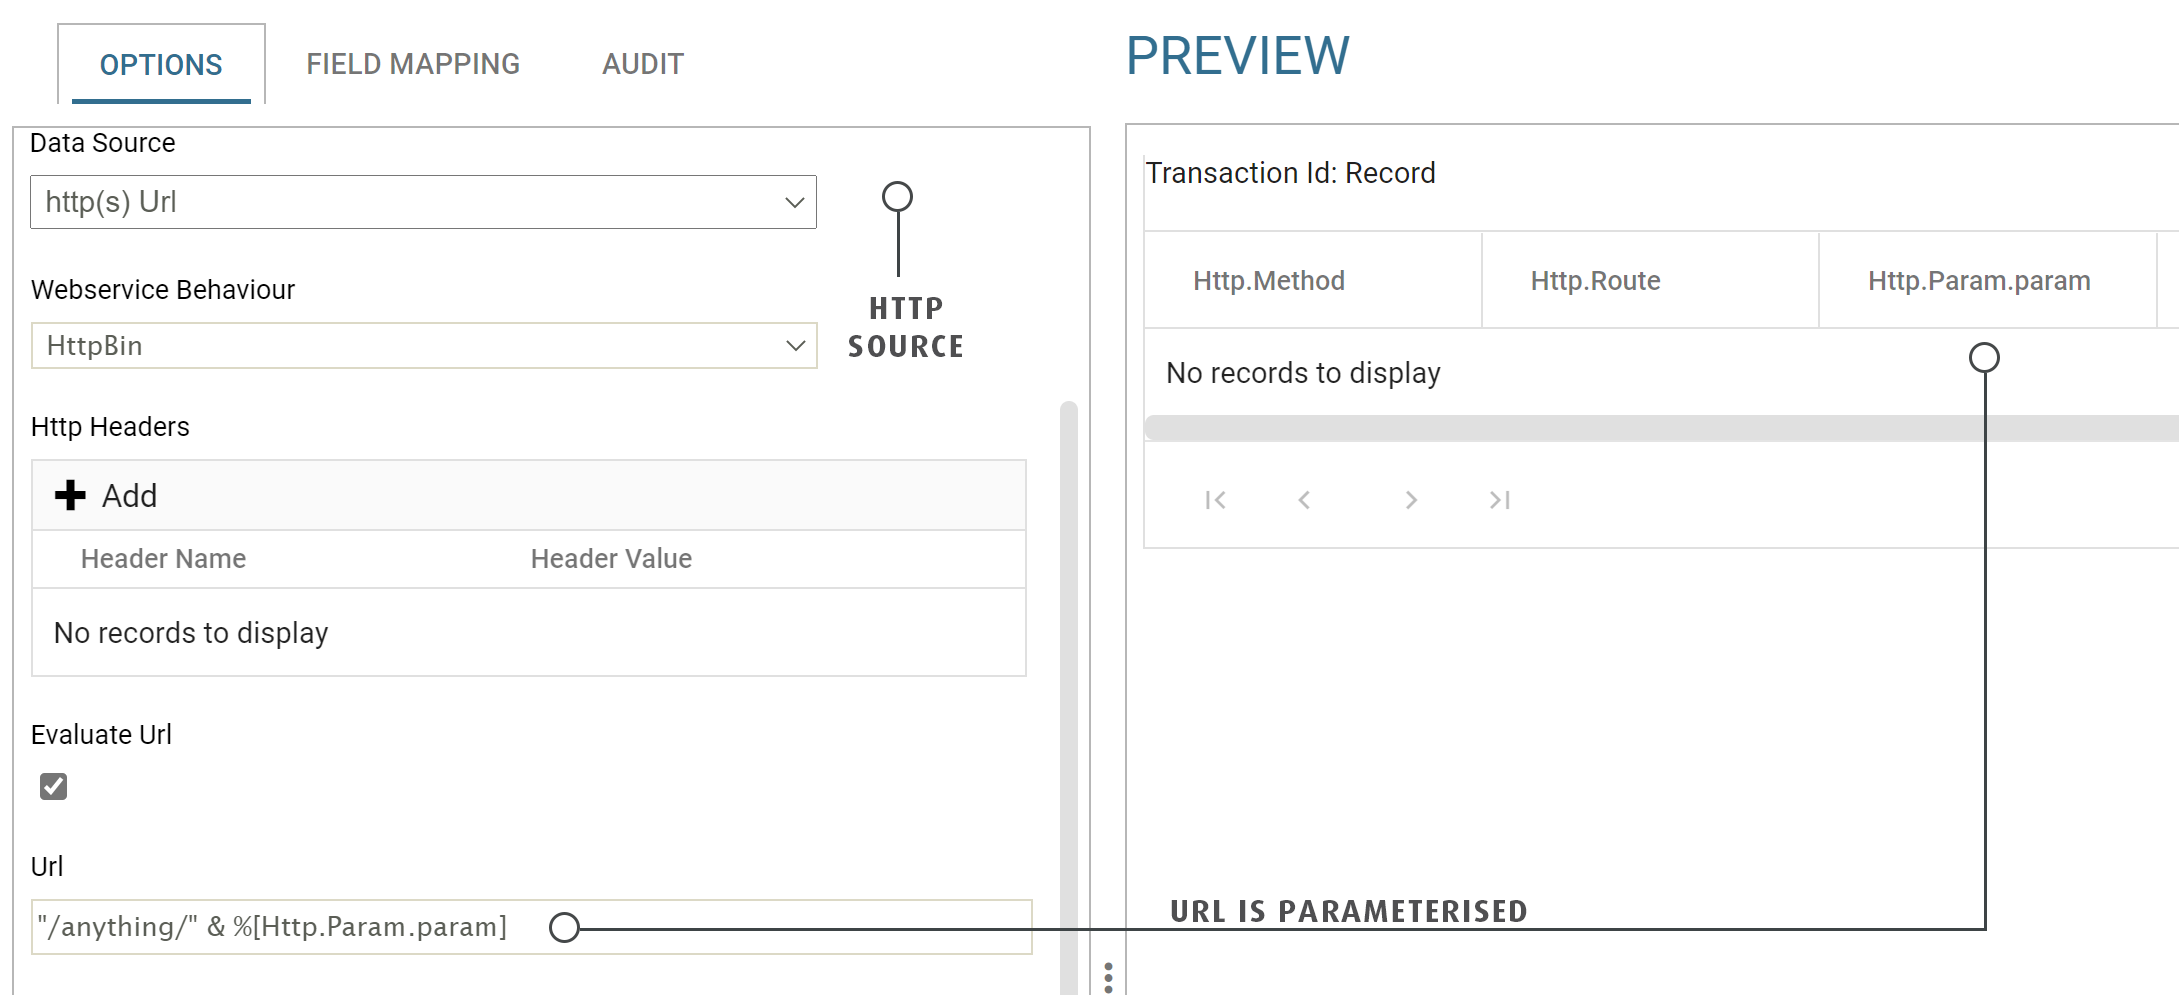
Http Requests
-
Http requests can have parameterised Url's. To be able to read/parse the response from the parameterised request you must use the corresponding reader. For example, if a request responds in JSON format, you should add a JSON Reader.
Add the Reader to the integration and connect it to the WebAPI.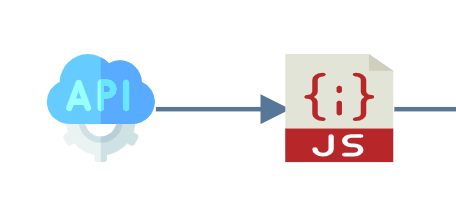
- Set the reader to the http datasource and the Url to an evaluated value which includes one or more references to the parameters from the WebAPI.
-
The reader is then setup using the standard steps.
POST/PUT Requests -> Create/Update a resource
POST/PUT requests signify a resource (an order, an invoice, an address) needs creating or updating.
The requests include a body containing the data to be created/updated.
-
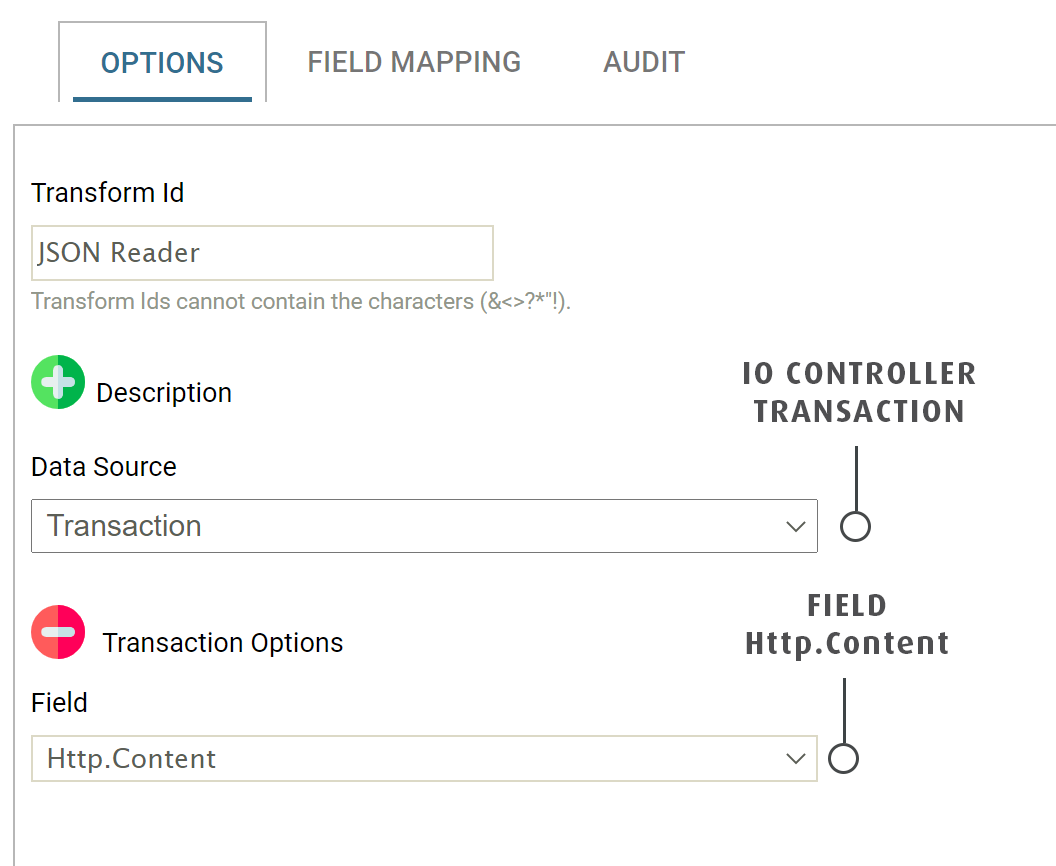
The Http.Content field contains the content/body of the request. To be able to read/parse this data you must use the corresponding reader. For example, if a request was sent in JSON format, you require a JSON Reader.
Add the Reader to the integration and connect it to the WebAPI. - To read/parse the data use the reader and set the IO Controller, transaction IO Controller and the field to Http.Content.
-
The reader is then setup using the standard steps.
Normal Transform Logic
Add the necessary transformation logic and connectors as you need to complete the integration.
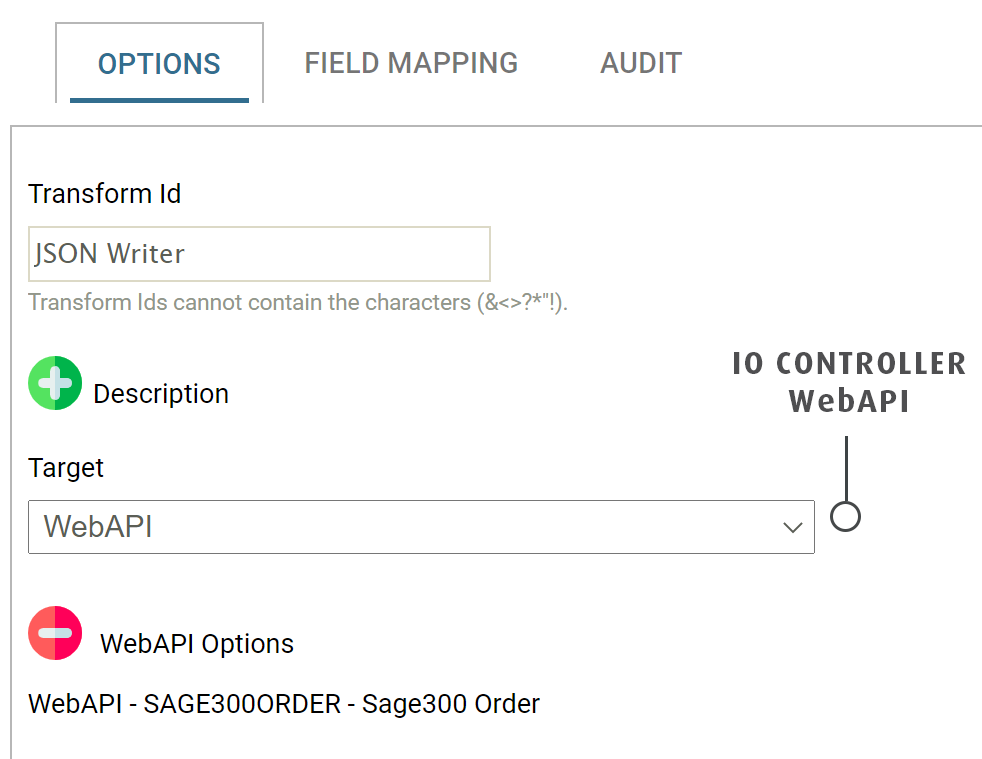
Sending the Response
The final step should be to send the response back to the client.
-
To write the response back to the client, set the IO Controller to WebAPI IO Controller.
-
Setup the writer as you would normally.
-
Press Refresh.
- If the client (Postman) is still waiting for a response you will see the writer's immediately.
- If the response has timed out (after 180 seconds) you can press Refresh on the writer, and then send another request from your client. The internal request queuing will recognise the waiting response and send this directly back to the client. This allows you to modify the response format quickly.
Running the Integration in Full
- To run the integration in full, bypassing the designer, save the integration.
- Remove, or disable the Debug header.
- Send a request. The first request may take a moment longer than subsequent requests as the endpoint needs to load and cache the integration configuration.