Replaying Response Data
This guide will show you how to configure the Writer to write the response (or part of) from a webservice operation back onto the IMan dataset. This is useful to obtain the ids or document numbers generated by the service being integrated with so they can be written back to the source application.
This guide extends the JSON Writer - Flat Data example.
A Better Alternative to Webservice Lookups
Typically when performing update (irrespective of it is a webservice, database or even file exchange) the id of the record needs to be specified.
In the Write example the WebserviceLookup is used to obtain the id of the customer record to update. The problem with this approach is that it executes a webservice GET request which is both slow and consumes a webservice request. In the case of Shopify the request may be throttled, but other webservices may consume a webservice call, and therefore excessive calls may end you exceeding any webservice API usage policies.
In this example id's generated as part of the customer insert will be obtained from the response, where they can be written to the original record and used in subsequent integrations. Since the id is already recorded with the record the WebserviceLookup would not be required.
Response Data
Each request made to Shopify responds with the updated record. The following is the response from a Customer insert or update.
{
  "customer": {
    "id": 1925472223297,
    "email": "[email protected]",
    "accepts_marketing": true,
    "created_at": "2019-06-03T08:46:35+01:00",
    "updated_at": "2019-06-03T09:28:23+01:00",
    "first_name": "Harlotte",
    "last_name": "DeWitte",
    "currency": "GBP",
    "addresses": [
      {
        "id": 2063636922433,
        "customer_id": 1925472223297,
        "first_name": "Charlotte",
        "last_name": "DeWitte",
        "company": "Realisable Software",
        "address1": "87 Stuff Street",
        "address2": "Old Truman Brewery",
        "city": "London",
        "province": "London",
        "country": "United Kingdom",
        "zip": "E1 6QL",
        "phone": "2081231017",
        "name": "Charlotte DeWitte",
        "province_code": null,
        "country_code": "GB",
        "country_name": "United Kingdom",
        "default": true
      }
    ],
    "accepts_marketing_updated_at": "2019-06-03T08:46:35+01:00",
    "marketing_opt_in_level": "single_opt_in",
    "admin_graphql_api_id": "gid:\/\/shopify\/Customer\/1925472223297",
    "default_address": {
      "id": 2063636922433,
      "customer_id": 1925472223297,
      "first_name": "Charlotte",
      "last_name": "DeWitte",
      "company": "Realisable Software",
      "address1": "91 Brick Lane",
      "address2": "Old Truman Brewery",
      "city": "London",
      "province": "London",
      "country": "United Kingdom",
      "zip": "E1 6QL",
      "phone": "2081231017",
      "name": "Charlotte DeWitte",
      "province_code": null,
      "country_code": "GB",
      "country_name": "United Kingdom",
      "default": true
    }
  }
}
Configuration
- In this instance we wish to generate a new record, so update your input file to create a new record. I.e. use a new email address.

- Refresh the Excel Reader and close.
- Open the Map transform and add a field 'AddressId', do not Evaluate, leave the field empty.
- Open the JSON Writer.
- Change the Rewrite Response Transaction
- Text Data
- This indicates that IMan will consume the response in textual format.
- Click the Field Mapping tab and expand the Initial JPath.
- Enter into the Return JPath the following:
- /customer
- Marked in red from response data.
- /customer
- Collapse the Initial JPath.
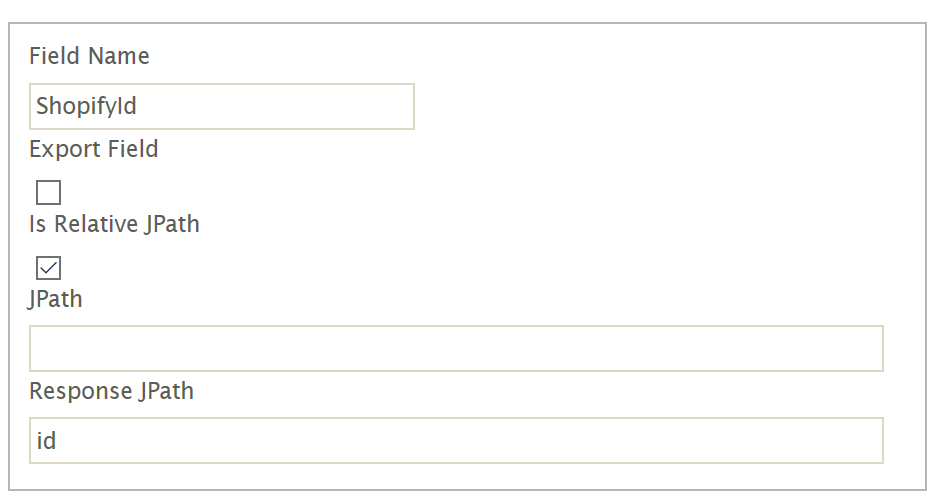
- Edit the ShopifyId field on the Field Mapping Grid.
Set the Response JPath to 'id'.
This represents the path marked in blue in the response data. Note that response JPath's are always relative.
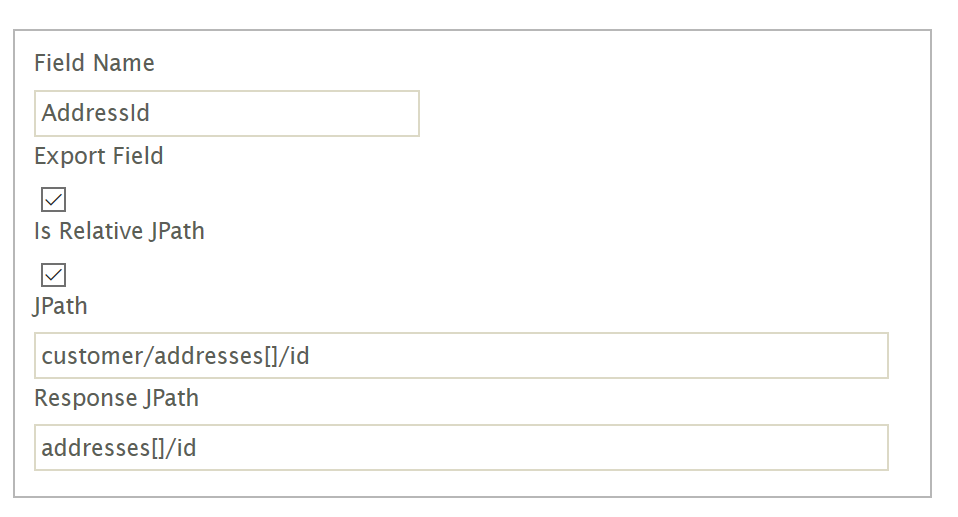
- Save the field and edit the AddressId field.
Set the Response JPath to 'addresses[]/id'.
This represents the path marked in green in the response data.
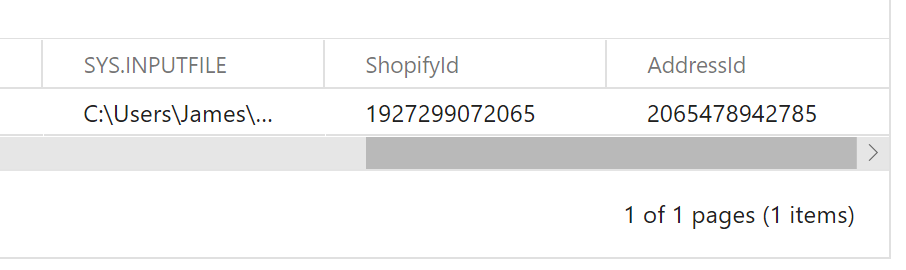
- Save the field and Refresh. If successful i.e. there are no errors a new Customer record will be created in Shopify.
- You will see the ShopifyId and AddressId are populated with the Shopify generated values.