JSON Writer - Flat Data
This guide will create a Customer record in Shopify. The primary reference will be the Shopify API, specifically the Customers endpoint.
https://help.shopify.com/en/api/reference/customers/customer
This guide will uses the concepts from:
In this section you will learn how to:
- Setup a JSON Writer to create/insert/POST a Customer record.
- Setup the same writer to perform an update/PUT to the previously inserted record.
Step A - Creating the Basic Upload
- Create a new integration and add an Excel Reader.
- Double click to open the Excel Reader and enter the following
- File Path
- C:\IMan\Training
- File Name
- ShopifyCustomerUpload.xlsx
- Header Records
- Header Records
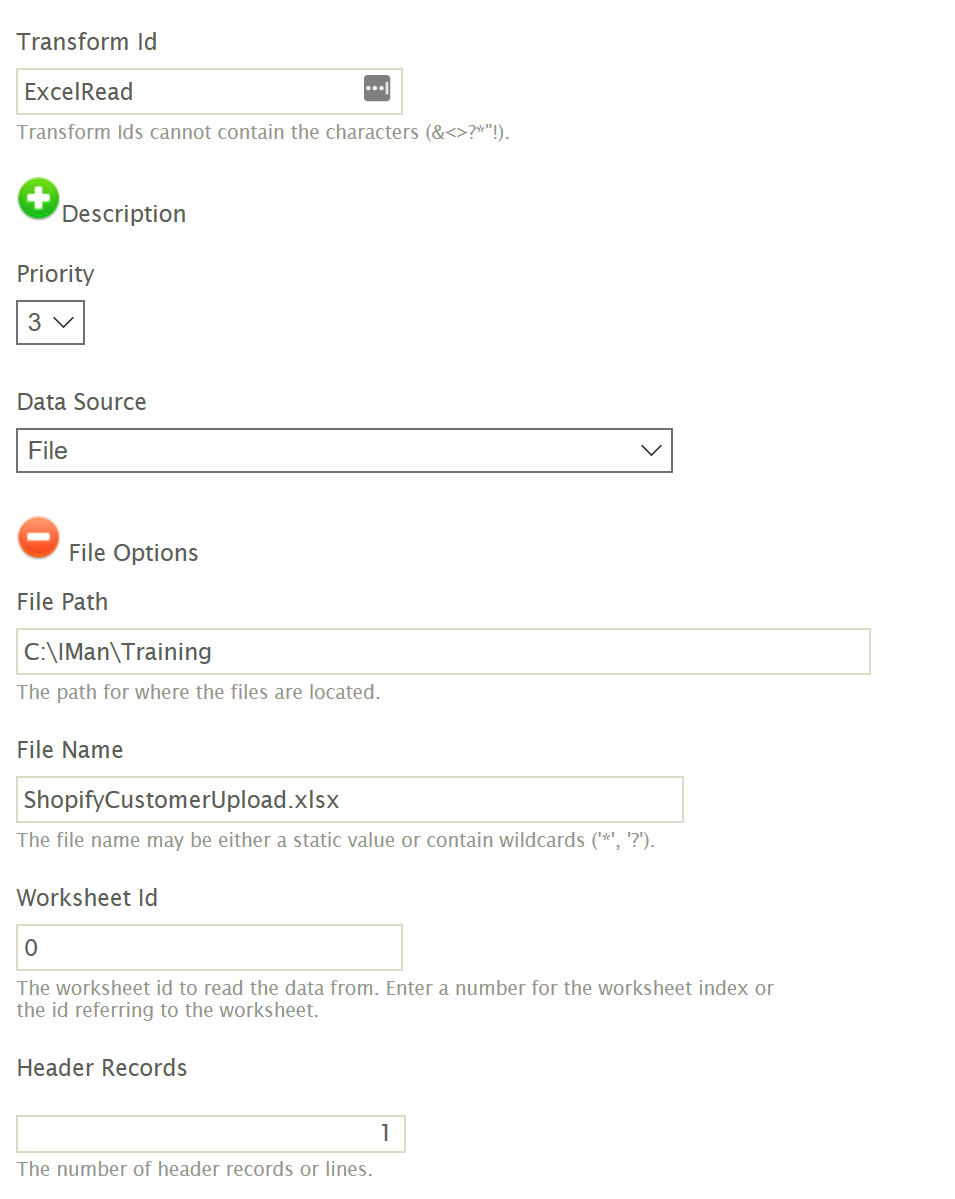
- File Path
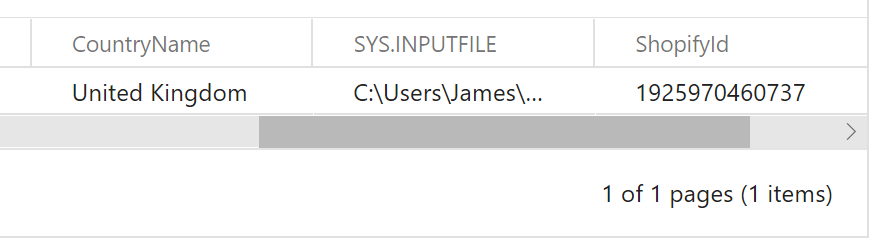
- Press Refresh and on the right hand Preview section should display contents of the ShopifyCustomerUpload.xlsx file.

- Click the Field Mapping tab and change the field type of the VerifiedEmail, AcceptsMarketing, SendVerifyEmail fields to Boolean.

The reason is that these fields will be included in the contents to the Shopify. IMan will attempt to convert the values of the fields to their relevant JSON types, so a Boolean field will be converted to true or false.
- Press Apply and close the Transform Setup Screen.
- Add a Map transform to the integration and connect it to the Excel Reader.
- Double Click it to open the transform to initialise it, and then close the transform; we're not doing anything with this yet.
Step B - Creating the customer record
In this step we will configure the JSON writer to create the Shopify customer record.
URL / EndPoint
Specifically we will be using the following Shopify EndPoint.

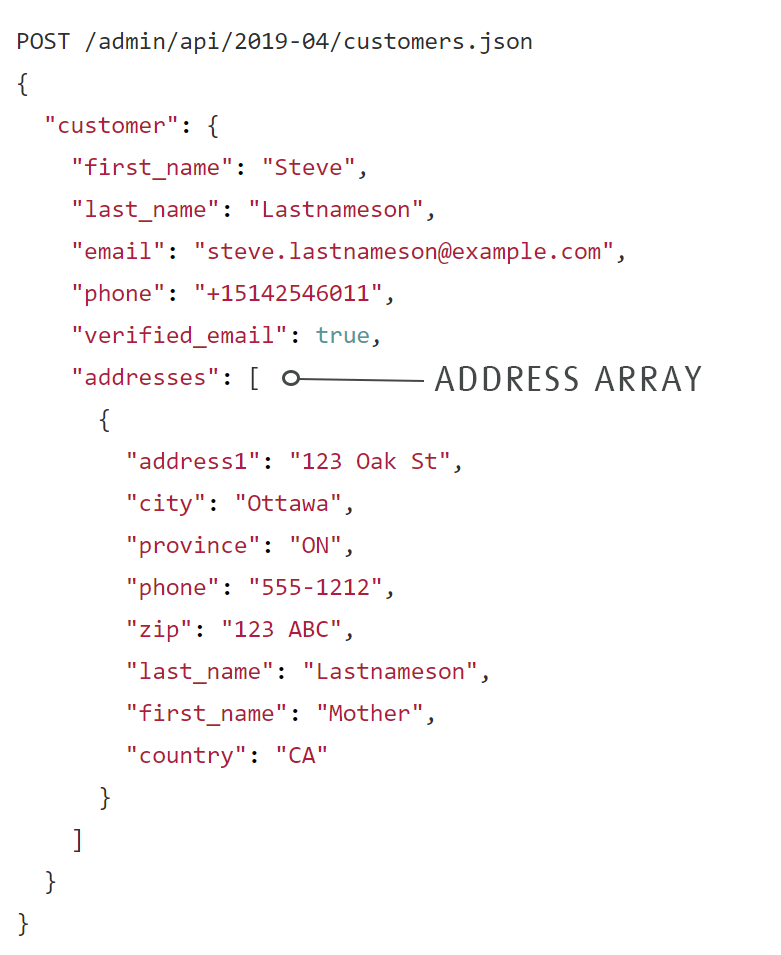
Creation Data
The following screenshot (taken from the Shopify documentation) is an illustration of the payload we need to send to Shopify.
One of the key aspects of the payload is around the Address data. Shopify have facility to associate multiple addresses with a single customer. In our example we will just have one, for the default address.
Configuration
- Add a JSON Writer to the integration and connect it to the Map transform, double click to open it.
- Expand the http(s) Url Options to configure the webservices for creating the customer record.
- Insert Url
- /admin/api/2019-04/customers.json
- Modify Operation
- Post
- This comes directly from the Shopify documentation.

- Insert Url
- Collapse the http(s) URL and set the following two settings.
- Generate File Per Transaction
- Record
- Each "Record" in the IMan dataset will trigger a new request to Shopify.
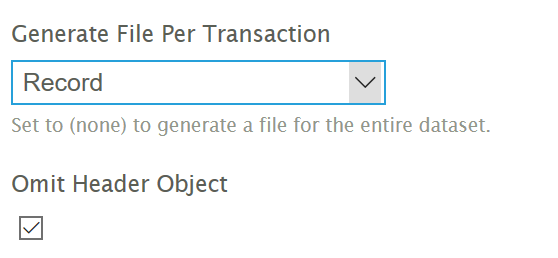
- Omit Header Record
- Checked
- When the JSON payload is generated, any outside proparty or array specified in the 'Initial JPath' and the JPath on the top most transaction type will be stripped.
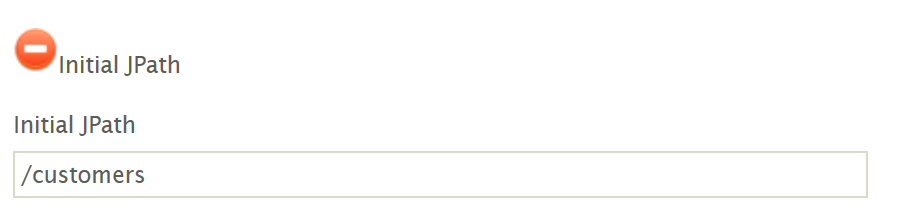
- Click the Field Mapping tab.
-
The Initial JPath specifies the outer property(s) to the JSON document. Since we're omitting the Header Object, we can enter anything, as long as it's a valid JPath.
- Setup the following field properties.
Field Name Export
JPath Notes ID
False
Email
True
customer/email
The customer/email will create an object with the name 'customer', and then a nested property email (containing the email address value).
FirstName
True
customer/first_name
LastName
True
customer/last_name
VerifiedEmail
True
customer/verified_email
AcceptsMarketing
True
customer/accepts_marketing
SendVerifyEmail
True
customer/send_email_invite
Address1
True
customer/addresses[]/address1
The open, close square bracket syntax indicates to create an array property, and enclose any value within the first object of the array.
This mechanism allows you to create a hierarchical structure without having to hierarchise your data.
Address2
True
customer/addresses[]/address2
City
True
customer/addresses[]/city
Company
True
customer/addresses[]/company
Phone
True
customer/addresses[]/phone
Province
True
customer/addresses[]/province
ProvinceCode
True
customer/addresses[]/province_code
CountryCode
True
customer/addresses[]/country_code
CountryName
True
customer/addresses[]/country_name
SYS.INPUTFILEFILE
False
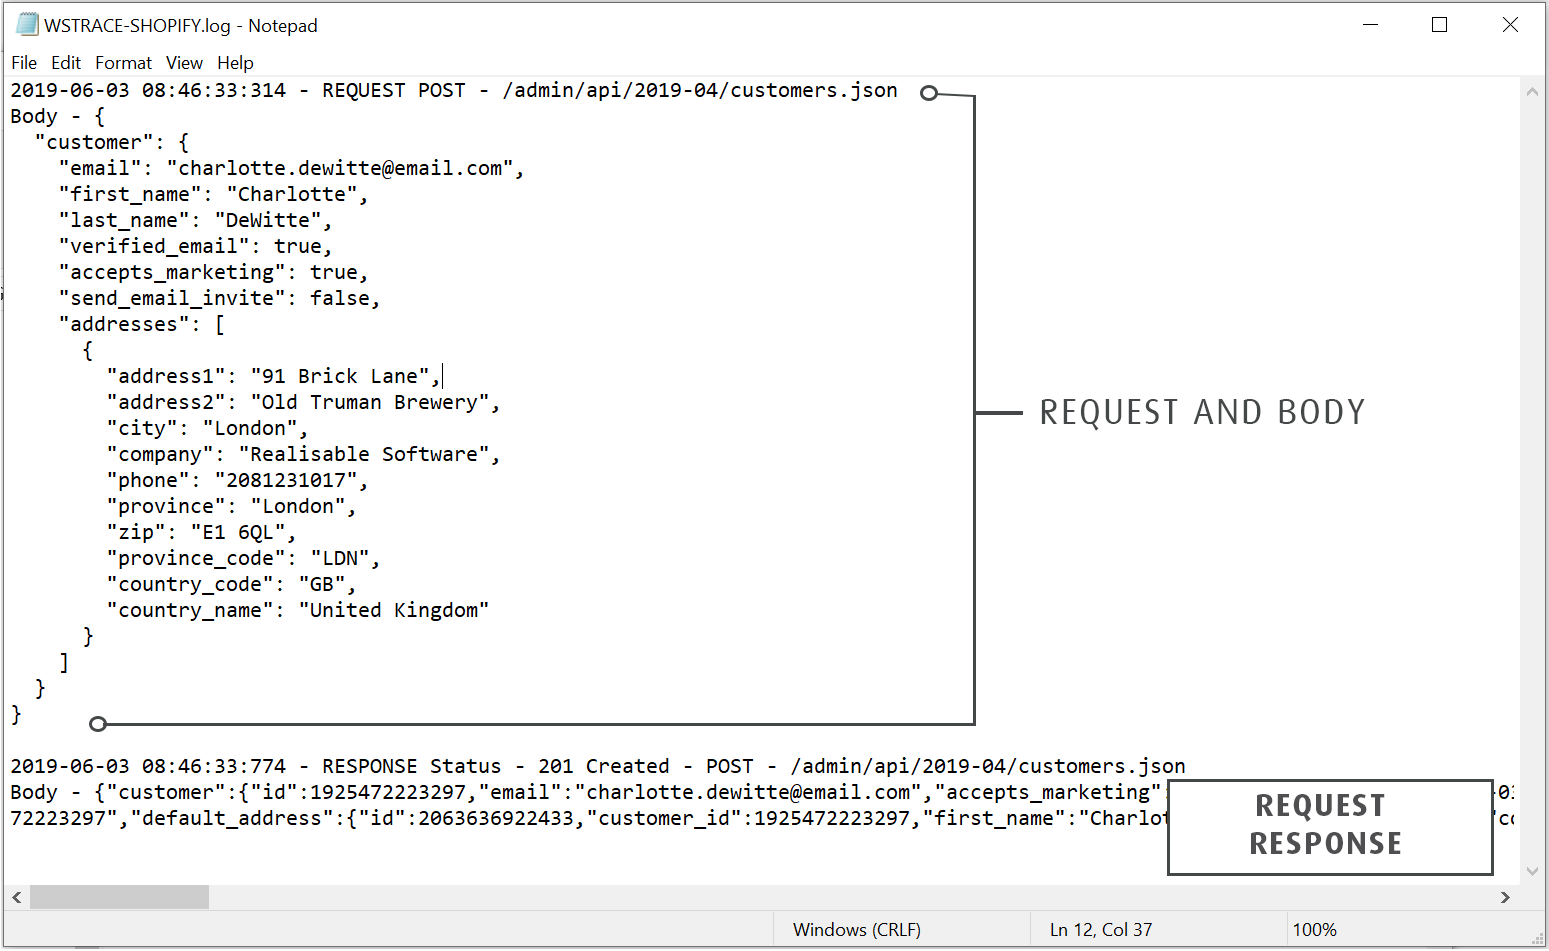
- Click Apply, and then press Refresh to generate the Shopify customer record. If there are no errors and the status of the Preview goes to Complete, the customer should have been generated in Shopify.
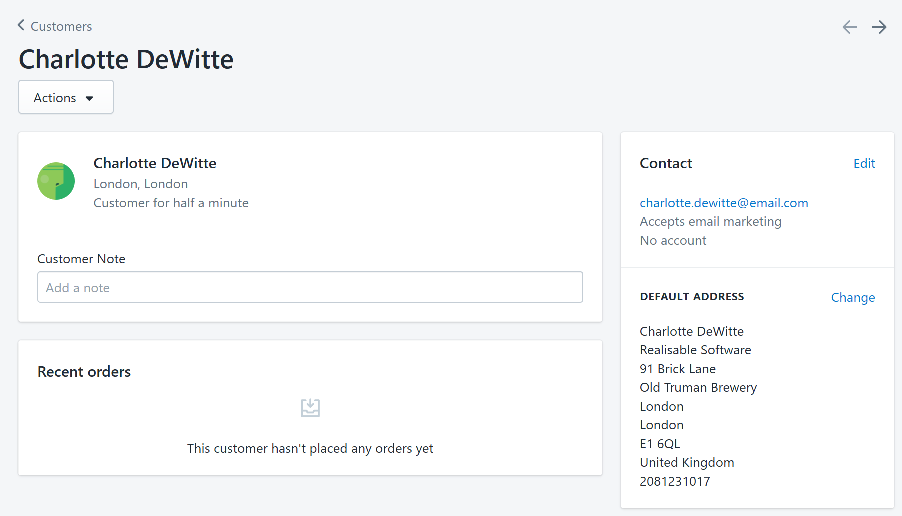
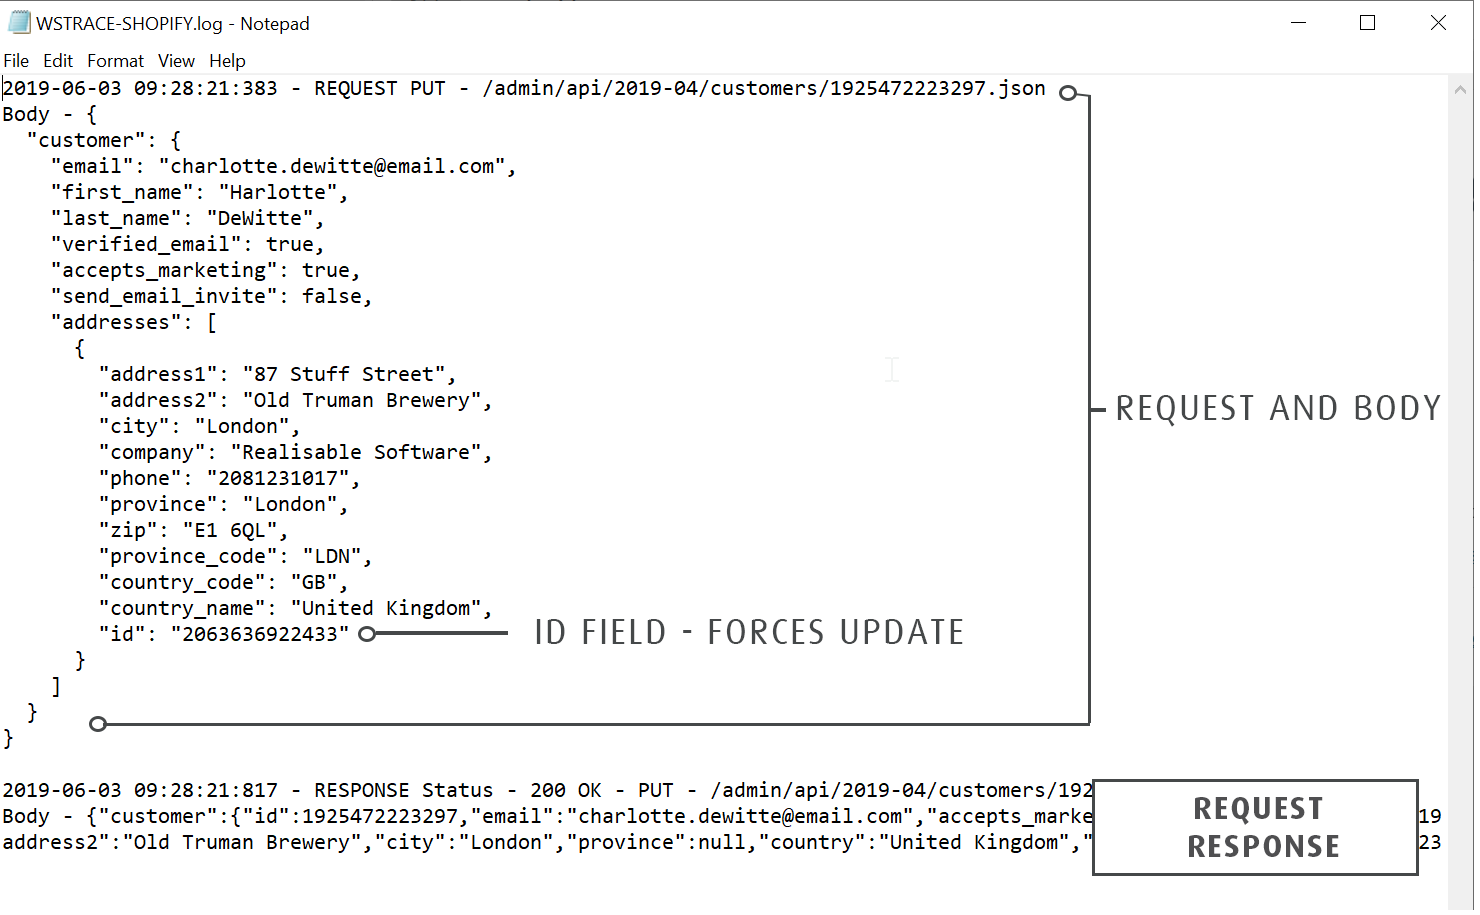
- To verify the URL and contents of the request (and response) the trace file can be reviewed.
Step C - Adding Customer Update Capability
Before starting the integration we recommend that you alter some of the data so that you can see the changes. Don't alter the email address as this will cause a new record to be created.
URL / Endpoint
The following URL defines how to update customer records. The documentation states both the URL operation and the parameterised URL necessary to specify which customer to update.

The URL is parameterised with the customer id. The first step in the section below will obtain the Shopify Customer id.
Configuration
- Open the Map transform.
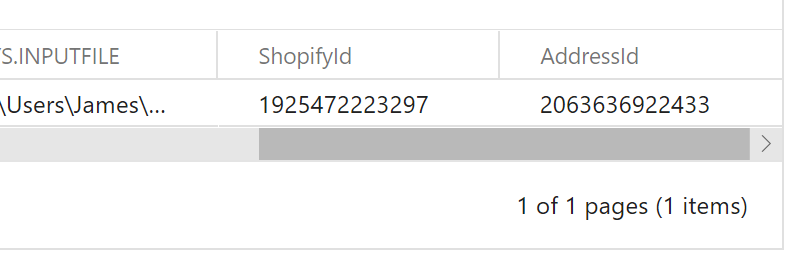
- Create new field 'ShopifyId' with the following formula. This assumes that you have created the Simple / Shopify Lookup.
WebserviceLookup("SHOPCUST", %Email, False, "customers[]/id") - Press Refresh. If successful, the ShopifyId should be populated.
- Close the Map transform and re-open the JSON Writer.
- Expand the http(s) Options to configure the settings needed to modify records.
- Modify Field
- ShopifyId
- This signifies that when the field is populated (with any value), the Modify URL and Modify Operation are used. A record with an empty 'ShopifyId' will use the Insert Operation and URL.
- Modify Url
- /admin/api/2019-04/customers/%[ShopifyId].json
- As seen with the Stepped Reader example, URL's can be parameterised with the %[FieldName] syntax.
- Modify Operation
- Put
- This comes directly from the Shopify documentation.
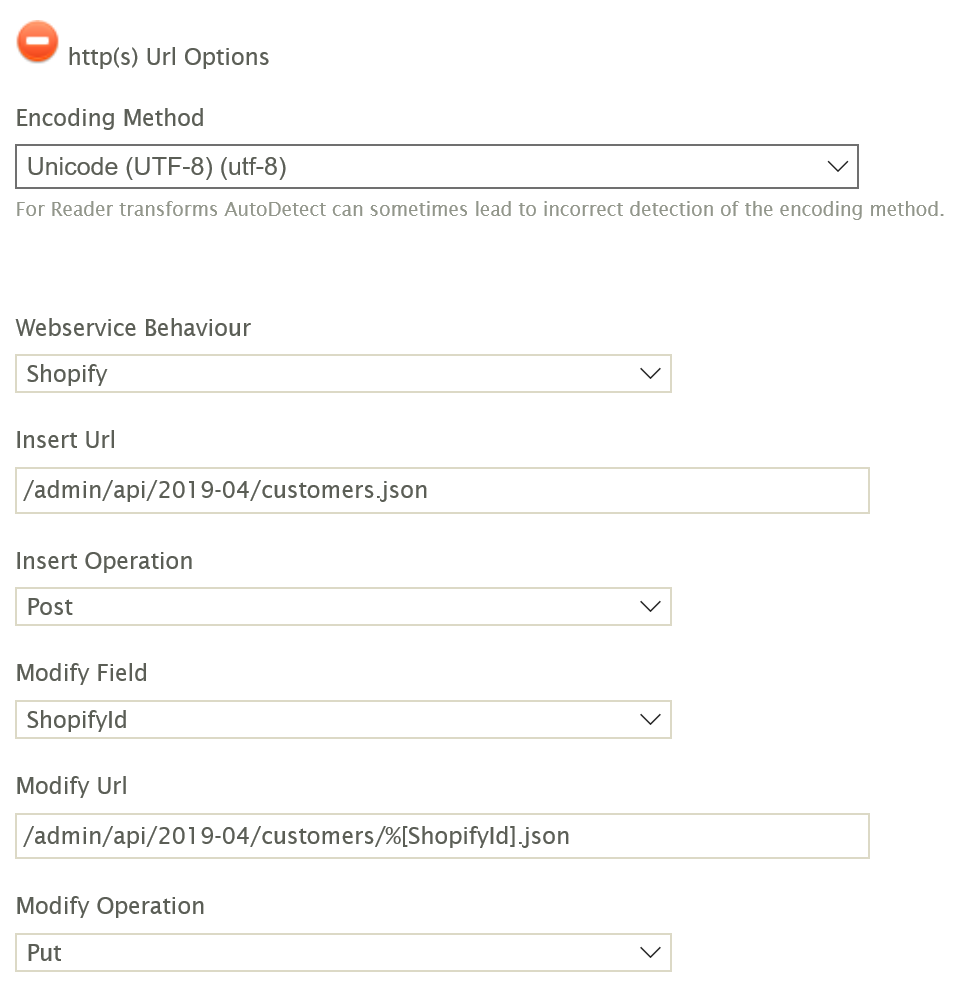
- Modify Field
- Press the Refresh button. If there are no errors the customer should be updated.
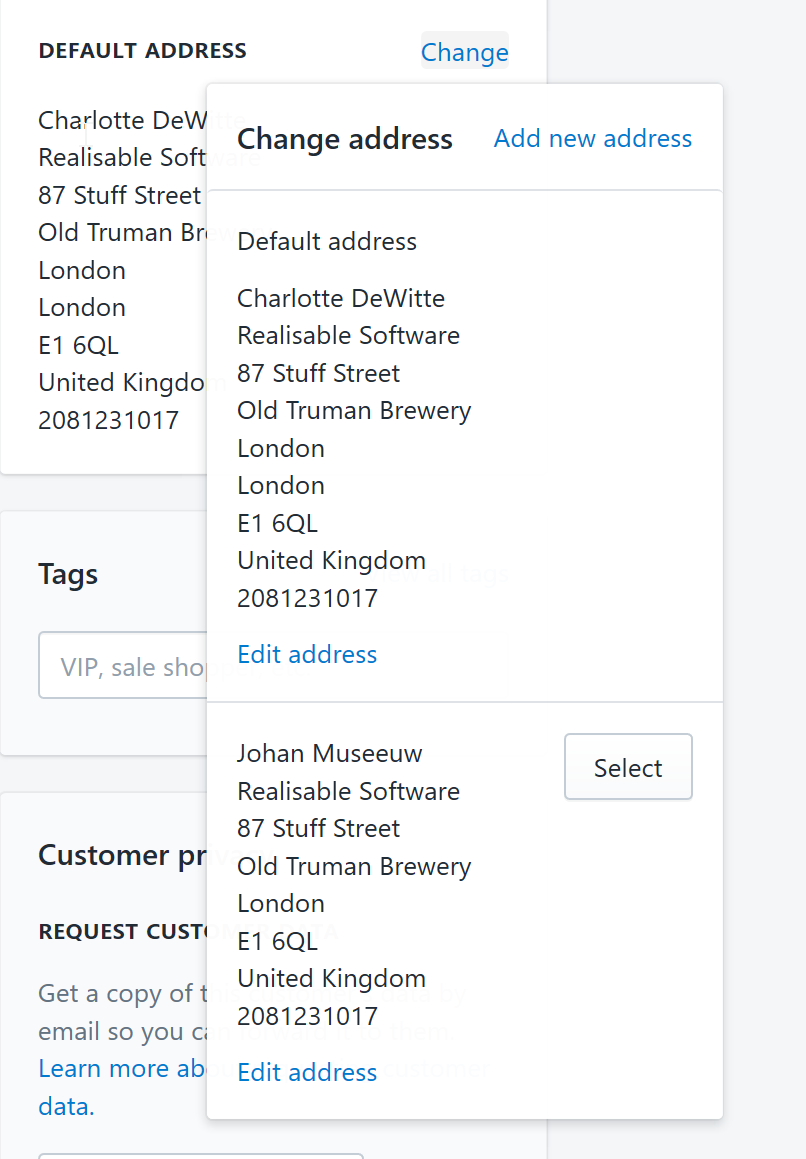
- If you click on the Change link on the address, you will see another address added, not the Default Address. The subsequent steps will add the logic to update the Default address.
Step D - Adding Customer Address Update Capability
This step will update the default address on the customer.
The Shopify customer update does facilitate the update of address details, but it isn't documented,. We've inferred this capacity since the previous step inserted a new address record against the existing customer.
If this facility weren't available, Shopify does provide and point to directly update the address, but we're trying to minimise the number of separate web requests.
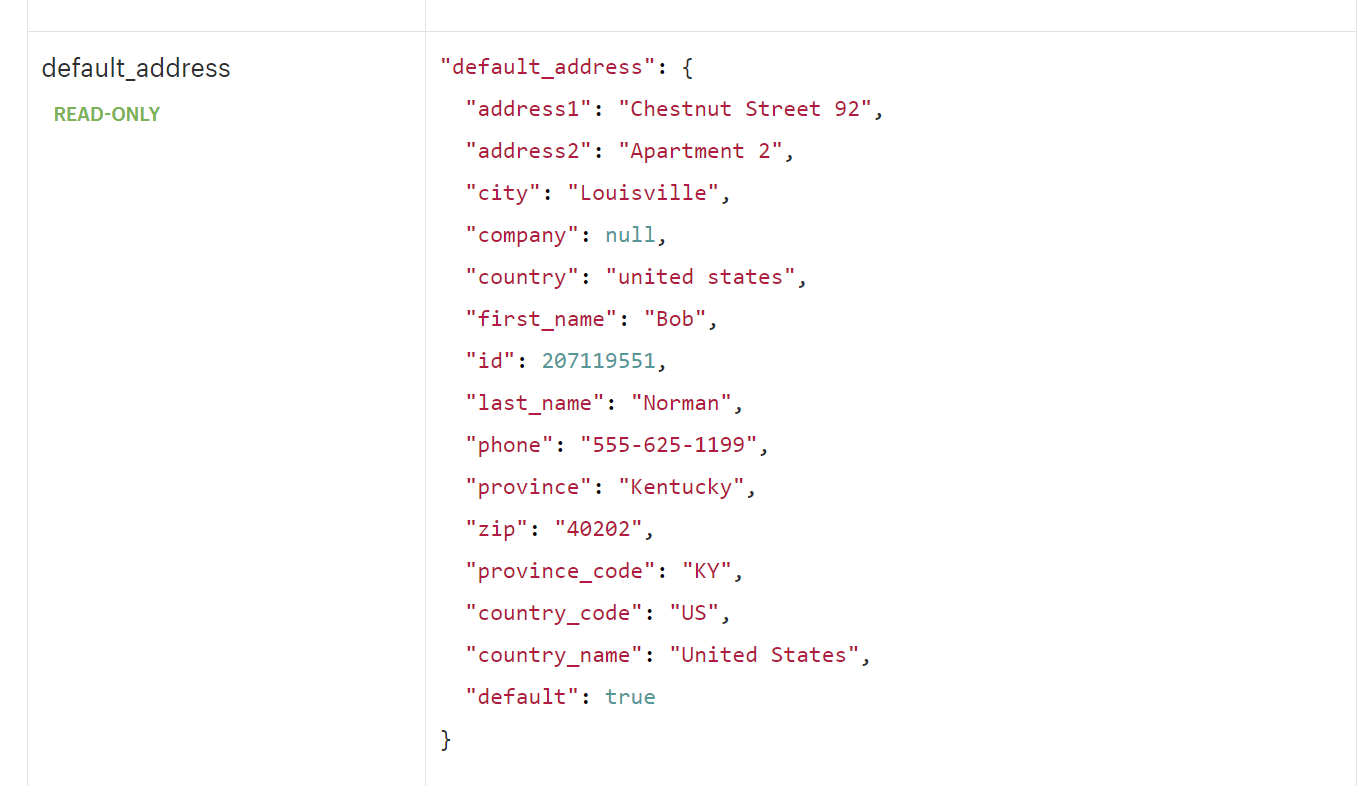
Irrespective of the way we update (inline with customer or as a separate update to the address), we require the id of the customer address. We can find this from the id property of the default_address from the customer record.
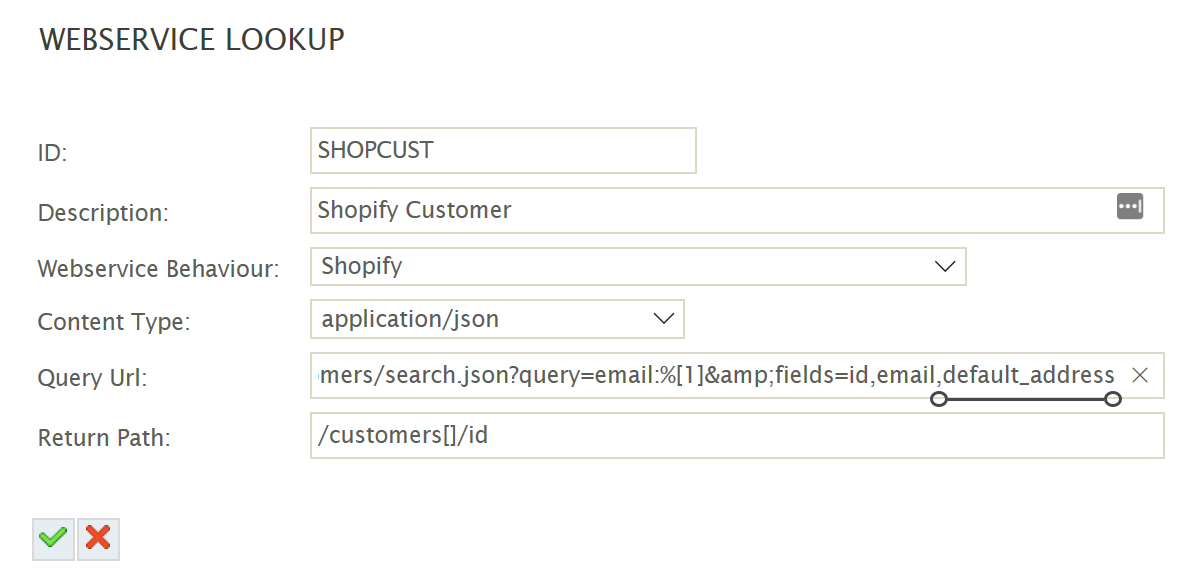
Configuration - Altering the Webservice lookup
In this section we will alter the existing Webservice Lookup to include the default_address property.
- Save the integration and go to the Setup tab, then click on Webservice Lookups, then double click the Shopify Customer Lookup to edit it.
- Add default_address as a return field into the query, and press the Green tick to Save.
- Return back to the integration, and double click the Map transform to open it.
- Create new field 'AddressId' with the following formula. You will notice the return path first obtains the customers array, then the default_address object and then finally the id property.
WebserviceLookup("SHOPCUST", %Email, False, "customers[]/default_address/id")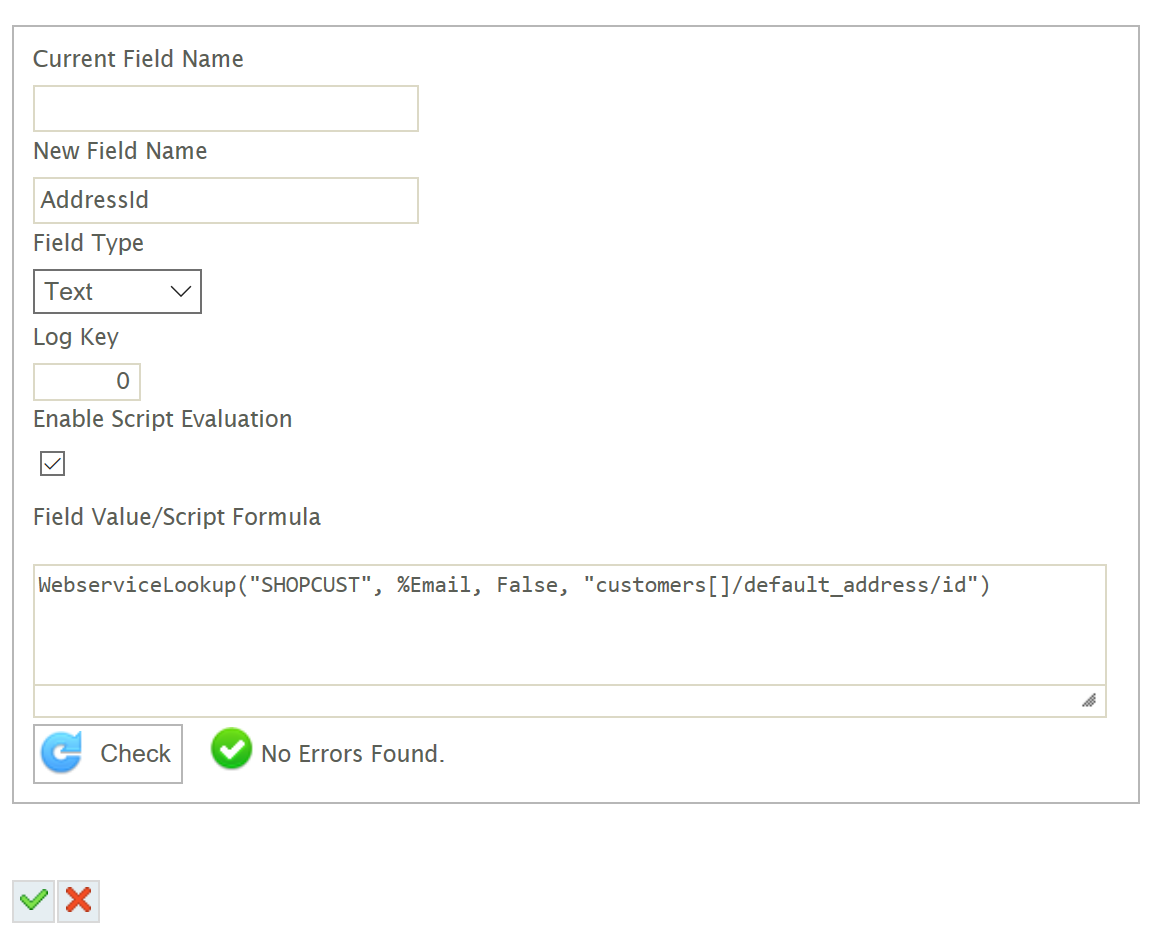
- Save the formula and press Refresh.
- Close the Map transform.
Configuration - JSON Writer - Updating the Default Address
In this section we will update the configuration so the default address can be updated.
- Open the JSON Writer and click on the Field Mapping tab.
- Edit the AddressId field.
- Export
- Checked
- JPath
- customer/addresses[]/id
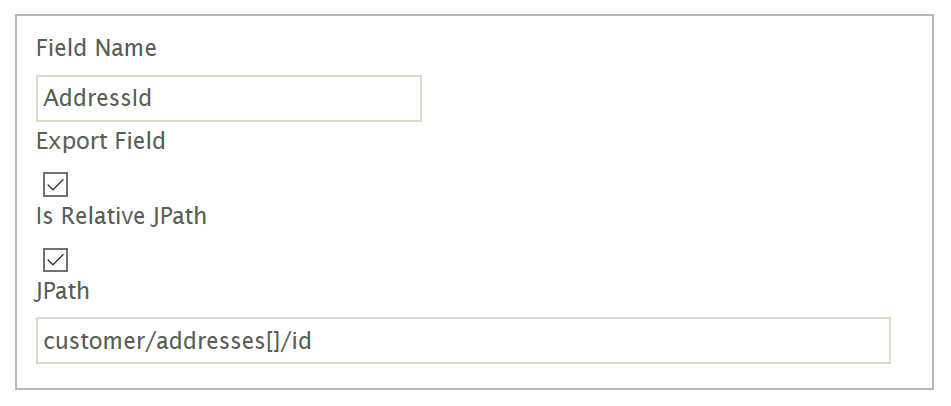
- Export
- Save the field and press Refresh.
- Now check Shopify to see if the default address has been updated.
- Review the trace file to see how update has been made.